Announcing my Wanderlust Preset Pack for Luminar
Preset fun for Luminar!

Hi there again - I’m back with another preset pack, but this time it’s for Luminar by Macphun. My previous preset pack was for Aurora HDR 2017. Missed that one? Get it here.
Don’t have Luminar yet? Shame on you. ;-) You can click on the banner below to buy it from the Macphun website. Trust me when I tell you that you will love it. You can also download a free trial at their site if you want to test drive it first.
I have been using Luminar for quite a while now, since I was an early beta tester and also worked on all the training videos, which you can watch here. So I've gotten really familiar with it and now can't imagine NOT using it. It would be like losing a limb, sort of. Ok, that's a little drastic, but I totally depend on it now. It's amazing, and has become an integral part of my editing workflow.
I enjoyed Luminar from the start and the more I have used it, the more I love it. It’s a remarkable product, and it will only get better as Macphun continues to innovate and add new features. I’m excited about the possibilities!
In case you aren't familiar with Luminar, here is a recent video I did using a bunch of tools in Luminar and completely revamping the image - in 5 minutes. This ought to give you a good sense of how powerful and easy it is to use. Plus, you sort of get a preview of a couple of presets from this pack, which I used on this image.
My first preset pack for Luminar!
Once I started editing a lot of images in Luminar, I started also making some presets. I find that there are often certain looks that I am going for in a photo, and instead of having to recreate them each time, I can now just click a single button to get me there, or at least get me close.
I like to think of presets as the “easy button” for photo editing. Sometimes it really just takes that one click to get your shot looking exactly how you imagined it, although of course there are times when a preset is a great starting point to send you off in a new creative direction. Either way, I know you will enjoy this preset pack and get a lot of mileage out of it. I had a lot of fun making them. It's great to experiment with this stuff.
I named this preset pack Wanderlust, because as a travel photographer I have a serious case of it, and it just seemed fitting. Nearly all my images are from “somewhere else” as opposed to being from my home city. As I edited photos from various trips in Luminar, I created presets so I could reuse that look again and again. Then I named that preset after the trip, or that particular experience, or perhaps how I was feeling when I took the photo that inspired the preset.
This preset pack was built with common travel themes in mind: cityscapes and street scenes, landscapes, architecture, sunsets/sunrises, and probably a lot of other stuff I can’t think of right now. ;-) There are boldly colorful presets and a few monochromes, too. It's all there.
As you probably know by now - assuming you have seen some of my work - I like bold, colorful and expressive photos, even if they are monochrome (well, except for the colorful part in those of course!). In other words, these presets are not just minor adjustments, they are big moves and I think you will be able to see that in the screenshots that I provided below.
Don't forget you can stack presets for more fun and experimentation! Also mix up opacities and change blend modes and get creative! Luminar lets you do it all.
There are 25 presets included in this pack, and once loaded in Luminar it will be displayed as it’s own category of presets, right alongside all the other categories that are built into Luminar (see below for installation instructions).
Ok, several screenshots are included below - and click any image to enlarge for better viewing.
How To Purchase This Preset Pack
Ready to purchase this preset pack? You can click on “Add to Cart” below, or visit my presets page. Once you complete the purchase process, you will receive an email with a download link for the preset pack file, which you can then import into Luminar. Installation instructions are below.
It sells for the low price of just $5.00. What a bargain! ;-)
Thanks for stopping by, and let me know if you have any questions. I appreciate the support very much!
How To Install A Custom Preset Pack
When you import a custom preset pack such as this one, it will create a new category in the Presets category window, and the presets will be displayed within that category.
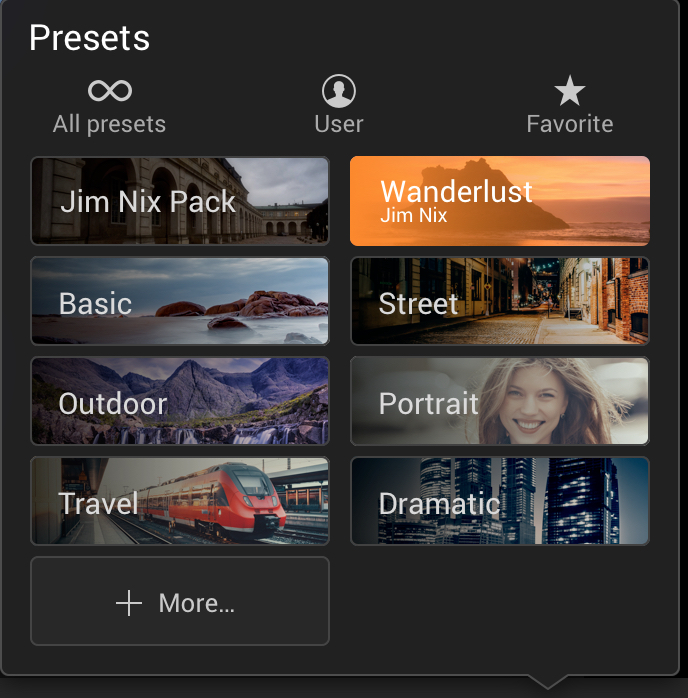
See Wanderlust in the example to the right. -->
Don't confuse this Wanderlust preset pack with the "Jim Nix Pack" which is a small, free preset pack I made available via Macphun's website. You can find that here.
To add a custom preset pack, select the menu item File > Add Custom Presets Pack. An open dialog box will be displayed, allowing you to choose the pack you wish to add.
After you receive your email with the download link, download the preset pack file to your desktop and that allows you to easily find it and select it.