
Announcing London Calling, a preset pack for Luminar!
Announcing London Calling, my newest preset pack for Luminar! Check it out!
A gorgeous collection of presets for enhancing your Luminar experience! Here are 27 new presets inspired by my recent trip to London!
Hello friends, I am back with another preset pack for Luminar! You can find my other preset packs right here if you would like to see them all.
This is the first Luminar preset pack I've created for sale in over a year - lots of cool stuff in here!

Don’t have Luminar yet? Shame on you. ;-) You can click on the banner below to buy it from the Macphun website. Trust me when I tell you that you will love it. You can also download a free trial at their site if you want to test drive it first. You can do SO MUCH with Luminar that it will blow you away. It has completely changed my photo editing, making it faster and better!

Some quick thoughts...
I spend nearly all my time in Luminar now. While my photos are managed in Lightroom, I take them into Luminar for the majority of my edits. I find Luminar to be more powerful and capable than Lightroom, with more filters to experiment with, too. Even with my HDR photos, I will build them in Aurora HDR and then take them to Luminar for stylizing.
I LOVE to create these preset packs. It’s not just fun for me, but educational as well. It makes me really dig into the product deeper and forces me to get out of my habitual edits to craft something new and interesting. I also use my presets ALL THE TIME. Sure, I create them and sell them here, but I also use them on all my images. I love them, or else I would not put them out there. I hope you feel the same!
I think of presets as the “easy button” for photo editing. Sometimes it really just takes that one click to get your shot looking exactly how you imagined it, although of course there are times when a preset is a great starting point to send you off in a new creative direction. Either way, I know you will enjoy this new preset pack and get a lot of mileage out of it.
Introducing London Calling, a preset pack for Luminar
I absolutely adore the city of London. It’s long been one of my favorite places. It has so much history and beautiful places to shoot, and even when it’s raining the city just sparkles with a beauty that draws me in. The city inspires me at every turn.
Upon returning from my recent visit there, I spent hours and hours editing photos and creating these presets. I have tried these presets on all sorts of photos - landscapes, cityscapes and more. They are very flexible and fun, and I have been using them on many of my recent images that I share. I’m proud of this preset pack and I hope you enjoy it as much as I have. There is a lot of variety in this pack, just as there is a lot of variety in London.
Assuming you have seen some of my work, then you know that I like bold, colorful and expressive photos. These presets are designed as big moves, and not just barely-noticeable minor adjustments. Big moves are good. Minor changes are a waste of time.
Don't forget you can stack presets for more fun and experimentation! I often stack 2 presets and adjust the opacity levels of each layer to get interesting and beautiful results. Or stack them and just mask in the part of the preset that fits with your photo. Your options are limitless! Just experiment and have fun. That's what this is all about, anyway. Create something interesting and have fun doing it.
There are 27 presets in this pack and once loaded in Luminar it will be displayed as it’s own category of presets, right alongside all the other categories that are built into Luminar (see below for installation instructions).
I even recorded a video showing many of the presets in action. Take a look!
Thanks for stopping by, and let me know if you have any questions. I appreciate the support very much! I couldn't do this without your support, so I want you to know I am deeply grateful. Thank you!
How To Install A Custom Preset Pack
When you import a custom preset pack such as this one, it will create a new category in the Presets category window, and the presets will be displayed within that category.
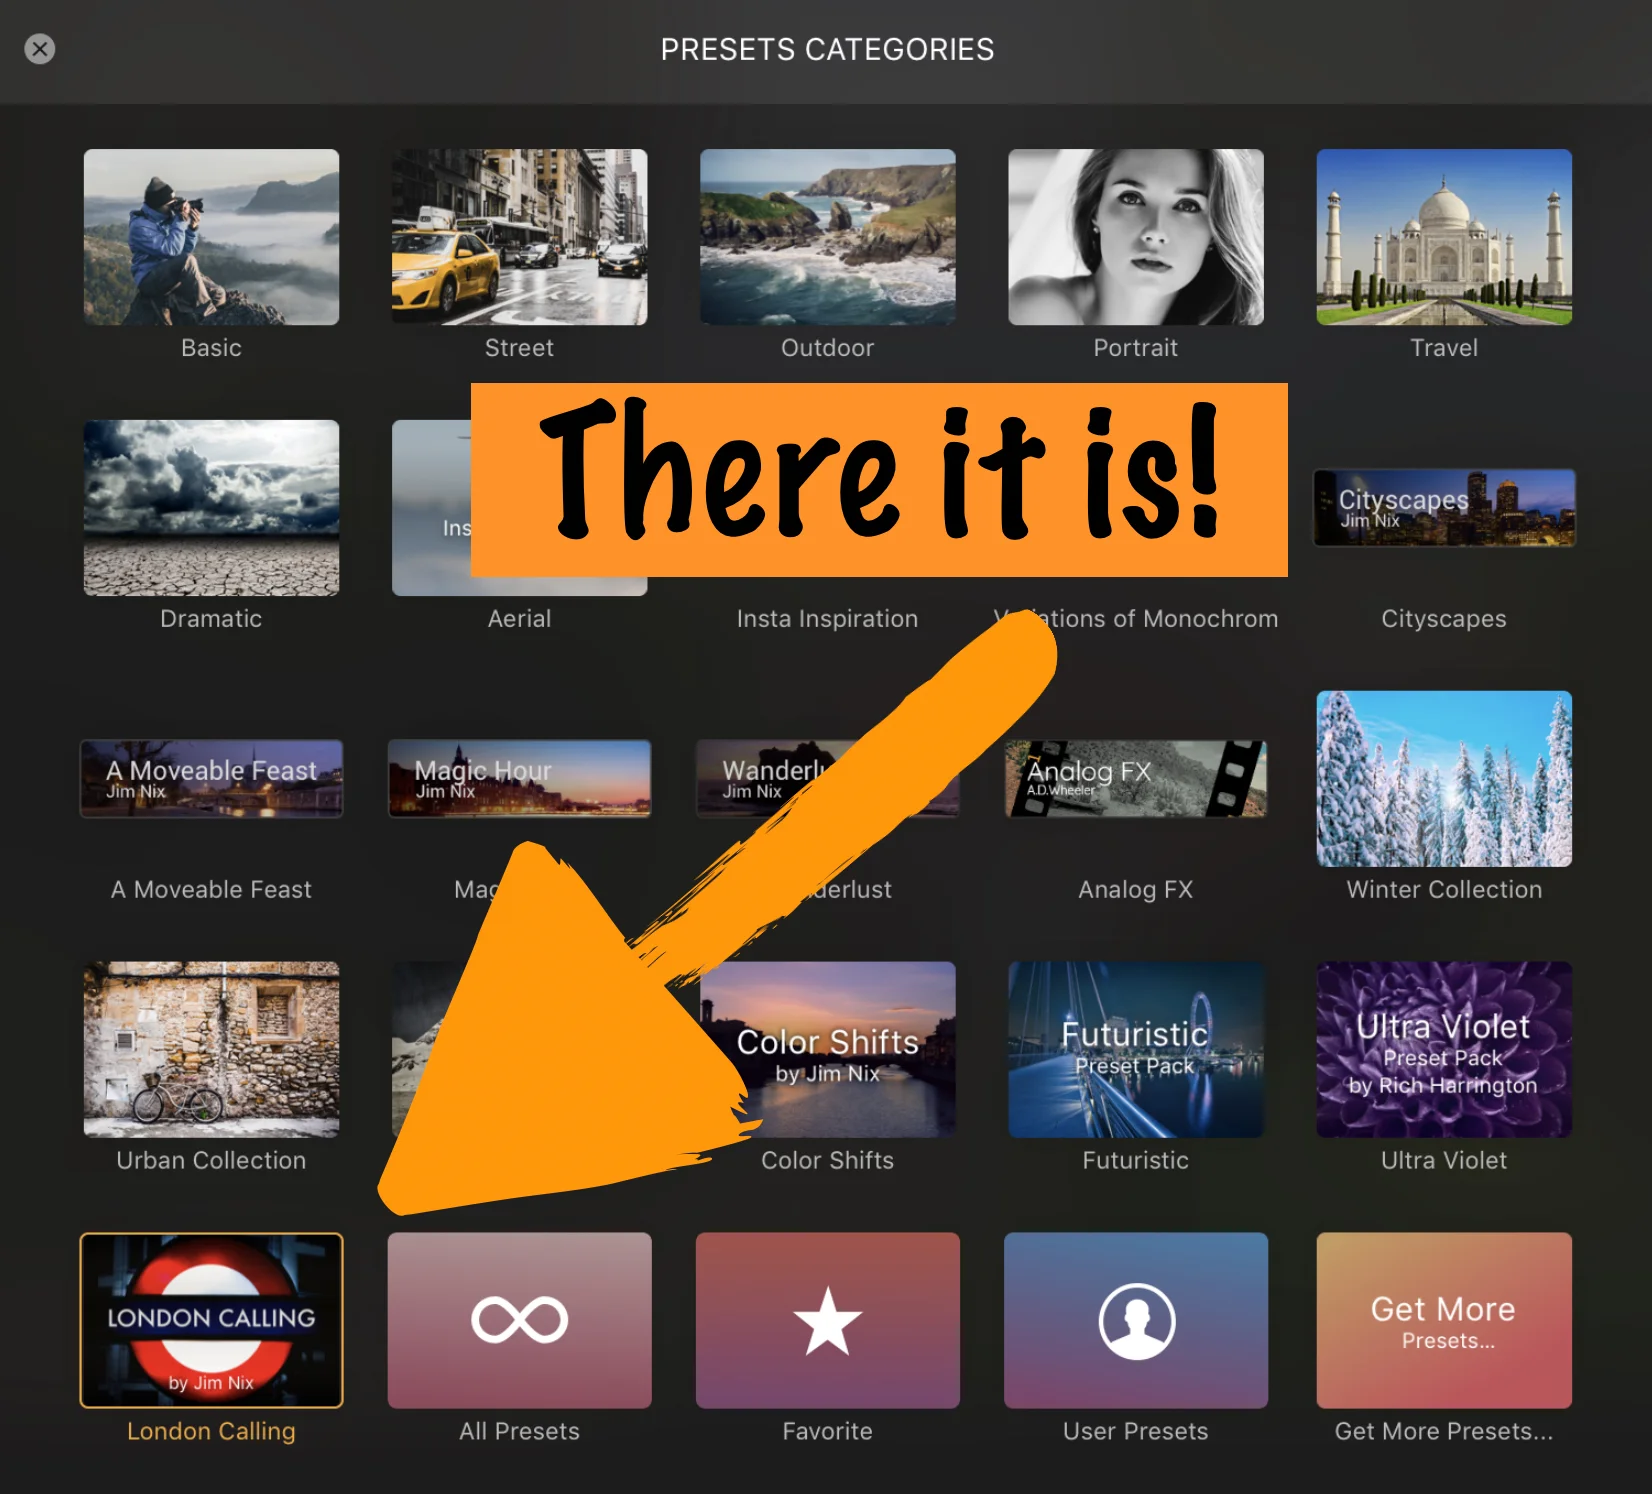
See the example to the right. -->
To add a custom preset pack, select the menu item File > Add Custom Presets Pack. An open dialog box will be displayed, allowing you to choose the pack you wish to add.
After you receive your email with the download link, download the preset pack file to your desktop and that allows you to easily find it and select it.
Then you start making awesome photos!
Show me some samples, Jim!
Ok, it’s about time to do that, don’t you think? Take a look at all the screenshots below and any of them can be viewed larger with a single click. I included the split screen Before/After view so you can see the impact each preset has on an image. You will also see the preset name in the screenshots below. Many of these are the same as shown in the video above, in case you didn't watch that. Enjoy!
Thanks for taking a look and let me know if you have any questions!


Blue Hour at the Tower of London
Blue hour at the Tower of London, with the Tower Bridge in the background...
A little something from this week here in London...
I am in the middle of a photo trip to London and thus far have been having a blast. So many photos and so many photo locations - I am all over this amazing city and it's been great! It's also great that sunset is at 4pm...yes 4pm! That is great because when I have been here in the summer, sunset is closer to 10pm, which makes for a very long day. So I can get nice light all afternoon (due to the cloud cover here) and then sunset/blue hour start at 4pm and last for a while. Needless to say I have been snapping away!
So today's shot is something from the Tower of London, where I spent a couple of hours shooting, a few days ago. There's just so much to see in this area (and this city, frankly) but I am doing my best to capture it all. More soon!

Introducing "Color Shifts", a Free Preset Pack for Luminar!
How about some free presets for Luminar? Ok, here you go!
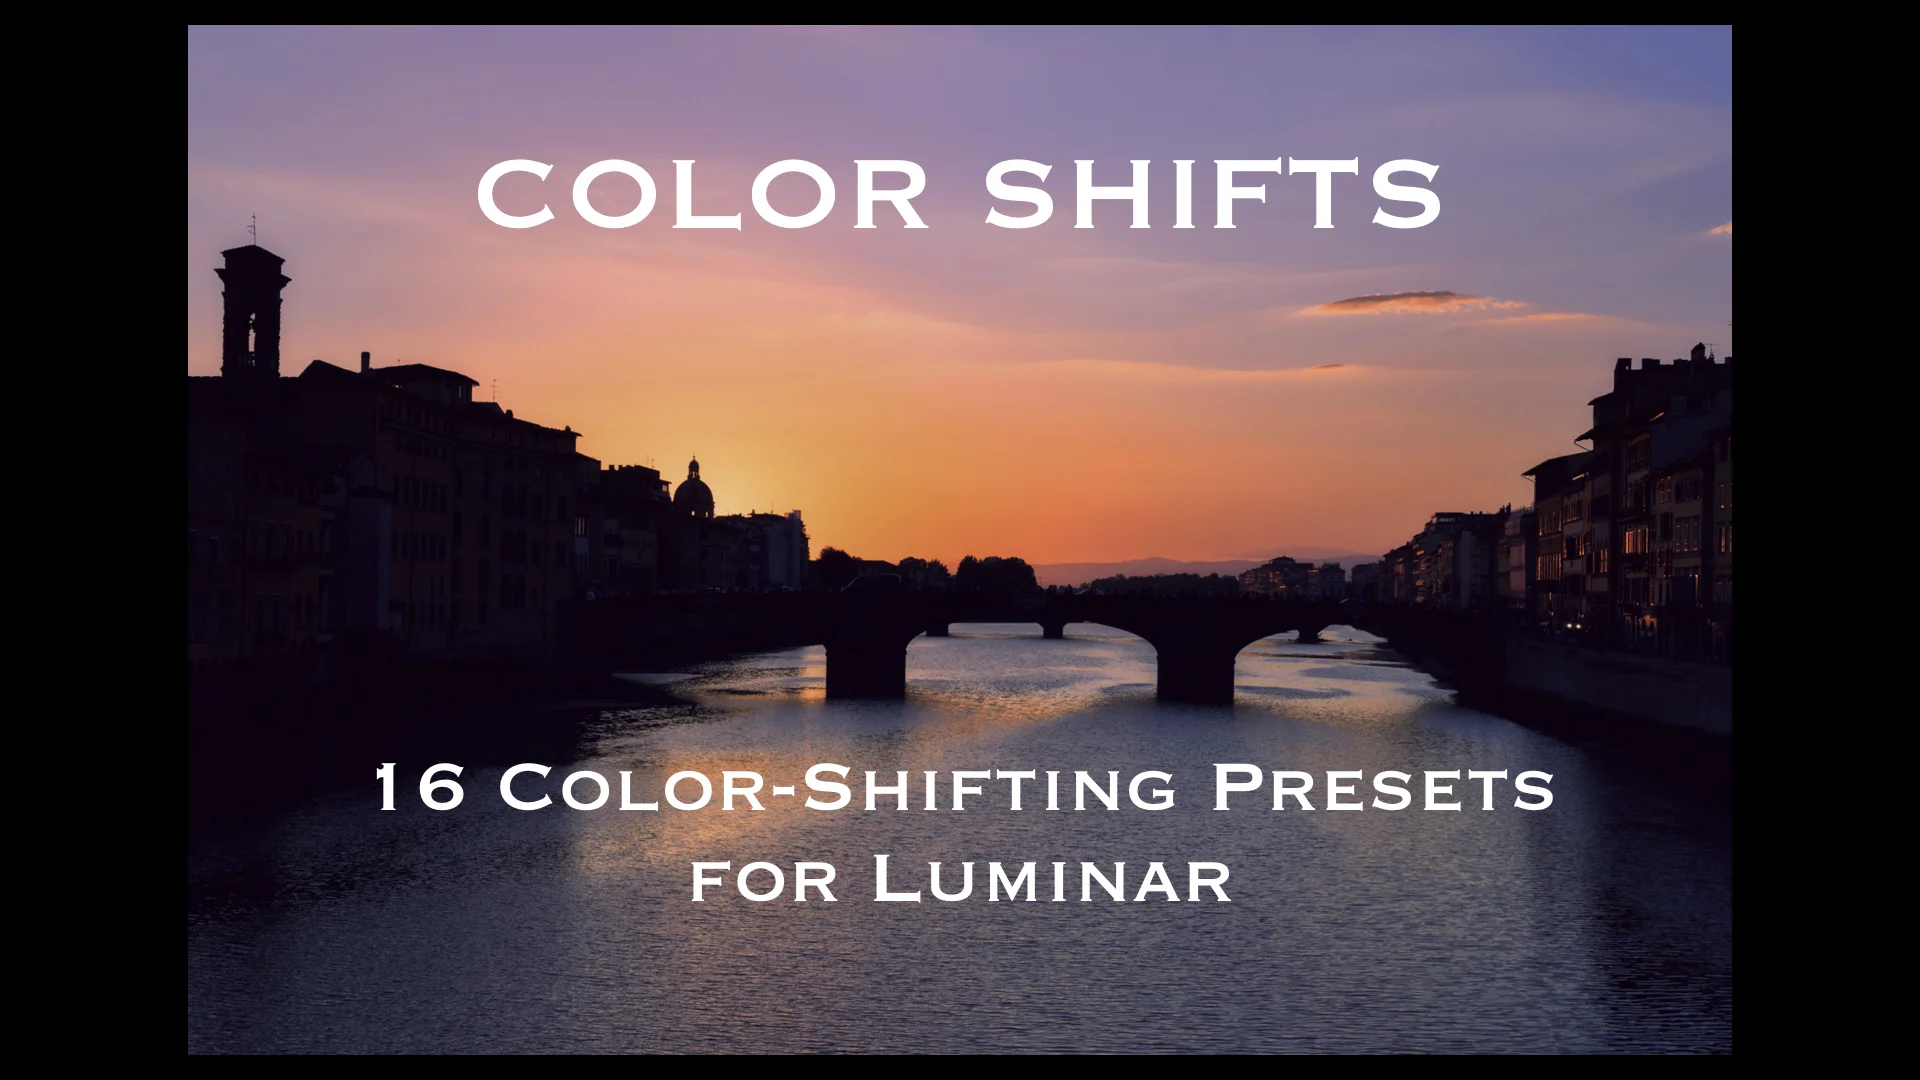
16 FREE PRESETS FOR LUMINAR - CHANGE COLORS WITH ONE CLICK!
It's no secret that I love color. It's also no secret that I love to manipulate colors in my images. So it was only a matter of time before I started making presets for this stuff.
I am constantly changing up colors in my images, for artistic or aesthetic purposes. Sometimes I will even take edited images and go apply some new color "looks" to them for fun and experimentation. It's part of how I spend my free time (yes, I am a bit geeky about this stuff).
So I decided to make some presets with a lot of different color looks built into them, and here they are! And yes they are free! Go download a copy for yourself!
Note: I will admit that these presets are a little weird. This isn't your traditional "bump up the saturation" sort of thing. These are just...different. However, they are free so if you don't like them, well you can't complain about the price! :-)
And if you want to see this in action, below is the intro video I did about this preset pack:
Get Your Free Preset Pack Here!
CLICK HERE TO DOWNLOAD THIS FREE PRESET PACK
(Note: click on the green button towards the top right that says DOWNLOAD)
This link will take you to a hosting site I have used for years, called MediaFire. The file is called Color Shifts.mplumpack. Download and then you can drag it onto Luminar to install it, or if you are in Luminar already, click on File>Add Custom Presets Pack and chose the file to install it.
SUPPORT THIS SITE
Yes this is a free preset pack and you are welcome to use it, share with your friends, and all that. I don't ask anything in return other than to have fun with it and spread the word about my work if you can. I always appreciate that.
However, if you enjoy all the free videos and presets and are interested in making a donation, I gladly accept them! I spend countless hours creating new things to share each week and if you are interested in supporting this work, that's great.
You can simply click this link https://www.paypal.me/jimnix and make a donation of your choice. Whether you do or not, enjoy the training and the presets! More coming every week! Thank you!

Macphun Holiday Offer for Luminar 2018!
Get a great deal on Luminar 2018 right now, through Dec 31. Check it out!
Save money on Luminar 2018 this holiday season!
If you have been on the fence about getting Luminar 2018, now is the time my friends! Macphun is offering it for a discounted rate from now until the end of the year, and you can save an extra $10 by using coupon code JIMNIX!
This is a great deal and one that won't last, so act now. And don't forget that if you have any questions about how to use Luminar 2018, I have an entire 12 video series on YouTube that will get you up and running quickly! You'll be cranking out amazing photos in no time at all!
Oh yeah, and I have a complete Luminar Learning Center right here on the blog, too! And yes, all of that training is free!

About Luminar:
Luminar 2018 offers everything a modern photographer needs for photo editing, including new filters powered by artificial intelligence, major speed improvements, a dedicated RAW develop module and a forthcoming in 2018; digital asset management platform.
Users will also benefit from the new intelligent Sun Rays filter, LUT support, and real-time noise removal. With workspaces that match different styles of editing, Luminar adapts to deliver a complete experience that avoids clutter and complexity.
Luminar 2018 has been re-built from the ground up for dramatic performance boosts. Existing filters deliver richer colors and depth in less time. A brand new streamlined user interface speeds up working with presets, filters, and masks. With the full support of pro options like layers, masks, and blending modes, complex repairs and photo composites can be easily accomplished.
Offer Availability: The Luminar 2018 Holiday offer will be available starting December 12 until December 31
Pricing:

Current users of Luminar may upgrade at a Black Friday price of $49 ($39 with coupon code JIMNIX)
New users can purchase Luminar 2018 for $69 ($59 with coupon code JIMNIX)
A collection of bonuses will also be included with every purchase.
Bonuses:
The Shootkit ebook
Preset pack: 20 Festive Texture Presets
500+ Sky overlays for Sky replacement
Video tutorial "How to replace Sky in Luminar"
EXTRA Bonus:
“Capture: Adventures in Photography” ebook by Simon & Lisa Thomas, the world’s foremost adventure motorcyclists
Thanks and let me know if you have any questions!

Aurora HDR named Best Mac App of 2017!
Aurora HDR 2018 is named Mac App of the Year by Apple - wow!
Apple names Aurora HDR as the Best Mac App of 2017!! This is huge!
To celebrate, Macphun is making a special offer for the rest of the month! Save $20!
Use my coupon code JIMNIX to save another $10!

Offer Availability:
The Aurora HDR Special offer will be available from December 7 - 31
Pricing:
Current users of Aurora HDR may upgrade at a Special price of $39
New users can purchase Aurora HDR 2018 for $79
A collection of bonuses will also be included with every purchase.
Bonuses:
Deep Dive video tutorial from Trey Ratcliff
“How to create realistic HDR images” Ebook
2 Preset Packs - 40 presets! Preset pack 1 - Winter Vibes. Preset Pack 2 - Wonderland.
Use coupon code JIMNIX at checkout to save another $10!!
Not sure how to use Aurora HDR? Want to see how it works? Check out my YouTube!
I have created a lot of YouTube videos about Aurora HDR. Just click right here to find all my Aurora HDR 2018 videos - 18 videos in all! Here's a sample of them, but you can click through to see them all!


Black Friday Deals from Macphun!
Black Friday deals from Macphun - get it while it's hot!

My friends over at Macphun (ok, the new name is Skylum but still) are offering a couple of smoking deals on their top products Luminar and Aurora HDR - check it out!
Yes you can use my coupon code JIMNIX to save $10 off either deal!
Luminar Black Friday Offer:
Get the deal here.
Luminar 2018 offers everything a modern photographer needs for photo editing, including new filters powered by artificial intelligence, major speed improvements, a dedicated RAW develop module and a forthcoming in 2018; digital asset management platform.
Users will also benefit from the new intelligent Sun Rays filter, LUT support, and real-time noise removal. With workspaces that match different styles of editing, Luminar adapts to deliver a complete experience that avoids clutter and complexity.
Luminar 2018 has been re-built from the ground up for dramatic performance boosts. Existing filters deliver richer colors and depth in less time. A brand new streamlined user interface speeds up working with presets, filters, and masks. With full support of pro options like layers, masks, and blending modes, complex repairs and photo composites can be easily accomplished.
Offer Availability:
The Luminar 2018 Black Friday offer will be available from November 21-29
Pricing:
- Current users of Luminar may upgrade at a Black Friday price of $49 ($39 with coupon code JIMNIX)
- New users can purchase Luminar 2018 for $69 ($59 with coupon code JIMNIX)
- A collection of bonuses will also be included with every purchase.
Bonuses:
- A Pack of Urban presets from Contrastly
- Creative Look LUTs Collection for use in Luminar 2018
- The Ultra-Wide Landscape Ebook by Ian Plant
- Lights&Shadows Photo Training Video by Matt Granger
Those who pre-ordered Luminar 2018, will get these bonuses for free.
Aurora HDR Black Friday Offer:
Get the deal here.
Aurora HDR is not just a tool for merging bracketed images, it also provides numerous tools and countless options to create perfect HDR photos for every taste - from one-click presets and advanced tone-mapping, to layers, noise reduction, and powerful luminosity masking controls.
Offer Availability:
The Aurora HDR 2018 Black Friday offer will be available from November 22-29
Pricing:
- Current users of Aurora HDR may upgrade at a Black Friday price of $49 ($39 with coupon code JIMNIX)
- New users can purchase Aurora HDR 2018 for $89 ($79 with coupon code JIMNIX)
- A collection of bonuses will also be included with every purchase.
Bonuses:
- Deep Dive video tutorial from Trey Ratcliff
- 40 realistic presets by PresetPro
- A Special Ebook

Moving Presets and Workspaces from Luminar 2017 to Luminar 2018
Did you upgrade to Luminar 2018 yet? Are you interested in moving your presets and workspaces from Luminar 2017 over to the new version? You can do that quickly and easily. Here's how.
Hi everyone - I received the same question so many times right after the Luminar 2018 launch that I found it much easier to just make a quick video about it.
It seems many people were not clear how to move presets and workspaces from the old version to the new. Truthfully, it's quick and easy. Here's a short video showing how. Enjoy!

Luminar 2018 is available for pre-order!
Luminar 2018 is available for pre-order! Order now and get some great bonuses, too!
Luminar 2018 pre-orders begin today! Buy now and get a special price plus bonus offers!
Preorders begin Nov 1 and the product is released on Nov 16
Current Luminar users may upgrade for $39
New users may purchase for $59
All preorders get additional bonuses, too!
Get your pre-order right here! Or click the banner below to go to the Macphun site!
Jim’s perspective on Luminar 2018
Assuming you have been to my blog or YouTube channel before, then you will already know I am a big fan of Luminar. It’s an amazing and rock-solid product that became a core component of my workflow literally from the first time I used the 2017 version. It’s still something I depend on every day, and it has just gotten even better!
I have had a copy for a little while now, and also spent most of last week in NYC at Photo Plus Expo at the Skylum booth doing demos of this software for customers. I spent a lot of time using it and exploring it top to bottom, and have gotten to know it very well. I am very impressed and excited about this version. There's a lot here to love.
There are a lot of improvements in Luminar 2018, such as:
- Major speed improvements
- Dedicated RAW develop module
- Sun Rays filter (this is going to be SO popular)
- LUT support (LUT is short for Look-Up Table, which in short sort of functions like a color preset, allowing you to use LUT files from other programs to apply a color grade to your images in one click - and there are some LUTs as part of the bonus offer)
- Matte Looks filter for faded and vintage looks
- Dodge & Burn filter for selective lightening or darkening of an image
- Lens Correction and Transform
- Improved and updated Noise reduction filter
- Updated and streamlined User Interface
- Available for both Mac and PC!
I have edited a LOT of photos in Luminar 2018 over the past couple of weeks and it’s been an incredibly satisfying and fun experience. I know you are going to love this as much as I do! Get your preorder in now and capture those bonus offers. You will be able to download it on November 16 and start editing right away!
First Look and What’s New Video
Of course I made a video about this version! :-) Take a look and let me know what you think. I feel certain you will be excited about this version too. Check it out!
Show me some screenshots!
If video isn’t your thing, maybe you would prefer to see some screenshots of the new version? Sure you would…so here you go my friends. Take a look and see it for yourself. In each screenshot below I show the Before/After comparison so that you can clearly see the changes I have made to the original. It is all very quick and easy in Luminar. Each photo below took me 2-3 minutes to adjust, and that's it!
And here are some images that I edited in Luminar 2018
(Yes, I am having a lot of fun with the new Sun Rays filters)
Here’s the official company announcement about Luminar 2018
About Luminar:
Luminar 2018 offers everything a modern photographer needs for photo editing, including new filters powered by artificial intelligence, major speed improvements, a dedicated RAW develop module and forthcoming in 2018; digital asset management platform.
Users will also benefit from the new intelligent Sun Rays filter, LUT support, and real-time noise removal. With workspaces that match different styles of editing, Luminar adapts to deliver a complete experience that avoids clutter and complexity.
Luminar 2018 has been re-built from the ground up for dramatic performance boosts. Existing filters deliver richer colors and depth in less time. A brand new streamlined user interface speeds up working with presets, filters, and masks. With full support of pro options like layers, masks, and blending modes, complex repairs and photo composites can be easily accomplished.
Offer Availability:
Luminar 2018 will be available for pre-order on November 1, and released on November 16.
Pre-Order Pricing:
- Current users of Luminar may upgrade at a special pre-order price of $39 ($49 MSRP)
- New users can purchase Luminar 2018 at a special pre-order price of $59 ($69 MSRP)
- A collection of bonuses will also be included with every purchase.
Pre-Order Bonuses:
- A Pack of signature presets and textures fro pro photography Nicolesy
- An Exclusive pack of LUTs
- 1-year Power plan from SmugMug ($72 value). For new accounts only
Are you filter-curious? Me too!
Here’s a closer look at some of those new filters…check out all this cool stuff!
Parting thoughts on Luminar 2018
I hope that these screenshots, images and the video are helpful. Now that I have been using this for a week I am really getting into a groove with it. I think it's a great release and I hope you enjoy it as much as I do. Please keep in mind that because we are about 2 weeks out from actual release, some features may change slightly in the final version. It's also good to note that the Windows version is slightly behind the Mac version at launch, but will be at feature parity by the end of the year or in January. They are working hard to get it ready!
Yes, I am going to be making a TON of videos about Luminar 2018, and they are coming soon (including a full tutorial series like I did for Aurora HDR 2018). So please subscribe to my YouTube channel and watch for them. Plenty of free training is coming your way really soon!
Let me know what questions you have, and thanks for stopping by today!
Click the banner below to get your pre-order in and the bonuses, too!
DISCLOSURE
I am an affiliate partner of Skylum Software (aka Macphun) and if you purchase using the links here, I make a small commission which helps me continue creating the free training that I love to create for you. YOUR COST IS ALWAYS THE SAME. So it's a win-win. You get an amazing price, I get a small commission, and I use these commissions to fund my ongoing efforts to provide cost-free training to you. Thanks for your support very much! It really helps. Literally, I could not do this without you and your support. I really do appreciate it.

Luminar will get a DAM in 2018!
Luminar will get digital asset management sometime in 2018, and people are excited. Adobe makes big changes to Lightroom, and people are confused and angry. Lots of interesting stuff happening!
DAM straight! Digital Asset Management is coming to Luminar!
In case you aren't familiar with the term DAM, it stands for Digital Asset Management and is a common term in the photo business to represent a library and cataloging function in software. This is essentially a tool for managing your images, instead of just having them sit in a folder somewhere. It gives you the ability to preview them, rate them, add keywords, create albums, organize them and so much more (though to be clear, I do not yet know what functions will or will not be in the Luminar DAM, and I do not have a copy of it).
DAM is incredibly important to photographers, and as your image count grows it becomes more and more important because managing a vast amount of images is unwieldy and basically impossible. For example, Lightroom has a DAM (and it's what I currently use) in addition to it's various editing tools. It's a core component of the product and one that is generally really useful to me.

Side note: Adobe announced some interesting changes to Lightroom this past week, essentially creating a secondary version of Lightroom, aimed more at hobbyist and mobile-phone-first photographers, which is all cloud-based. Macphun set up the below site in response. Whether you are going to continue with LR or move on, Macphun has products that can help. This is actually a very informative website, and you will learn a lot about their plans for Luminar if you browse it.
Click here to read more about this on the Macphun site.
A video preview and some screenshots!
This week my friends at Macphun publicly shared a tiny little sneak peek into the DAM they are developing, which will be added to Luminar sometime in 2018. I am very eager to see this DAM and play around with it. I imagine it will be powerful yet intuitive, just like the rest of their products.
You can watch that sneak peek here (or just watch it below): https://youtu.be/9FCHmJiF894
Macphun has also provided a couple of screenshots of their upcoming DAM, which you can see below. At first glance, it looks very interesting, though admittedly there is not a lot to go on just yet. This is, after all, just a quick glance at what they are making.
Things that I do notice, that are important to me (and again, these are total guesses because I have only seen what you are seeing here, so some of this is assumptive):
- Album/folder structure
- Rating system
- Image previews and browsing
- Easy move from the DAM to Luminar for editing (it's all easily connected)
- Tags (which implies keywording)
- Import window
- Some sort of "smart collection" feature
- The ability to create multiple libraries/catalogs
- I suspect a quick and easy transfer of images to Aurora HDR will be included
Taken together, this looks like a really solid product, especially as a first effort. There is obviously a lot of thought and planning going into this and they want to make a great first impression.
I'm very interested in this and will be sharing more as it comes to me.
Thanks for stopping by and let me know if you have any questions!

Announcing "Roadtripper", a preset pack for Aurora HDR 2018!
My newest preset pack is ready! It's called Roadtripper, and it's for Aurora HDR 2018. Check it out!
Roadtripper: a preset pack for Aurora HDR 2018!
Hello friends, today I am announcing my first preset pack for Aurora HDR 2018. I have been working with this wonderful product for a while now, and have hand-crafted these presets to help you get the most out of your Aurora HDR 2018 experience. You can do SO MUCH with Aurora HDR 2018 that it will blow you away. It has been a lot of fun for me to crank out some beautiful HDR photos with it!
You can find my other preset packs right here on my presets page if you would like to see them all (but this is the only pack available right now for Aurora HDR 2018).
I love to create these preset packs and I use them on many of my images, too. I think of presets as the “easy button” for photo editing. Sometimes it really just takes that one click to get your shot looking exactly how you imagined it, although of course there are times when a preset is a great starting point to send you off in a new creative direction. Either way, I know you will enjoy this new preset pack and get a lot of mileage out of it.
Introducing Roadtripper
If you have been following me since before this past summer, you may be aware that I took a massive road trip with the family over the course of June, July and August and we covered about 9 states and 2 Canadian provinces. Dang, it was a hell of a lot of driving (but a lot of fun too). On this trip, I captured thousands of photos and these were the inspiration for this preset pack.
These presets range from something you could use on a beautiful sunset and go all the way to a grungy, rusted out old truck - because that is the entire range of what I photographed on this road trip. These presets are designed to work with ALL sorts of scenes, just as you would encounter on a road trip yourself. I like bold, colorful and expressive photos, so my presets are designed to accentuate that, and I think you will be able to see that theme in the sample screenshots below.
Don't forget you can stack presets for more fun and experimentation! I often stack 2 presets and adjust the opacity levels of each layer to get interesting and beautiful results. Or stack them and just mask in the part of the preset that fits with your photo. Your options are limitless! Just experiment and have fun. That's what this is all about, anyway. Create something interesting and have fun doing it.
There are 20 presets in this pack and once loaded in Aurora HDR 2018 it will be displayed as it’s own category of presets, right alongside all the other categories that are built into Aurora (see below for installation instructions).
Go watch it in action!
Here's a video showing many of the presets in action. Take a look! (Can you tell I like doing videos? I think they just work better than reading something, and they are fun for me.)
How To Purchase This Preset Pack
Ready to purchase this preset pack? You can click on “Add to Cart” below, or visit my presets page. Once you complete the purchase process, you will receive an email with a download link for the preset pack file, which you can then import into Aurora HDR 2018. Installation instructions are below.

It sells for the low price of $10.00. That's just $0.50 per preset! Think of all the amazing creations you will use these on!
Thanks for stopping by, and let me know if you have any questions. I appreciate the support very much! I couldn't do this without your support, so I want you to know I am deeply grateful. Thank you!
How To Install A Custom Preset Pack
When you import a custom preset pack such as this one, it will create a new category in the Presets category window, and the presets will be displayed within that category.
See the example to the right. --> Roadtripper is in the bottom right hand corner.
To add a custom preset pack, select the menu item File > Add Custom Presets Pack. An open dialog box will be displayed, allowing you to choose the pack you wish to add.
After you receive your email with the download link, download the preset pack file to your desktop which allows you to easily find it and select it.
Then you start making awesome photos!
Show me some samples, Jim!
Ok, it’s about time to do that, don’t you think? Take a look at all the screenshots below and any of them can be viewed larger with a single click. You will also see the preset name in the screenshots below. This is just a few of them - remember, there are 20 presets in the pack!
Thanks for taking a look and let me know if you have any questions! Click any image to enlarge!
Do you need help using Aurora HDR? Want to create masterful HDR photos?
One thing that I decided to do, upon the release of Aurora HDR 2018, was to create a tutorial series on YouTube. I used to write out lengthy tutorials but I find videos are much better for this. You can follow along and watch what I do, instead of just read about it, and I think that's way better. So, if you need help with Aurora, check out my Aurora HDR 2018 Tutorial Series over on YouTube. The tutorial itself is a collection of 10 videos covering the basic all the way to advanced techniques, and there are a few other videos in the set, too. I think you will enjoy this quite a lot! And yes, these are all free!
Click here to see my entire collection of Aurora HDR 2018 videos.
Here's a sample of what you will see there...enjoy!
Thank you and enjoy the presets!

Moraine Lake is gorgeous!
Moraine Lake in Banff National Park is just off-the-charts gorgeous. It's a place I would gladly return to again and again. I was lucky enough while there to get 2 beautiful sunsets...
This just in - Moraine Lake is beautiful! ;-)
Moraine Lake is shot SO often and I have seen millions of amazing photos from there. It's just an incredibly gorgeous place. During our 7 nights in nearby Banff, we spent 2 of them here so I could shoot the sunset. It didn't disappoint. I had great light and obviously amazing scenery. All I had to do was point the camera in the right direction!

5 Reasons to Get Aurora HDR 2018 Right Now
Aurora HDR 2018 is available for pre-order, and it's awesome. Here are 5 reasons I think it makes sense to get it pre-ordered right now.
5 Reasons to Get Aurora HDR 2018 Right Now (Like, Today)

Aurora HDR 2018 is the latest version of Macphun’s award-winning HDR software, and it’s fabulous. I got my hands on a copy a couple of weeks ago, since I am currently creating a bunch of videos for the Macphun site. This basically means that I have been using it for several hours each day as I dive in, experiment, and create videos explaining how to get the most out of it (they will be on the Macphun site soon).
The more I use it, the more I find that I love about it. I’ve already shared an overview video as well as a video about some of the new features, but what I haven’t done yet is sit down and write out some thoughts about why this is such a good release. So, here you go!
Natural HDR is automatic and easy
Lens Correction and Transform will literally change how you look at your photos
Dodge & Burn will become one of your favorite new features
HDR Enhance is an amazing replacement for Clarity
The User Interface is modern, elegant and awesome
Prefer to watch a video instead of reading this? No problem, here ya go!
Let’s look at each of these a little closer…
1) Natural HDR
The biggest knock you hear about HDR is that it isn’t natural looking. People always complain that HDR is extreme, over the top, whatever. Sure, we have all seen and probably created monsterpieces in HDR but frankly you can do that in any program, regardless of whether it’s HDR or not.
But in Aurora 2018, your base image is just so natural and beautiful and realistic. Macphun did an AMAZING job with it. Photos just look great. Colors are right, skies look great, and everything is realistic and natural. Sure you can go extreme if you want to - and sometimes it’s just fun - but you can totally make a superbly beautiful and natural HDR quickly and easily.
This is the base HDR photo after importing, with no adjustments. So natural and realistic!
2) Lens Correction and Transform tools
While I have used these tools in Lightroom in the past, I never really paid them a lot of attention. But now that they are front and center in Aurora HDR 2018, I am using them a LOT. And WOW, what a difference they make (I usually use them together). You can not only remove distortion but you can fixing “leaning buildings” and more in just a few seconds. It has literally caused me to approach each photo with a different sort of eye. This stuff is just great to have at your fingertips!
Fix those leaning buildings quickly and easily!
3) Dodge & Burn filter
Gone are the days of adding a new layer, changing the exposure values, and then masking that change into the photo. Now you just open the Dodge & Burn filter and start painting. Quick, easy and incredibly effective.
I used Dodge & Burn to darken the walkway on the Right side of the frame - only took about 10 seconds!
4) HDR Enhance slider
If you are like me, you used the Clarity slider on every photo in the previous version. So when I heard that Clarity was replaced with HDR Enhance, I had to check it out. After using it on countless photos, I can firmly declare that this is a huge win. This filter is perfect. It accentuates details and textures in the right places, without causing a lot of artifacts and other unwanted elements to appear in places where you don’t want them, such as a beautiful sky. Now I use this filter on every photo! HDR Enhance is the new Clarity!
HDR Enhance gives rich details and textures to a photo.
5) User Interface
I love it when a User Interface gets updated - there’s just something about getting a new and shiny thing to play with. The UI changes in Aurora 2018 are just perfect. It has a modern feel but remains very intuitive. I jumped right in the first time and started editing photos without delay. It just feels so much more streamlined and modern.
OK, I lied - there are 6 reasons to get Aurora HDR 2018 right now. #6 is that the pre-order bundle price is awesome! (See below).
These are just some of the things I am loving about the new Aurora HDR 2018. It's not an exhaustive list of new features. There’s just too much to write about. So, here’s a screenshot from the Macphun site that gives you a bit broader perspective on all the new stuff in this version (click to enlarge):
In short, Aurora HDR 2018 is a total win in my opinion. My photos are looking amazing and I am having more fun creating HDR than ever before. This release has literally rekindled my love of HDR. Ok, time to go edit some more HDR photos. Thanks for stopping by!
Get Your Pre-Order in Before It’s Too Late!
The pre-order period for the new Aurora HDR 2018 goes until September 28, then the special price and all the bonus material you get with it are gone forever!
You can place your pre-order right here on the Macphun site.
You can read more details about it right here on my blog.
Want to see it in action? My introductory overview video is right here.
Thanks again and let me know if you have any questions!


Aurora HDR 2018 is available for pre-order!
Aurora HDR 2018 is available for pre-order. Get your order in now and get some great bonuses, too!
Macphun announces pre-orders for Aurora HDR 2018!
Preorders begin September 12 and it is released on September 28!
Current users can pre-order for $49
New users can pre-order for $89
All pre-orders get additional bonuses too!
Get your pre-order here!
Or, click the Aurora HDR 2018 banner to be sent to the Macphun site.

Jim’s perspective on Aurora HDR 2018
If you have been to my blog before, then it's rather obvious that I am a fan of Macphun products. Apart from managing my library in Lightroom, everything I do takes places in Luminar and Aurora HDR. You can find all sorts of tutorial videos for these products for free on my YouTube channel right here. So when I got my hands on Aurora HDR 2018 I was pretty excited to try it out. While I expected to like it, I am finding more and more to love about it each time I edit a photo and I am continually impressed with how it is handling my images.
I’ve been using Aurora HDR 2018 for about a week now. It has a lot of improvements, many of which are “under the hood”. For example, there is improved raw file handling, much better tone-mapping and a completely new engine running it all. This is immediately noticeable when your tone-mapped image first opens in Aurora. You have a much more natural look than in the previous version. In fact, I would say that all of the changes and updates made to Aurora HDR 2018 are designed to produce a more natural looking HDR photo, and it works quite well. Details and colors are more realistic and accurate. There is a new Structure algorithm for better management of details and clarity. All of these things help. But there is a lot more to enjoy with this release, including:

- new Dodge & Burn filter
- new HDR Enhance filter (replaces Clarity and gives more natural results)
- improved Denoise feature
- improved Image Radiance
- Redesigned User Interface
- Lens Correction tool fixes distortion
- Transform tool allows perspective shifts
- History panel
- Available for Mac and Windows!
I have been editing LOTS of photos in Aurora HDR 2018 over the last week and it’s been a breath of fresh air. I see a lot to benefit from in this release, and there is even more coming over the next few months as they add some new features and make further updates to existing ones. The text section down below is from Macphun, but I wanted to add a personal note about my own use of it and my experience with it thus far. Let me know if you have any questions.
First Look and What's New video
Here is a quick video showing some of the new features. I think you will like this!
Show me some screenshots!
To illustrate my point about the natural look of the base tone-mapped image, I have included a few screenshots below. The first 3 of these is just the base HDR photo after it has been brought into Aurora HDR 2018 and the tone-mapping was automatically applied. This is prior to any edits on my part. What immediately catches my eye is that all of them appear very natural and smooth and there are no halos present in the images. As you can see starting with the 4th image, I have shown some Before/After compares just for fun.
Disclaimer: Because we are about 2 weeks out from release, I do not have a FINAL FINAL version of the software. There will likely be some minor changes before it is released, and thus I cannot guarantee that everything you see here will be in the final version. I just want to be clear about that. If something changes, that is beyond my control.
I love how natural this HDR base image looks.
Again, very natural result from tone-mapping.
My favorite part here is how the water blended so nicely. It looks painterly. This is a 3 exposure HDR without edits. The water just came out that nice!
Here's a before/after compare so you can see that you can obviously make your own stylistic choices once you start moving filters around.
I know this split screen looks redonkulous, but I wanted to share it so you can see the dramatic difference you can make in a photo with the new Lens Correction and Transform tools (both of which were used here). I'll be back with more on those two tools really soon.
Just another before/after example to give you something else to look at. :-)

And here are some photos that I edited with Aurora HDR 2018...and obviously they have been stylized a bit.
Here's the official Macphun announcement about Aurora HDR:
Aurora HDR is not just a tool for merging bracketed images, it also provides numerous tools and countless options to create perfect HDR photos for every taste - from one-click presets and advanced tone-mapping, to layers, noise reduction and powerful luminosity masking controls.
Offer Availability:
Aurora HDR 2018 will be available for pre-order on September 12, and released on September 28.
Pre-Order Pricing:

- Current users of Aurora HDR may upgrade at a special pre-order price of $49 ($59 MSRP)
- New users can purchase Aurora HDR 2018 at a special pre-order price of $89 ($99 MSRP)
- A collection of bonuses will also be included with every purchase.
Pre-Order Bonuses:
- Trey Ratcliff Deep Dive video
- Travel Photography Tutorial by Matt Granger
- Source Brackets
- 3-month Zenfolio Pro website, including a complementary design consultation. $60 value.
What's new in Aurora HDR 2018:
- Next-generation Tone Mapping – A new smart Tone Mapping algorithm automatically reduces noise, and produces more realistic and natural initial results.
- Mac and Windows versions – Aurora HDR 2018 is available both for Mac and PC users, enabling mixed-computer households to share the same product key.
- Lens Correction Tool* – The new Lens Correction filter easily fixes all kinds of lens distortion, from barrel and pincushion to chromatic aberration and vignetting.
- Transform Tool* – Easily scale, rotate and shift your image to better fit your vision.
- Dodge & Burn Filter – Selectively lighten or darken specific areas of an image to artfully direct your viewer’s eye towards the key subject of your image, similar to a traditional darkroom technique.
- HDR Enhance Filter - Adds details and clarity to an image, adjusting colors, details and contrast without creating artificial halos or other problems.
- User Interface – A new, modern and responsive user interface brings a powerful, yetjoyful experience to HDR photo editing.
- History Panel – An easy-to-reference list of edits made to your image, the History panel allows you to click on any editing step to revert the photo to an earlier stage of editing.
- Touch Bar support for Mac – Aurora HDR 2018 adds Touch Bar support to give new MacBook Pro users fast access to key editing features and speed up their workflow.
- Image Flip and Rotate* – Perfect for correcting photos with incorrect horizons or making creative compositions or other stylistic changes to an image.
- IMPROVED: New Structure Algorithm – The re-developed Structure tool allows you to adjust detail and clarity of an image to get a classic HDR effect with great detail or a smoother effect with less details.
- IMPROVED: RAW handling – An improved RAW conversion brings out more details in shadows/highlights, displays colors more accurately and reduces noise in RAW files.
- IMPROVED: Crop tool update – Now specify custom crop sizes for even more versatility.
- IMPROVED: Speed – Faster merging and masking performance, improvement in RAW image processing.
* Lens Correction and Transform tools, as well as image flip and rotate will be available in the Mac version at launch, and arrive in the PC version with the first free update in the beginning of October. Other tools and features that are currently available for Mac only would be added to PC version by the end of the year.
A closer look at the filters panel
For those of you that want a close up look at the filters panel, here are some screenshots...
There are several new things to enjoy here, such as Lens Correction, Transform, the HDR Enhance slider (I trust you will be using this one a lot), and Dodge & Burn (another on you will use a lot). But there were improvements and enhancements made to many of the existing filters to give you better control and to help you create more natural-looking HDR photos.
Parting Thoughts on Aurora HDR 2018
I hope that these screenshots, images and the video are helpful. Now that I have been using this for a week I am really getting into a groove with it. I think it's a great release and I hope you enjoy it as much as I do. Please keep in mind that because we are about 2 weeks out from actual release, some features may change slightly in the final version.
Let me know what questions you have, and thanks for stopping by today!
Click the banner below to get your pre-order in and the bonuses, too!


Creating a Cinematic Orange and Teal Look in Luminar
Have you noticed the popularity of the orange and teal look? It seems to be everywhere. So, here's a new video showing you how you can recreate that look in Luminar. Enjoy!
Have you noticed the popularity of the "orange and teal" look?
I never paid attention to this "look" until someone sent me an email and asked how he could create this look. Once I started experimenting with it, I started noticing it EVERYWHERE. It's in movies, all over Instagram and more. And now that I have spent a lot of time recreating the look, I like it quite a bit and better understand the attraction of using it.
Orange and teal sit on opposite ends of the color spectrum, and thus they are very complementary. And yes, the first photo I edit is the same image as I shared in yesterday's blog post. No, I'm not double-posting the same shot, it's just that I finally have the video ready and the timing is what it is. But check out the video because I edit 4 pics in it. Enjoy!
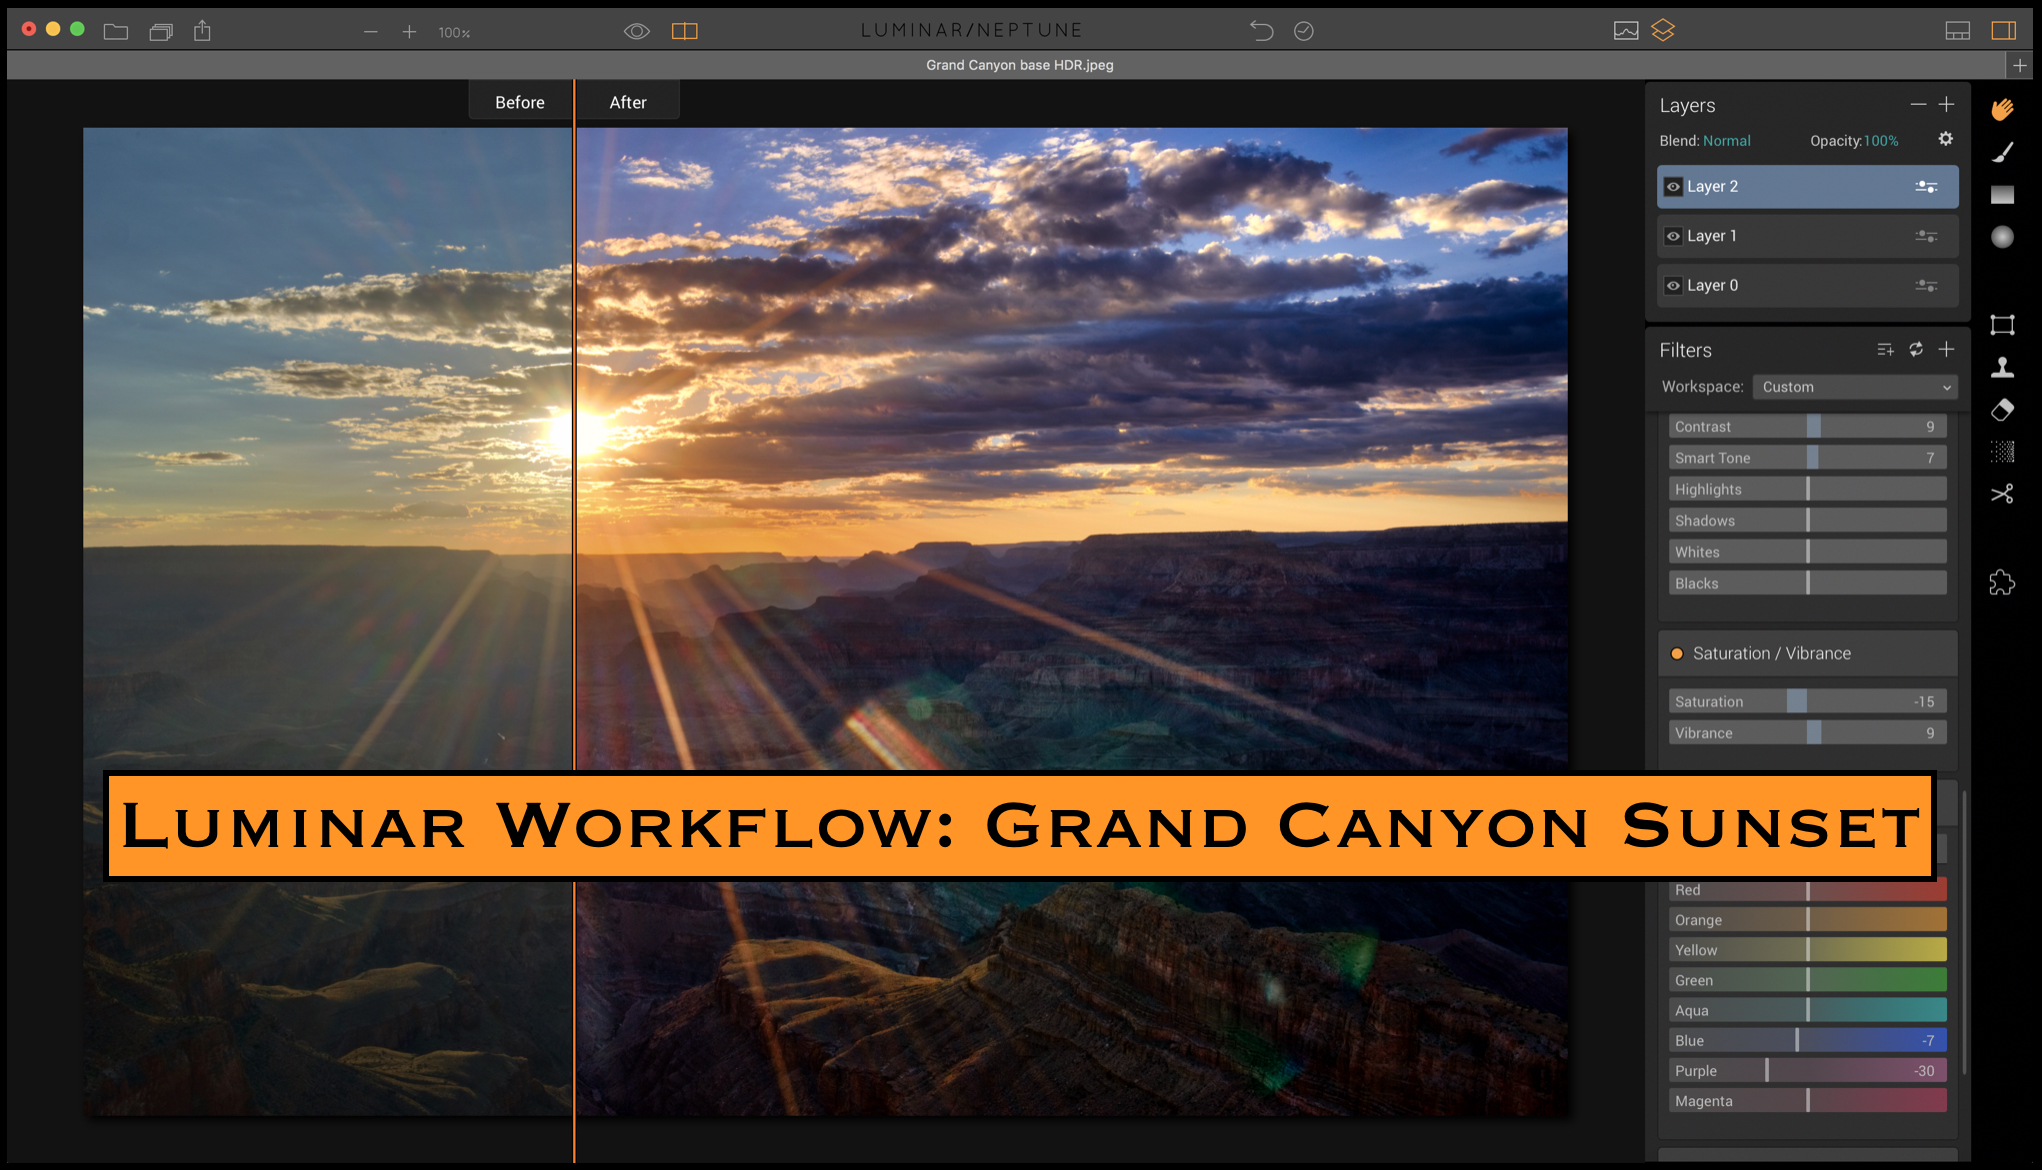
Luminar Workflow: Grand Canyon Sunset
A lovely sunset at the Grand Canyon - my latest Luminar tutorial video...
Here's my latest Luminar tutorial, showing how I edit this HDR photo of a lovely sunset at the Grand Canyon in Arizona. I stack many filters (nearly 20) over several layers, and even use some filters twice. I also struggle with some indecision but find my way to the final result.
Take a look, let me know if you have any questions, and thanks for looking!