
Luminar will get a DAM in 2018!
Luminar will get digital asset management sometime in 2018, and people are excited. Adobe makes big changes to Lightroom, and people are confused and angry. Lots of interesting stuff happening!
DAM straight! Digital Asset Management is coming to Luminar!
In case you aren't familiar with the term DAM, it stands for Digital Asset Management and is a common term in the photo business to represent a library and cataloging function in software. This is essentially a tool for managing your images, instead of just having them sit in a folder somewhere. It gives you the ability to preview them, rate them, add keywords, create albums, organize them and so much more (though to be clear, I do not yet know what functions will or will not be in the Luminar DAM, and I do not have a copy of it).
DAM is incredibly important to photographers, and as your image count grows it becomes more and more important because managing a vast amount of images is unwieldy and basically impossible. For example, Lightroom has a DAM (and it's what I currently use) in addition to it's various editing tools. It's a core component of the product and one that is generally really useful to me.

Side note: Adobe announced some interesting changes to Lightroom this past week, essentially creating a secondary version of Lightroom, aimed more at hobbyist and mobile-phone-first photographers, which is all cloud-based. Macphun set up the below site in response. Whether you are going to continue with LR or move on, Macphun has products that can help. This is actually a very informative website, and you will learn a lot about their plans for Luminar if you browse it.
Click here to read more about this on the Macphun site.
A video preview and some screenshots!
This week my friends at Macphun publicly shared a tiny little sneak peek into the DAM they are developing, which will be added to Luminar sometime in 2018. I am very eager to see this DAM and play around with it. I imagine it will be powerful yet intuitive, just like the rest of their products.
You can watch that sneak peek here (or just watch it below): https://youtu.be/9FCHmJiF894
Macphun has also provided a couple of screenshots of their upcoming DAM, which you can see below. At first glance, it looks very interesting, though admittedly there is not a lot to go on just yet. This is, after all, just a quick glance at what they are making.
Things that I do notice, that are important to me (and again, these are total guesses because I have only seen what you are seeing here, so some of this is assumptive):
- Album/folder structure
- Rating system
- Image previews and browsing
- Easy move from the DAM to Luminar for editing (it's all easily connected)
- Tags (which implies keywording)
- Import window
- Some sort of "smart collection" feature
- The ability to create multiple libraries/catalogs
- I suspect a quick and easy transfer of images to Aurora HDR will be included
Taken together, this looks like a really solid product, especially as a first effort. There is obviously a lot of thought and planning going into this and they want to make a great first impression.
I'm very interested in this and will be sharing more as it comes to me.
Thanks for stopping by and let me know if you have any questions!

5 Reasons to Get Aurora HDR 2018 Right Now
Aurora HDR 2018 is available for pre-order, and it's awesome. Here are 5 reasons I think it makes sense to get it pre-ordered right now.
5 Reasons to Get Aurora HDR 2018 Right Now (Like, Today)

Aurora HDR 2018 is the latest version of Macphun’s award-winning HDR software, and it’s fabulous. I got my hands on a copy a couple of weeks ago, since I am currently creating a bunch of videos for the Macphun site. This basically means that I have been using it for several hours each day as I dive in, experiment, and create videos explaining how to get the most out of it (they will be on the Macphun site soon).
The more I use it, the more I find that I love about it. I’ve already shared an overview video as well as a video about some of the new features, but what I haven’t done yet is sit down and write out some thoughts about why this is such a good release. So, here you go!
Natural HDR is automatic and easy
Lens Correction and Transform will literally change how you look at your photos
Dodge & Burn will become one of your favorite new features
HDR Enhance is an amazing replacement for Clarity
The User Interface is modern, elegant and awesome
Prefer to watch a video instead of reading this? No problem, here ya go!
Let’s look at each of these a little closer…
1) Natural HDR
The biggest knock you hear about HDR is that it isn’t natural looking. People always complain that HDR is extreme, over the top, whatever. Sure, we have all seen and probably created monsterpieces in HDR but frankly you can do that in any program, regardless of whether it’s HDR or not.
But in Aurora 2018, your base image is just so natural and beautiful and realistic. Macphun did an AMAZING job with it. Photos just look great. Colors are right, skies look great, and everything is realistic and natural. Sure you can go extreme if you want to - and sometimes it’s just fun - but you can totally make a superbly beautiful and natural HDR quickly and easily.
This is the base HDR photo after importing, with no adjustments. So natural and realistic!
2) Lens Correction and Transform tools
While I have used these tools in Lightroom in the past, I never really paid them a lot of attention. But now that they are front and center in Aurora HDR 2018, I am using them a LOT. And WOW, what a difference they make (I usually use them together). You can not only remove distortion but you can fixing “leaning buildings” and more in just a few seconds. It has literally caused me to approach each photo with a different sort of eye. This stuff is just great to have at your fingertips!
Fix those leaning buildings quickly and easily!
3) Dodge & Burn filter
Gone are the days of adding a new layer, changing the exposure values, and then masking that change into the photo. Now you just open the Dodge & Burn filter and start painting. Quick, easy and incredibly effective.
I used Dodge & Burn to darken the walkway on the Right side of the frame - only took about 10 seconds!
4) HDR Enhance slider
If you are like me, you used the Clarity slider on every photo in the previous version. So when I heard that Clarity was replaced with HDR Enhance, I had to check it out. After using it on countless photos, I can firmly declare that this is a huge win. This filter is perfect. It accentuates details and textures in the right places, without causing a lot of artifacts and other unwanted elements to appear in places where you don’t want them, such as a beautiful sky. Now I use this filter on every photo! HDR Enhance is the new Clarity!
HDR Enhance gives rich details and textures to a photo.
5) User Interface
I love it when a User Interface gets updated - there’s just something about getting a new and shiny thing to play with. The UI changes in Aurora 2018 are just perfect. It has a modern feel but remains very intuitive. I jumped right in the first time and started editing photos without delay. It just feels so much more streamlined and modern.
OK, I lied - there are 6 reasons to get Aurora HDR 2018 right now. #6 is that the pre-order bundle price is awesome! (See below).
These are just some of the things I am loving about the new Aurora HDR 2018. It's not an exhaustive list of new features. There’s just too much to write about. So, here’s a screenshot from the Macphun site that gives you a bit broader perspective on all the new stuff in this version (click to enlarge):
In short, Aurora HDR 2018 is a total win in my opinion. My photos are looking amazing and I am having more fun creating HDR than ever before. This release has literally rekindled my love of HDR. Ok, time to go edit some more HDR photos. Thanks for stopping by!
Get Your Pre-Order in Before It’s Too Late!
The pre-order period for the new Aurora HDR 2018 goes until September 28, then the special price and all the bonus material you get with it are gone forever!
You can place your pre-order right here on the Macphun site.
You can read more details about it right here on my blog.
Want to see it in action? My introductory overview video is right here.
Thanks again and let me know if you have any questions!


Using Luminar Instead of Silver Efex Pro
Are you using Silver Efex Pro to create monochrome photos, but you're concerned because it will no longer get updates? Consider using Macphun's Luminar to edit your monochrome photos. Click in to see a ton of sample photos and see why it works so well for this!
Yes, you can create absolutely gorgeous monochrome photos in Luminar, even though it is a general purpose photo editor.
In fact, I believe it's a more capable monochrome editor than Silver Efex Pro - plus you get all the other benefits too!
I will be the first to admit that I am a big color guy at heart, thus making me not a black and white guy at heart. However, I do love creating black and white photos, and have ever since I first started using Tonality by Macphun a couple of years ago. Tonality is an incredible product and it literally converted me over to being a fan of monochrome photos…and that was not easy to do. Believe me, I was ADDICTED to big colors (still am, to a certain degree).
Despite my love of Tonality, the shiny new toy from Macphun is Luminar (including the amazing Neptune update that just happened), and you can also create stunning black and white photos in Luminar - and rather easily I might add. I do this quite often nowadays, and it is both quick and easy to do so in Luminar. In fact, I rarely use Tonality any more because Luminar is just so capable. I don’t really need Tonality these days. Luminar excels at this stuff.
The Nik Collection is going away
A few weeks back, I wrote an article about why adopting Macphun is the right thing to do, since there are many users of the Nik Collection from Google still out there and it is basically going to whither and die on the vine - while Macphun is growing and investing in their products.
This article was general in nature, and not directed at a specific product, but rather the bleak outlook for those using the Nik Collection. Although many photographers have used and loved the Nik Collection over the years (including me), it is not going anywhere and Google has essentially come clean on that. It is time to move on. (I made the switch to Macphun almost 2 years ago, and I haven’t looked back.)
My friend challenged me to create stunning monochromes in Luminar
When I shared that article on Facebook, one of my photographer friends said that although he loves Macphun, he challenged me to use Macphun to create stunning monochromes which many photographers still do in Silver Efex Pro (the monochrome product in the Nik Collection by Google). I assume he isn’t convinced that Luminar is capable of delivering as solid a monochrome end result as Silver Efex Pro.
But I am convinced, and his challenge is accepted. :-)
With a built-in filter known as B&W Conversion, it is very quick to get started on a monochrome photo. However, that filter is just the beginning. Because of all the available filters (there are over 40 included in Luminar), you literally have unlimited options at your fingertips in terms of how you want to approach the black and white edit you are about to perform on your shot. Truthfully, you have many more options than you ever had in Silver Efex Pro (and more than you have in Tonality, with a few minor exceptions such as lens blur).
Since Silver Efex Pro (along with the rest of the Nik Collection) is no longer going to get updates or upgrades, you need to find another monochrome editor anyways. Why not try Luminar? It’s an amazing product, has serious capabilities and is customizable depending on your skill level, and besides I have a ton of videos to help you get better at using it. You can download a free trial here if you want to take it for a spin.
Here are a few monochrome ideas that you can easily implement using Luminar, adding various filters as needed (any of these could be accomplished in 2-3 minutes or less, using 1-3 filters):
- Classic black and white look (well-balanced blacks and whites)
- Contrasty black and white (heavy on the blacks)
- Selective color (all black and white except for one color, usually red)
- Color-toned black and white (sepia, cyanotype, etc)
- Grungy black and white (bring up details)
- Soft black and white (remove the details)
- Grainy black and white (add a significant amount of grain to simulate a film look)
- Add a texture (millions of possibilities here)
- The list goes on…
Film profiles are included in Silver Efex Pro...which is likely a popular feature of the product.
Now to be fair, I also dove into Silver Efex Pro to see what makes it so popular for monochrome editing (it had been 2+ years since I last used it, and I didn't remember much about it). I like the product, and I did use it some back in the day. There were two things I found that are not yet available in Luminar - frames/borders and film types. Personally, I would very rarely use a photo frame and rarely see them on most images. I am not sure if that is a popular feature but it's not of real interest to me. However it is in Silver Efex Pro and not in Luminar.
Regarding film types, I can understand the use of that feature. There is a certain charm to a filmy feel. However, as far as I can tell in Silver Efex Pro there are only 3 differentiating factors between the film types it offers: light, contrast, and grain - and those are easily added to a photo in Luminar.
You see, Luminar does not yet have film types (and I have no idea what the roadmap looks like), but I am certain that using the copious amount of powerful filters in Luminar would allow me to easily reproduce any of those looks (many of which are done using the Tone Curve, which is also available as a filter in Luminar). Sure, I completely get the appeal of a 1-click motion for achieving that film look. It’s a time-saver. However, with a little experimentation in Luminar you could create those looks and save them as “film presets”, and then they are a 1-click adjustment. Simple as that. Plus, you have all the other benefits of Luminar, which are many (and some of which are listed below).
Show me some monochrome photos! Prove your point, Jim! ;-)
So to illustrate my point that you can create compelling monochromes in Luminar, I have taken a number of my photos and, using Luminar only, have converted them to monochrome. I have also included the “before” shot so you can see the difference. In some cases during the editing process, I actually edited in full color first before converting to monochrome (and thus the before photo will show that). Sometimes that helps me with my monochrome “vision”. I don’t know why…it’s just something I find myself doing at times.
In my opinion, Luminar is more than capable of holding its own against any other product out there, and not just for converting to monochrome. It’s a full-featured photo editor that stands on its own merits. It’s incredible, and is literally packed with features.
(click any photo to view in a lightbox)
Here are some of the wonderful features in Luminar that make it a compelling product:
- 40+ built-in filters for customizable photo adjustment
- Layers so you can easily stack edits, add textures and more
- Filter masking, allowing you to selectively apply multiple filters on a single layer
- Workspaces, which are collection of filters bundled together so you can quickly access them
- Adaptive interface that you can adjust to your liking and level of skill
- Built in and customizable noise reduction option
- Object removal/eraser function to remove unwanted items from your photo
- Free preset packs included and more on the Macphun website
- Premium preset packs from yours truly ;-)
If you want to get more familiar with Luminar, you may want to check out my Luminar Tips page. It’s a collection of articles that I have written here about Luminar, showing various tips and tricks, and also links to my most-watched Luminar tutorial videos.
See? You can create some beautiful monochromes in Luminar!
What ever happened to my friend that challenged me?
Oh, and do you remember back at the top when I mentioned my friends' concern over whether you can create stunning monochromes with Macphun? Yeah, well he finally had a chance to dig into Luminar and wrote me back a little note:
"Holy Crap! Luminar is fantastic! I'm blown away. So powerful and easy to use. It even does black and white nicely."
Yep, that is an excerpt from a message he sent me. His words, not mine. It just took a little experimentation and he is now a fan. Win.
Why don't you give it a try?
Get my free Monochrome Magic workspace for Luminar!
Many months ago, I created a free workspace for black and white editing in Luminar, and also recorded a video about it. If you want to check that out and download the free workspace, you can read about it right here.
I hope this helps. If you haven’t yet tried converting to monochrome in Luminar, what are you waiting for? It’s fun, easy, and the photos look terrific!
And if you don’t even have Luminar yet…go and download a free trial. You can’t beat a test drive to see how it handles, right?
So what do you think? Do you agree that Luminar is a very capable monochrome editor?
Thanks much and let me know if you have any questions.
Disclosure: I am an affiliate of Macphun and use affiliate links in my Macphun articles. If you click through and purchase one of their products, I receive a small commission which I reinvest in this site. However, your price is the same whether you buy using my links or not, so it's a win-win situation. These small commissions allow me to continue to add additional content, provide free training and more, right here on the blog. Thanks for your support! Please let me know if you have any questions.
One more thing! You can actually SAVE MONEY on Macphun using my coupon code JIMNIX at checkout. Save $10 on Luminar or Aurora HDR using coupon code JIMNIX. Thanks!


21 Tips to Help You Get The Most Out of Luminar
Are you using Luminar, or thinking about it? There is so much you can do with it. Here are 21 tips to help you maximize your use of this amazing photo editing software!
Grow your Luminar expertise with these 21 tips!
As you can probably tell from my blog posts and videos, I love Luminar and use it on all of my images now. It has literally given new life to my photography in many ways, and I can’t get enough of it. As I get deeper and deeper into it, I find more and more things you can do with it. It’s just so powerful, capable and flexible. It’s amazing.
I started thinking about how everyone can maximize their use of Luminar to get the best results in their own photos. How can you get more out of it? What steps can you take to ensure you are learning as much as possible, and growing your own editing skill set with Luminar? How can you get the most out of your usage of this amazing product?
So I started writing down a few tips about how to get the most out of Luminar, and the list just started growing and growing. It turns out there is a lot you can do to maximize your use of Luminar (and of course I didn't think of it all). Some of these tips may be obvious, and some may seem a little out there, but give it a try and see how it works for you. I am certain there is something here for everyone!
If you don’t have Luminar yet, you can download a free trial here or click the banner below.
Ok, let's get busy!
1) Shoot raw
Raw files contain more data, and data is good, especially if you decide you want to make major changes to your photo. A raw file is just better to have around, period. Sure you need more storage, but that’s a small price to pay for peace of mind and future flexibility. Plus, you never know where your mindset will be in the future, so having a raw file is also great insurance. The raw processing engine in Luminar supports lots of cameras, too (I use Sony and it works great).
2) Edit raw or TIFF only
I do most of my Luminar videos using JPG images, and the image quality is just not as good. I frequently see artifacts in those JPG images. However, I do it because it’s a smaller file and that means it’s quicker (which is good for video) - plus it’s just to demonstrate a technique. But for my real, published work, it’s raw or TIFF only, no exceptions. The quality is much better and it shows in the image. I get no pixelation, no artifacts, and no issues.
3) Create custom workspaces
Using workspaces allows you to customize the look, feel and use of Luminar, and that is very powerful. I have made quite a few workspaces, and they are a serious time-saver. Try this out and you will see what I mean. While there are a few built into Luminar, it’s quick and easy to build your own.
Even if you don't build one for a specific style of photo, you could build one called “My Favorite Filters” or something similar, assuming you have a group of filters you use on nearly every photo (which I certainly do). You could build one for "Color Shifts" or "Color Enhance", for example, that contains filters you would use for that (Color Balance, Color Temp, Cross Processing, Golden Hour, Saturation/Vibrance, etc). The options are limitless, really. But taking advantage of this innovation in Luminar is a time-saver and also ensures you are using the filters you intended to use on a photo (and not forgetting stuff).
4) Try out some presets, with intent
Although this sounds like a shameless plug (since I create and sell presets, right here), I am not asking you to buy my presets (and to those of you who have, thank you very much!). You can get some off the Macphun website (on their site, scroll to the bottom and look at the footer menu under "Extras", click on "Luminar Presets") or elsewhere, or use the ones that come built into Luminar (or get my Magic Hour pack for free - it is 8 presets designed for the magic hours of photography, such as sunset, golden hour and blue hour). I think using Presets is a quick and cost-effective (or free!) way to learn more about using many of the filters and helping you determine what you want your photos to look like.
Apply a preset, but then go look at the filters that make it up and see how they impact the photo by clicking each filter on and then off. Pay close attention to what happens to the photo when you do this. Read the filter description, or find a video that details it on the Macphun site. Read the Macphun user manual which is on the Macphun site (click on "Luminar", then scroll about halfway down the page and click on "User Guide"). This guide provides some detail about each filter.
5) Now customize the presets a little
This is the next step after you apply a standard preset to your image. Get into the filters and move them around a little bit. See what that does to your image. Try another preset and do it again. The more you experiment with presets (and thus, the filters that comprise them), the more quickly you will master this stuff. It’s really not hard, it just takes a little time.
6) Blindly recreate a preset
Now, without looking, see if you can recreate a particular look of a preset without writing down or otherwise memorizing the filters that were included. This isn’t a graded test obviously, but rather another big step to take in your education. Can you replicate something that you like without using a preset? Do you know the filters well enough to do so? You’ll be surprised at how quickly you start to get a handle on this stuff. It just takes practice and experimentation, which is pretty fun anyways, right?!
7) Build your own presets
Ah yes, this is the final step in the presets section of Luminar. Make your own stuff, from the ground up. Build something cool. You can keep it to yourself or share it with your friends. It doesn’t matter, just make something that is all yours. I make presets all the time. Some of them make it into my preset packs, and some make it into the trash can - but either way, it's a great exercise. Having made quite a few presets myself, I can tell you there is a real joy in creating this stuff and seeing it function across multiple images. It’s like you have been given a key to unlocking a door to creativity. Walk through that door!
8) Try out filters that you don’t understand
This is a huge thing to do, because it involves setting fear and confusion aside and just going for it. But it’s quite fun and you will certainly learn something along the way. There are a LOT of filters built into Luminar, and you have to experiment a bit to really get your arms around some of them. I think the Curves Filter probably comes to mind for many. It can be a bit intimidating, but really it’s pretty simple and it’s incredibly powerful. But if you don’t try it, you will never know, will you? ;-)
And if the Curves Filter is the bane of your existence, maybe this video will help:
9) Get familiar with layers
One of the most powerful features of Luminar is Layers. This is a HUGE advantage that is built into Luminar, and once you get your arms around it, it really is pretty simple. Being able to add a new layer gives you incredible flexibility in your processing, and opens up a lot of new creative edits, such as adding a texture or even replacing a sky. While this may sound intimidating, it’s rather easy and of course there are some videos you can watch that demonstrate how to use layers.
Here is an example video showing how I replace a sky in a photo:
10) Get familiar with layer masking
Once you have gotten used to adding layers, start to experiment with layer masking. This is a simple trick that allows you to just brush in part of the new layer on top of your photo. For example, you can add a preset on top of your photo on a new layer, but just use it in the sky by using layer masking. Super powerful and not hard to do at all.
11) Stack filters, presets and more
This goes along with the layers we just talked about. You can make some filter edits on your base photo, then add a new layer and apply a preset. Then, experiment with adding another layer with another preset on it, or just a few filters. You can stack many layers to get creative in Luminar and achieve the look you are going for.
For me, the key here is to manage the opacity of each layer (and that’s another advantage of Layers in Luminar). At the default 100% opacity, any edits on a new layer may appear to be too much, but you can easily slide the opacity lower and end up with something of beauty. Or take advantage of layer masking to brush in the edits on that layer selectively.
12) Use filter masks
Filter masking is one of those really cool little features of Luminar that make you wonder how you ever got by without it. Basically, you can just mask in a filter to a portion of a photo (like using a layer mask), but without adding a new layer. And you can do it with multiple filters all on the same layer. It’s quick and easy and so effective. Literally I use this on just about every photo. There is always something that looks great in one part of a photo, but not so great in another. Just mask that filter in selectively and move along. It's quick and painless and this innovation of Luminar is probably one of my most-used.
13) Do some black and white
I will admit that I am a big color guy at heart, but as my style and tastes have evolved I have grown to really love monochrome images. While I used to spend my time doing this in Tonality, I now do it in Luminar and get great results. Monochrome photography is a great way to focus on the composition and lines in a photo, instead of getting distracted by big, bold colors (which I admit, happens to me a lot - I love big color). It’s like a purified version of photography, and Luminar makes it easy. Literally just a few clicks and a few slider adjustments, and you have a winner!
I even put together a custom workspace for monochromes, entitled Monochrome Magic, that you can get here. As you can see in the screenshot below, even a stunning, colorful sunset can look beautiful in black and white.
I also did a video a while back showing how I edit monochromes in Luminar, if you want to take a look:
14) Use the gradient and radial masks
These two masks are very useful and getting accustomed to using them will really help your editing. I generally use them when I am doing something a little unique - adding a new sky (see that earlier video about sky replacement), converting day to night (yes, you can do that in Luminar, too - see video below), adding a sunflare or adding some light, for example. But they can be used in a lot of different ways and give you some amazing flexibility for getting creative.
Here's the video showing how I change day to night, using both gradient and radial masks:
15) Experiment with blend modes
I will admit that using blend modes is not something I do a lot of, but whenever I do, I get unexpected results - and I mean that in a good way. Any outcome I get with them is completely unpredictable, and sometimes that causes me to change how I am editing and thinking about a photo. It’s a good way to have your brain get forced to think differently, and I believe that is a positive when it comes to creative endeavors such as these. Otherwise, we tend to be creatures of habit, which isn't exactly the goal in artistic pursuits, right?
16) Watch some videos
Yes, this sounds like a shameless plug, though it’s not intended that way. I do have a LOT of Luminar videos available on YouTube, and of course there are a bunch on the Macphun site, too. But even if you don’t watch mine, watch someone’s videos. More and more content is coming online about Luminar as it continues to grow, and you can always learn something from somebody (and I believe video is the best way to do this sort of instruction).

Look at all this stuff - check it out and let me know if it helps!
17) Join the Macphun FB group
I never really expected to find myself saying "Hey, go join a Facebook group!", but I will admit that this one is really good. Any of you reading this that are already in the Macphun Facebook Group can likely attest to how helpful it is to be a member of. In addition to seeing great shots from Luminar users around the world, you can solicit and receive constructive feedback, get inspiration from others and make like-minded virtual friends from around the world. It’s truly a great group and one of the things that keeps me looking at Facebook every day. I really enjoy it, and that's not something I say about most things on Facebook these days! ;-)
There is also a new Community Forum that Macphun/Skylum created wherein you can read about support topics, chime in and just keep up to date on the apps and general support-related questions. You can find that site right here.
18) Think about your desired outcome
Call this pre-visualization, and get into your "art brain". Think about what you want your shot to look like, assuming you are getting into creative edits. Don’t just go on auto-pilot but think ahead. Get creative and think outside the box. Maybe come up with a different and unique look in your mind, and then go figure out how to get it done. Luminar has a TON of power, and all it takes is to get in there and experiment. Pretty much the only limitation is our own imagination.
19) Try to replicate a look you have seen in another photographer’s work
I have tried this many times over the years, and it’s always a good exercise. Find a photo from someone else that you like, and then see if you can edit a similarly-composed (or similar subject) photo of yours to achieve a similar final result. No, you don’t want to just carbon copy someone else’s style, but as a learning exercise it is great to try and sleuth out how someone did something, and of course you will learn in the process (which is really the point). Of course you have no idea what their starting point looks like, but since you know the endpoint you can take something of a similar subject of your own and aim it in that direction. Regardless of the outcome, this is about experimentation and learning the tools.
20) Process the same photo multiple ways
This one really gets the brain in gear, and fast. Take one of your shots that you have already edited, and then go edit it in a completely different manner. Then do it again and again. I have done this many times, and it really does cause the brain to stretch as you are reaching for new and creative ideas. There’s something about taking the same photo and making various looks with it that really works for me. Try for 5 totally different looks if you can. It’s fun.
I wrote an article about this idea using Aurora HDR a while ago, which you can get to by clicking on the photo below. Yes, that was Aurora HDR and not Luminar, but the idea of it is the same. It caused me to get creative and learn the tools, and that is always a good thing for an artist to do.

21) Take a lot of different types of photos
While this is also a good exercise for getting better at taking photos, I also believe it helps you get better at editing. For example, if you always take photos of the same subjects, then it’s likely you fall into the habit of editing them in a similar way…which means you are not exploring all the power and versatility of Luminar. But if you take photos of a lot of different subjects, you sort of force yourself to change up how you edit things, and this will get you using a lot of different tools in Luminar. Basically, I am trying to encourage you to experiment, which is how I learn new stuff (and I am assuming the same goes for you).
If you take cityscapes, try some portraits. If you take landscapes, try some macro. If you shoot portraits, get outside and shoot a landscape. If you shoot florals, go shoot architecture. You get the idea. Expand beyond your comfort zone, which in addition to helping you better understand the editing power of Luminar, will also help you better learn your camera. It's really a great exercise. Plus, it means you get to go photograph something, and isn't that always fun?
Well that’s it my friends - 21 tips for getting the most out of Luminar. Did any of this help? What did I miss?
Luminar truly is an incredible product and taking the time to learn how to use many of the powerful tools that it contains will help you grow your post-processing skill set. You will find yourself coming up with new and creative ideas, and then finding a way to implement them on your images.
If you have any questions, please leave a comment below, or use the Contact Form to send me a message. I always do my best to assist, though of course I don't know everything. I'm always trying to learn, too. That's part of what makes this creative, photographic life so interesting. There is always something new to investigate.
Thanks for stopping by today!

5 Amazing Filters in Luminar (that don’t exist in Lightroom)
Have you heard about Luminar, but haven't jumped in yet? Are you Luminar-curious? What are you waiting for?! Luminar offers SO much, including these 5 amazing filters that you cannot get in Lightroom. Check it out!
I spend WAY more time in Luminar than I do in Lightroom, and it's partly due to the collection of built-in filters. They are just fabulous and quite capable. If you are using Lightroom but are Luminar-curious, this is for you!
When I first got my hands on Luminar, I liked it. I found it to be intuitive and easy to use, while also being powerful - and that my friends is an incredible combination. However, it wasn’t until I really started spending a lot of time in Luminar that I realized that it is actually way more powerful, flexible and adaptable than Lightroom.
Luminar blows Lightroom away in terms of the breadth of filters that are built into it and in terms of ease of use - it’s not even close. Luminar is just much easier to get started with. I spent years using Aperture, and when I moved over to Lightroom a few years back I had to buy an online course to learn how to use it. Moving into Lightroom is like learning to speak another language. I had very little idea what to do with it or how to get started. It’s just not very intuitive.
But you simply don’t have that with Luminar. The tools and filters are easy to understand and they simply work (and if you need help, check out my YouTube channel). Now that I have been deep into Luminar for several months, I don’t even use Lightroom other than to manage my library/catalog (and that feature is rumored to be coming to Luminar at some point).
I’m not saying that Lightroom is a bad product - in fact, I have grown to like it over the last few years of using it - but Adobe does not seem to innovate at the same pace as Macphun, and that is a little concerning to me. I rode the Aperture ship nearly to the point of drowning, so when I see a product that doesn't appear to be getting a lot of incremental new stuff, I get a little worried. Now I don't think that Adobe is ignoring LR in any way - and they certainly aren't abandoning it - but it's definitely not advancing at the same pace. And personally, I want my software to continue to push forward.
In other words, I am very glad that I am using Luminar, and despite all the amazing features that are packed into Luminar, we are technically still only on version 1! Can you imagine how much more awesome it will be in 1 year or 2 years? Literally, the sky is the limit. (And in case you were curious, Macphun has already released two updates with new features added each time, and Luminar only launched back near the end of last year, a few months ago. It's been great.)
Now that I use Luminar exclusively for my editing instead of Lightroom (except for HDR, for which I still use Aurora HDR, though sometimes I bring the base HDR into Luminar to edit), I was examining my workflow and the filters that I like to use, and realized why I love Luminar so much - there are simply some amazing filters in it that don’t exist in Lightroom. This gives me the ability to create custom looks and grow my vision for my shots. It's incredible.
So for any of you out there that are on the fence about Luminar, this is for you. If you are serious about editing your photos, Luminar is way more capable than Lightroom - period.
While there are plenty of filters in Luminar that don’t exist in Lightroom (at least a dozen or so), below is a selection of them that I find myself using a lot, with before and after examples (or videos) to help illustrate their capability.
Now to be fair, some of these things can be accomplished in Lightroom in other ways, but not nearly as easily. That’s part of the beauty of Luminar - you don’t have to learn complicated ways to do things. Just use a slider and get it done. Easy.
Before any Lightroom-lovers take offense, I am not trying to bash the product. I have Lightroom and I generally like it. It's a good product. And yes, it has some features that are not in Luminar yet, such as a catalog/library. That's a fair point. My point here is that Luminar is rapidly encroaching on it and exceeding it in several areas. You don't have to abandon LR anyway - just test out using Luminar as a plug-in for editing some of your images. I trust you will be impressed with it!
By the way, there is a HOT DEAL on Luminar going on right now, up until Feb 19th. Click here for details. Get Luminar plus some great bonuses, and save money in the process. It's a win!
Ok, are you curious yet? Great. Let's get started!
1) Color Balance
I use Color Balance a LOT. I put it into some of my presets, and when I don’t use a preset on a photo, I will bring Color Balance into the mix in some way or another. It’s an incredible tool that can significantly change the look of your photos. The best part is that it is very simple to use. You select Shadows, Midtones or Highlights and then move sliders to get the colors aligned to your liking.
I use this filter on a lot of sunset and blue hour photos, because it helps me accentuate the color tones that are already present in the scene without over-saturating the photo. However I also use it on a lot of cityscape photos, which allows me to better control the color in the final look of the photo, or to significantly change the color tones if I am so inclined. It's very flexible. You never know what you will get, so I invite you to experiment with this filter and see what results from it.
Here’s a video about the Color Balance Filter if you would like to see it in action:
2) Cross Processing

10 different options for cross-processing
Cross processing is a digital representation of an old film trick where people would deliberately develop film in chemicals intended for a different type of film. Basically, they would use the wrong chemicals and come up with some very different looks. It's interesting stuff.
In Luminar, this is just a fun filter for experimenting with different looks. You have 10 different options at your fingertips, all named after a city somewhere. Each has a particular color look to it, and then you move the slider to increase the intensity of the effect. You may use one to pump up a sunset shot, and you might use another to get sort of a vintage look. It’s quite fun and worth experimenting with. It's another one of those "you never know until you try it" scenarios.
Technically, there are 3 “cross process” presets built into Lightroom, although they are buried in the left-hand menu under Presets and then Lightroom Color Presets. Not only are they hard to find, but they are fairly useless to me (and there are only 3 of them), plus there is not a way to easily adjust the intensity of each effect. Luminar makes it much easier by making this a filter with a slider. Choose one of 10 effects, and drag the slider to increase or decrease the amount. Easy.
As you can see in the below example screenshot, I have used “Seattle" which gives it a nice twilight sort of feel. I like to use this setting on a lot of my sunset and blue hour photos as it seems to complement them quite well. (And note that this is the ONLY filter used on the photo below, since it is just for example purposes. In reality I would use more filters on this photo.)
In this example, I took a lovely sunset photo (previously edited) and applied the "London" Cross Processing option to give it a golden hour sort of treatment. Just experiment with this filter and have fun - there are a lot of things you can do with it!
3) Orton Effect
Oh, the Orion Effect - you either love it or you hate it. Personally, I love it and find that sometimes it is the perfect complement to a photo. It adds a bit of contrast and some soft focus, all wrapped up in a dreamy overlay sort of thing. I don’t know how to describe it, really. Just try it for yourself. I think it looks great on landscape photos when you are looking for that little something extra, or to add a little interest to a gritty cityscape. So fun.
The below screenshot is a good example of what the Orton Effect will do to a photo. The base photo is a 3 exposure HDR that was merged in Aurora HDR 2017 but no further edits were made to it. It is highly detailed and “crisp” in the Before photo, but as you can plainly see the addition of the Orton Effect gives it a little more interest and moodiness, while softening it up a bit.
Additionally, there are two options for this effect: Type 1 and Type 2. I generally use Type 1 as I just prefer that look. You can also see other sliders below it that give you more flexibility to customize the impact of the filter on your photo. You can further adjust Softness, Brightness, Contrast and Saturation. Lots of power to customize your look.
4) Top and Bottom Lighting
Top and Bottom Lighting, which I like to just call TBL, is so handy. It’s perfect for all sorts of photos, though I generally use it on landscapes and cityscapes because a single exposure rarely has the perfect light distribution. It seems there is always a section of my shot that needs to be brightened a little, and that’s where TBL comes in. With the ability to shift and rotate you can use this tool for all sorts of lighting adjustments in your shots. It works well as a polarizing filter for a sky, to brighten a foreground and more (conversely, you could darken with it).
Using it in the example below basically saves the shot. With that dark of a foreground, you lose basically half the photo so being able to bring it back is a huge win. Again, this is the only filter in the example below, which is not how I would actually edit the photo for display (see example video below for more on how I handled this photo).
In Lightroom, this would need to be done with a combination of gradient masks and exposure settings, but in Luminar it’s a standard filter with simple sliders (though you can also use the gradient mask and exposure filter if you want to). I believe that Luminar’s approach is much easier to understand as well as to implement for most users.
Here's a video showing how I edited this photo in real life, and it illustrates the use of Top & Bottom Lighting, along with a bunch of other filters in Luminar:
5) Golden Hour
This filter is perfect for golden hour or any sunrise/sunset sort of photo when you want to accentuate the golden tones in the scene. It can also be used to change the mood in a photo by giving it a golden tint (see screenshot below as an example of this idea). It really amps up those lovely warmer tones and gives your photo a nice pop of color too. I love to use it on photos taken on the edges of the day in beautiful light. It’s quite easy to use too, since it’s just two sliders: one for amount and the other for saturation. Simple and effective!
In the example below, I took a previously edited photo which was darker and moodier, and applied the filter to give it a completely different look, more of a colorful sunrise version.
This video shows it in action along with some of the other filters that were recently added to Luminar.
So that's it - any questions?
I hope this has been helpful and possibly eye-opening for you. Luminar is a full-featured photo editor and in my opinion it is the best there is - and believe me, I have tried just about everything. Despite all the power under the hood in Luminar, it is still quite intuitive, easy to use and the interface is a dream to work with (and thanks to their innovative Workspaces in Luminar - which I haven't even talked about here - you can customize the appearance and use of Luminar to fit your workflow). Tools are placed in logical spots and you won’t spend a long time trying to figure things out. You will be up and running with it as your primary photo editor in no time at all.
Powerful + intuitive + easy to use: what's not to like about that?
Interested in reading more about Luminar? Click here to see my full review and tutorial. It covers a LOT of ground!
Follow me on YouTube for Luminar tips and tricks!
Should you need to see more examples of Luminar in action, I recommend taking a look at my YouTube channel, where I have over 50 videos now, primarily focused on Luminar and Aurora HDR, both from Macphun. I keep adding new tips & tricks videos, as well as workflow examples, every week. I love doing this stuff, and it's free for you. Win. The below screenshot gives you an idea about what I cover in my videos. Answer: lots of stuff!
Follow me here: https://www.youtube.com/user/jimnix17

Three more things before you go!
- If you are interested in trying Luminar for free, you can download a trial copy on their website. It’s a great way to test things out before you commit to buying it.
- If you decide to buy it, use the coupon code JIMNIX at checkout to save $10 on the purchase.
- I briefly mentioned my preset packs above. Thus far I have released a pair of awesome preset packs for Luminar, which you can find on my Presets Page right here. Both are very reasonably priced and are packed with a lot of options. They are an easy add to Luminar if you like to experiment with a lot of different looks. I also have a free pack available there, and I am close to releasing a NEW PRESET PACK which I will share soon-ish. Thanks!
Thanks for stopping by and let me know if you have any questions!
Full Disclosure: I am an affiliate of Macphun, and if you buy through my links I receive a small commission which I reinvest in the growth of this site. However your price is the same whether you buy through my links or not. You are doing me a small favor - which I greatly appreciate! - and that allows me to continue bringing you great content week after week. Note that Macphun did not ask me to write this, and did not compensate me for writing this, either. In other words, this is not a sponsored post. This is my blog and I wrote it because I believe it to be true, and I use Luminar for 99% of my photo editing because I absolutely love the product. Please let me know if you have any questions about this.
Thanks very much for your support!
Lightroom Users: Don't Make This Costly Mistake
If you use Lightroom, you may want to read this and possibly save yourself some serious problems. I made a big mistake that you can learn from!
Learn from my stupid mistake and save yourself some serious heartache (and potentially a lot of rework)!
I have been using Lightroom for several years, and although I do all my editing in Luminar these days, I still maintain my library in LR. It’s where I keep, manage and organize all of my photos, and thus it’s very important to me.
I have long had all my photos on an external drive (or rather, a collection of them) and continue to make sure that I have multiple copies of all my photos in case of some issue. This process has never let me down because of the inherent redundancy in it.

I love this new MacBook Pro!
However, I had a major issue with my MacBook Pro recently and learned a hard lesson about backups in Lightroom. My video card basically just died, which means not only can I not see the screen anymore, but it also won’t power an external monitor. So although the laptop powers on (I can hear the hard drive etc), it’s essentially an electronic paperweight now. It's a 5 year old device though, so it was just a matter of time before something happened to it.
So I picked up a new MacBook Pro - which is pretty awesome, by the way - and set about downloading all my Macphun apps and other stuff to get it ready for primetime.
Shortly after that, I realized I had a big issue on my hands…
You see, it’s one thing to have a copy of all your photo files stored elsewhere. Everyone does that. They are your photos, so you are actively thinking about preserving them. But there’s another component to backing up your Lightroom library, and that is the Lightroom Catalog file.
The LR Catalog file is basically the set of instructions that tells LR what you did to a photo. In other words, all your edits, keywords, ratings etc are stored in the catalog file. If you don’t have the catalog file, then Lightroom has no idea what you did to your photos.
I was aware of this and have been making copies of my catalog file too and storing those on an external drive, but apparently I got a little lax in that process and the last one that I have is from October 2016. When my MBP crashed, I felt secure knowing I had all my files on several external drives. When I got my new MBP and downloaded LR, I then copied over the LR catalog file and it hit me. This file was 3 months old - crap!
Thankfully, I was traveling a lot in November and December, so the extent of changes made in Lightroom were pretty minimal during that time (I don't tend to edit a whole lot while traveling). While on the road, I copied images to my MBP and edited straight in Luminar from there. After each edit, I would save a TIFF file as well as a full size JPG. So during that time I was making changes OUTSIDE of Lightroom, and then when I returned home I imported them all back into Lightroom. So although my image edits were not saved in the Lightroom Catalog file, I had the final result saved in a TIFF. Close enough to the same thing for me.
Luckily, I dodged a bullet this time!
So basically I made a huge error but luckily it didn’t cost me much other than the time spent re-importing all my photos taken in Nov/Dec into Lightroom (again) and essentially creating a new and updated LR Catalog file - which will get backed up much more often going forward, to be clear!
If I had not ever made a backup of that LR Catalog file, I would have all my photos but none of the edits. That would be disastrous, basically. Anytime someone wanted a photo, I would have to go and re-edit it and hope I came up with the same look. I have had to do that before, and trust me when I tell you that it’s nearly impossible. How can you remember what you did to a photo from 5 years ago, for example? I already forgot what I had for breakfast this morning.
Hopefully this is a good warning and will save you from having the same problems that I just had to go through. Don’t let my foolishness cost you. Always back up your LR Catalog file!
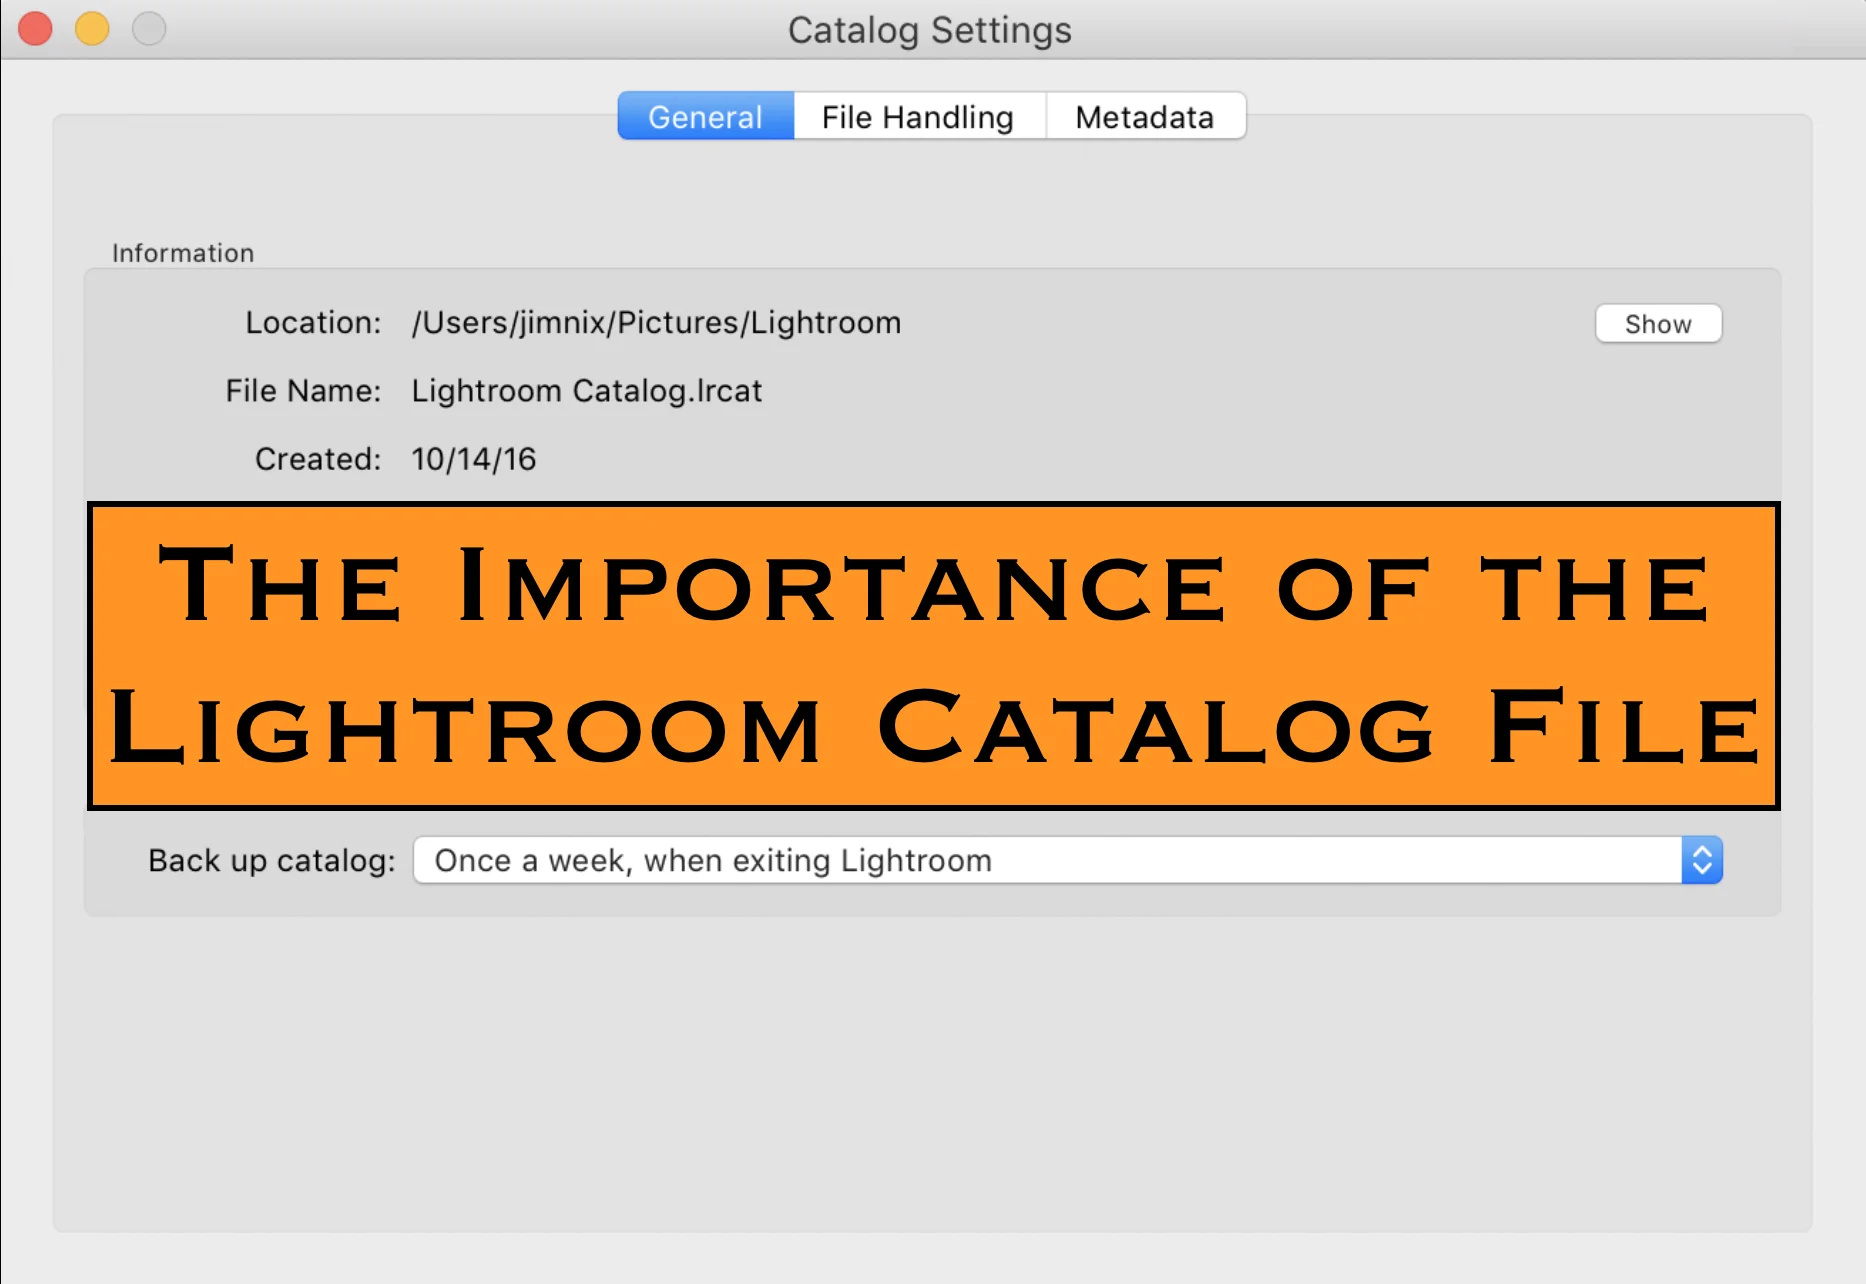
If you need to find your Lightroom Catalog file, just click on Lightroom > Catalog Settings and you will see something like this:

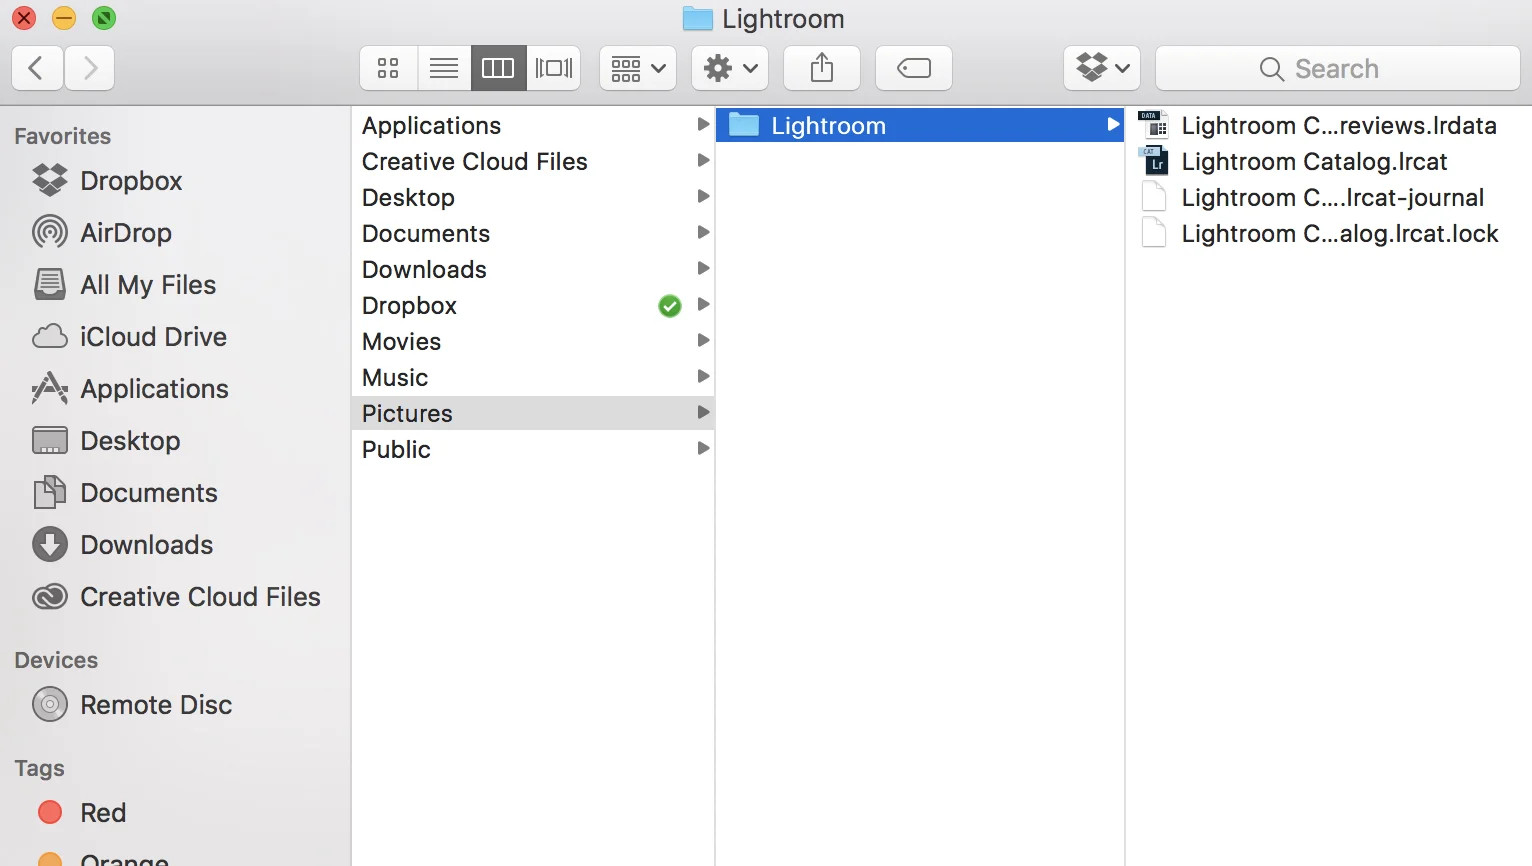
If you click on Show, you will get a box like the below one and you will see the file there.
MAKE A COPY OF THAT FILE AND KEEP IT SOMEWHERE OTHER THAN YOUR LAPTOP! You'll be glad you did! ;-)

25 Tips to Jumpstart Your Photography in 2017
Here are 25 tips designed to help you get the most out of your travel photography in 2017. Go forth and create my friends!
Make 2017 Your Best Photographic Year Yet!
With the New Year upon us, many of us have told ourselves that we are going to improve our photography. I know that I have done so. Have you? There is always something to learn, whether it’s how to use a particular camera setting, or some new-fangled trick in the digital darkroom. This photography thing is a never-ending quest for knowledge.
I love the start of a new year. It’s a symbolic reboot and it makes me think about everything I want to do in the next 12 months. While I already wrote about that a bit, I didn’t go into too much detail…partly because some of this is fluid and partly because it’s impossible to predict. But I did mention writing some longer form articles, and this is the first in that category for 2017.
Perhaps you got a new camera for Christmas, or perhaps your dream of visiting some far away destination is coming true in 2017. Either way, your desire to capture great travel photos is probably high on your list. It’s definitely atop mine. Who doesn’t want to take great shots? Whether they are for you and your family or for a wider audience, we are all driven by the desire to capture the stunning beauty we encounter while we travel.
I gave some thought to how I prepare for a trip and have put together this list of tips which will hopefully get you all set and ready to go capture some of the awesomeness that is waiting for you out there.
These tips are based on my own experiences traveling around the world over the past 5+ years. While it is not exhaustive - and being inspired by my own travels, it’s a very personal approach to things - this should help you stay the course and come home with images you are proud of. Worst case, maybe it gives you a couple of ideas.
Take a read, feel free to disagree or offer suggestions, and go forth and capture. Have a great year in photography, my friends. There is so much beauty that awaits us. We just have to get out the door and start shooting.
I broke this list of tips down into 4 categories and they are in a specific order: Plan, Arrive, Shoot, Process. This is the way I look at things and how I approach my own photography. Any photo trip, near or far, is an opportunity for capturing those fleeting moments of magic, and it always serves us well if we have a bit of a plan. So, that’s where we start…
Plan
- Research the area in advance: Check out Flickr, Google Images or whatever your preference is and make sure you know WHAT you want to shoot and WHERE it is. There is nothing worse than being somewhere and being unable to locate a particular spot.
- Prioritize your spots and top alternates: After compiling all your targets into a list, prioritize them. You never know how much time you will really have to shoot in the best conditions, and of course you want to get the most important stuff done.
- Do the math (count the # of sunsets and sunrises): Most of us like to shoot the big stuff at the edges of the day, so count how many of those you will have and compare it to the number of sites and their location/orientation to the sun, and make a plan.
- Edit your list ruthlessly and focus on the ones you consider most important: This is another version of #2 above (pick your spots and top alternates), but based on the fact that you now know exactly how many sunrise/sunsets you will have to capture them.
- Plan your route: This is obvious, but there is nothing worse than shooting something, moving on and then realizing later that you missed something that was close by. I use Google Maps and often print out a hard copy if I am not familiar with the city. It really helps.
- Have a backup plan: Sometimes weather or other factors screw up everything. Make a contingency plan. If it’s raining, is there a great museum you can shoot in? If it's too bright and sunny, can you shoot macros or architectural details? Just be creative and exhaust every alternative.
- Get up early: I find sunrise is the best time for shooting famous landmarks in big cities, because all the tourists are still in bed. Literally, this works every single time. Never fails.
Arrive
- Slow down: I often arrive somewhere after hurriedly walking there to get into position, which means I am short of breath. Take a moment and breathe, calm down, and get into the moment. You don’t want to be twitchy with a camera in hand.
- Look around and get familiar: Resist the urge to start shooting the very second you get somewhere. Take a moment, take in the scene, and plan your shots.
- Focus on your composition: Don’t just hurry to get something captured. Think about what you are doing and not just how excited you are to be seeing it. I know, it’s hard. I'm as twitchy as they come, believe me.
- Check all of your settings: Is your ISO still on 2000 from something you shot last night? Make sure you don’t take a bunch of shots with the wrong settings.
- Shoot RAW: This gives you more leverage for editing later. You literally NEVER know what you might want to do with a photo a few years down the line. I frequently go back to old photos and try stuff with them in newer tools. Having raw files makes this a much better experience.
Shoot
- Use a tripod: Sure you can get clean shots handheld, but better safe than sorry, right?
- Use a cable release or remote release: This only works if you are on a tripod of course, but it further ensures you aren’t shaking the camera when you depress the shutter button.
- Start shooting. See how long it took to get to this step? ;-)
- Change things around and shoot it again: Now experiment a bit with your f/stop, composition, and more. Mix it up a little. I often capture better stuff after getting the shot I planned to get.
- Consider your orientation - Now shoot it in portrait orientation instead of in landscape. You will be surprised how this minor change can have a big impact on your shots.
- Experiment with the # of photos in your brackets: If you are firing brackets for HDR, don’t assume that your basic 3 exposures capture the full range of light. Perhaps you need to move up to 5 or 7, depending on the scene.
- Don’t always center your brackets: I rarely shoot -2, 0, +2. Generally I start a little darker, something like -3, -1, +1 or even -4, -2,0. I find that the +2 exposure when brackets are centered is just too bright and thus pretty useless.
- Try some filters for long exposures: If you haven’t tried a 10 stop filter, you are missing out on a truly joyful experience.
- Take a lot of photos: They say your first 10,000 photos are your worst, although with digital it’s more like your first 100,000. Practice, practice, practice.
Process
- Experiment with different techniques (process an image two or three times): I often take a single image and process it 2 or 3 different ways. It gives me more experience with editing, which is good, but also I often come up with things I hadn’t thought of initially that I actually like.
- Try it in black and white: I have been a “big color” sort of photographer forever, but over the last year or so I have really started getting into monochromes, and they are just beautiful.
- Share and engage: Share your photos with your friends, or family, or online. Ask for feedback and constructive criticism. Don’t take anything personally. Just enjoy the art of photography and the joy it brings you and others.
- Make yourself happy first: Isn’t this what it’s all about? Be sure you are enjoying the entire process, because this should be fun. Do whatever you want to do with your art, because that's your prerogative. Find your own vision and express it.
Well friends, I hope this helps you make the most of your travel photography this year. In many ways this is a reminder to myself, as I am as guilty as anyone about many of these tips. I screw up a lot but usually figure it out before it’s too late! Usually. ;-)
In all seriousness, I wish you a productive and creative 2017. Challenge yourself, learn some new things, go somewhere you haven’t been yet, experiment and screw up, and try again. Take a shit-ton of photos. This is art and should be fun, challenging, educational and eye-opening. Go forth and create my friends. There’s a kind of magic that happens when you do.

Thank You, 2016
2016 was a great year for my photography, and for that I am very thankful. Here's why.

A lot of comments you see online about 2016 generally are of the “good riddance” variety. I get that, and clearly we did lose a lot of very talented people in the public eye. But since you didn’t come here to read about that stuff - and I am not one to write about it, anyways - I wanted to share my thoughts on why I am thankful for 2016.
Being a perpetual optimist, I always look on the bright side. I am going to focus on the positive stuff that has happened for me this year, because honestly there has been quite a bit of it. 2016 has been an incredible year for me as a photographer, and for that I am very thankful.
Here are a few highlights:
- I licensed quite a few images for commercial usage, which is always rewarding to me. I love when a corporation decides my photo is what they want to use in representing their organization publicly - coming from barely knowing a camera a few years ago, this is something I never imagined.
- My blog views are up by 48%. That’s huge! In this world of social media, it is actually rather difficult to create things that cause people to leave those “walled gardens” of social media (Facebook, Instagram, etc) and go read something on a blog. I continue to work hard to create things of value here.
- I created a YouTube channel and started sharing my tips and tricks and this has reinvigorated my creative thinking in many ways. I discovered that I absolutely love teaching these things.
- …and the big one - I re-engaged with Macphun and created a significant amount of content both for their website and for my own (and for my YouTube). This one is definitely the highlight of 2016 for me. It’s honestly changed my trajectory, so to speak.
- We traveled a fair amount as a family, which is always great. After spending 6 weeks in Italy, we also were able to squeeze in a 3 week trip to France (Paris, Strasbourg) that included a 4 day stop in NYC on the way home. Most of this travel was squeezed into the last half of the year.
You see, when 2016 began, I was using Lightroom and Photomatix, as well as the Google Nik Collection to edit the majority of my photos - pretty much what everyone else seemed to be doing. Of course there was nothing wrong with using those tools, but they weren’t going anywhere interesting, so to speak (well, LR has continued to innovate, so I will give Adobe points for that). But Photomatix has been the same for several years, and the Nik Collection (I primarily used only Color Efex Pro) hadn’t seen an update in a couple of years either.
Being an old Aperture guy, I get nervous when a product goes for a couple of years without any updates. That never bodes well, especially in software. Software is a market built on the very idea of innovation. Innovate or die, they say…and those products were not innovating at all.
Then one day I got an email from Macphun (thanks Mark!) asking me if I was interested in being an affiliate in their program (I had been one years ago, but never did much with it, and they changed programs and I got lost in the shuffle). Being asked to be an affiliate is not uncommon, being a fairly consistent photo blogger over the last 7+ years. Usually I turn these things down because I prefer to only promote things I really love (and not everything in the universe), but this one caught my attention. They had just released Aurora HDR a few months prior, and being an HDR guy (and having the good fortune to know Trey from his time in Austin), I knew the product had to be worth exploring. And let’s face it, Photomatix wasn’t doing anything.
So I bit, and boy was that ever a good choice on my part!
Aurora HDR blew me away from the first time I opened it. Literally, I have never opened Photomatix again. It just had so much in the product that not only did I not need Photomatix anymore, but I didn’t need Color Efex Pro either! (Which by the way, was a great thing since Google then announced it would be free, which is code for “we aren’t ever going to update this thing again”.)
So I started experimenting with it and came up with some fun things you could do in Aurora, and that’s how I started recording videos. I always wanted to create some sort of educational content, but never felt like I had anything of value to add. At times I thought I would look dumb and my content would be redundant or useless. I literally was afraid to start sharing these things.
But I got over those fears and just started doing what I wanted to do. My initial videos are a little tentative, so to speak - I was trying to find my voice and get comfortable with it. Thankfully, many of you took notice and it seemed to be helpful, so I did more. Macphun took notice too, and asked me to help create videos for the new Aurora 2017 and then for Luminar as well. I’m blessed, people. This was never in the plan for 2016, and that’s why I am thankful. So thankful.
And now I am creating presets for Aurora HDR and Luminar, with more coming in 2017. And on top of that I have other things planned for the new year, too. I feel like I am just getting started.
I will come back later with a post outlining some things I want to do in 2017 (and I will be asking for your input and feedback), but I just wanted to take a moment here and say THANK YOU to everyone that has come by this year. I truly appreciate the visits, likes, comments and interaction.
Enjoy the rest of your holiday season and thank you once again. Onward to 2017!

Five Filters I Love in Luminar
There are a TON of great filters in Luminar, and I definitely have my favorites. Today I list 5 that I love that you might have overlooked. Try these out on your images and see how it works for you!
Hello Luminar users! I hope you are having as much fun with Luminar as I am having. Isn’t it great? I am literally spending a HUGE chunk of my time editing photos in Luminar - it’s just so good that I don’t need to use Lightroom (of course, I still create HDR photos in Aurora, and that won’t change).
Now that the product is widely available, I thought it would be fun to write up something about some of my favorite filters in Luminar. There are currently 38 filters, and believe me when I tell you that I have been through ALL of them, in depth. You see, I created all the training videos for Macphun for the launch of Luminar (which was an awesome project to work on).
You can find them all here: https://macphun.com/luminar/video-tutorials
Like anyone, I have some favorites among the list. There are some obvious filters that may be your faves too, such as Clarity, Structure, Color Temperature, Saturation/Vibrance and Top & Bottom Lighting. I use those all the time, so I thought I would list some others that I love that maybe you have overlooked thus far. Maybe you are still figuring out your workflow and you haven’t gotten to them all.
My point is that with Luminar, there is just so much to experiment with, and I personally love them all. So get in there and try them all out - I think you will enjoy it!
Adjustable gradient
This filter allows you to selectively control exposure, contrast, vibrance and warmth in the top or bottom of the photo. You can also change blend, shift and orientation which lets you customize where the edits fall on your photo. It’s sort of like a combination of Top & Bottom Lighting and Saturation/Vibrance. Sort of. It’s great for any sort of landscape or cityscape photo where you have two essentially distinct sections - a top and a bottom.
Foliage enhancer
This filter enhances the color of foliage, so it’s great for landscapes, for example. It really works on the greens and makes things look lush and beautiful. As you drag it to the right, things get lusher and greener. It’s quite beautiful. However, I also use it to go the other way, removing the green and creating more of a Fall look. Couple that with some slider adjustments in the HSL filter and you just created a stunning Fall photo, even if you didn’t see one. ;-)
Orton Effect
I really can't get enough Orton Effect!! This is a really cool filter that includes both glow and focus so it looks sharp and soft at the same time. It’s hard to explain. I find that it creates a really dreamy look in landscapes. It would also be great for blue hour or sunset photos taken in a city, where you can give it a lovely, moody sort of look.
Soft Focus
This filter adds a creative glow to portraits and wedding photos, but since I don’t shoot those at all, I use it to soften up blue hour photos, giving them a more magical feel. See how it gets all soft and dreamy? It's doubly helpful when the streets are wet as in the example below.
Split Color Warmth
Don’t confuse this with Split Toning (which works on highlights and shadows). This filter selectively enhances cool and warm tones, increasing color contrast and vibrancy. You can really accentuate colors or even create interesting color shifts. I often use it on sunsets to give it more "pop" - like in the example below - but also in gray, overcast scenes to give them a bit more color.
Well, that’s a quick rundown of 5 filters in Luminar that I highly recommend you take a closer look at. They are powerful, flexible and fun, and give you a lot of room for creative expression, which I believe is incredibly important.
What are your favorites so far?
If you haven't tried Luminar yet, you can download a free trial via the banner below. Why not give it a test drive? You just might decide it's something you need. It took me about 5 minutes to decide it was awesome! ;-)

50 Things I Love About Luminar
The pre-order period for Luminar is almost over. Get it now, save money and get some bonuses, too! Oh and here are 50 things I love about it!
See how much of an impact you can have on your shots?
It’s no secret that I love Macphun products. I find them all to be easy to use yet very powerful, and they definitely help me craft my images with precision. So when I started experimenting with Luminar, I expected the same thing: an intuitive and powerful product that could help me craft beautiful images. That has long been my opinion of and experience with Macphun.
However, I was not prepared to be BLOWN AWAY by Luminar. Sure, I expected to like it - even love it - but I didn’t fully understand what I was getting into. I expected a great photo-editing app, but what I got was so much more. I got an entirely new way of doing things and a simpler but more powerful photo-editing experience.
A fun monochrome conversion with an added texture.
This is a serious game-changer, and not just for Macphun and their customers, but for the industry. This product is highly capable and literally bundles so much together that it is somewhat mind-boggling. However it fits everything in a fluid and intuitive UI that never feels crowded.
It just works, and it works beautifully. I am spending all my time in it right now, and I expect you will feel the same when you get it.
I did some cross processing and a bunch of other stuff to take this drab photo and give it a little more pop.
I also just created the below video showing how I edited the NYC skyline photo - take a look!
The pre-order period for Luminar is about to end (the product launches November 17) so take advantage of the great deal while it’s available!
LUMINAR PRE-ORDER OFFER INFO
- Offer available: November 2 – November 17
- Pricing: $240 Value Starting at only $49 for Current Macphun Customers
- New Customer Pre-Order Price: $59 Includes Pre-Order Bonuses!
- Current Users of any Macphun Software, including Aurora HDR Price: $49 Includes Pre-Order Bonuses
BONUSES:
- Professional video training from Matt Granger: Educating Tina-Directors Cut $99 Value
- Premium Membership + eBook from Will Burrard-Lucas: Build a Profitable Photography Business
Here are 50 stream-of-consciousness thoughts about why I love Luminar and think that you will too:
- It’s an incredible, powerful all-in-one photo editor.
- No more jumping between apps to complete an image!
- It’s a perfect complement to Aurora HDR.
- Touch up an HDR or take the base HDR and stylize it completely.
- Create stunning monochrome images.
- The UI is adaptive and flexible so you can alter it to fit your skill level or preferences.
- The entire package is very intuitive. It never feels overwhelming despite all the tools it contains.
- Easily add layers to gain creative control over your image.
- Masking is easy and quick.
- Extensive collection of blend modes for ultimate creative control.
- Non-destructive editing of RAW files.
- Supports PSD files.
- Save in multiple file formats.
- Easily share/publish online when editing is finished.
- Editing brush with customizable size, opacity and softness.
- Histogram that can display hot and cold pixels.
- Use it as a standalone, a plug-in or an extension. It will fit into your preferred host/workflow.
- History panel allows you to jump back in time to view your editing steps.
- Workspaces to personalize your editing approach based on the style of photograph you are editing.
- Create, save, share, import and export workspaces.
- Add a texture quickly and easily.
- Completely replace a sky in a couple of minutes.
- Extensive collection of presets in 6 categories.
- Create, save, share, import and export presets.
- Easily adjust presets to customize your photo.
- Apply opacity slider to a preset in preview mode.
- Radial masking filter.
- Gradient masking filter.
- Luminosity masking.
- Significant list of standard editing filters.
- Orton Effect filter - so fun!
- Foliage enhancer filter.
- Fog filter.
- Split Color Warmth filter.
- Split toning.
- Filter descriptions.
- Filters organized by category.
- Apply blend modes to individual filters on a single layer.
- Apply masking to individual filters on a single layer.
- Rearrange filters that have been applied.
- Crop and straighten image.
- Transform image.
- Noise reduction.
- Object removal/spot healing eraser.
- Clone and stamp tool.
- Keyboard shortcuts for quicker workflow steps.
- Up to 3000% zoom.
- Before and After comparison.
- Easily adaptable from landscapes to portraits and everything in between.
- Just a lot of fun to experiment with!
That's it for today my friends. I really have been enjoying Luminar, and it's definitely right at the top of my favorite apps, along with Aurora HDR. Between those two, that's all I really use now. It's great to have so much power at your fingertips. Let me know if you have any questions, and thanks for stopping by!
Full Disclosure: I am an affiliate of Macphun, and if you buy through my links I receive a small commission which I reinvest in the growth of this site. However your price is the same whether you buy through my links or not. You are doing me a small favor - which I greatly appreciate! - and that allows me to continue bringing you great content week after week. Thanks very much for your support!

There's Nothing Left to Shoot
Some thoughts on trying to be original in a world where everybody has a camera, everybody is a photographer, and everything has already been photographed.
Some thoughts on trying to be original in a world where everybody has a camera, everybody is a photographer, and everything has already been photographed.

Do you ever feel like there is nothing left to shoot? You know the drill. You’ve already shot all over your hometown, and you are casting about for other ideas that aren’t too far away, so you can hop in the car and shoot something new. (We always want something new to shoot, don’t we?). So you come up with an idea of something nearby, and Google it, only to find some fabulous photo that has already been taken of the place (or more likely, several photos) - and likely by someone you haven’t ever heard of (even though they are local).
Or here’s another one - and this feels even worse. You and the family decide on a big vacation somewhere new, and you are fired up and ready to get some photographs of something far away and exotic, something new and exciting, something foreign and unique. So once again, you turn to your friend Google, and start researching the things you want to see and do when you get there.
And what do you find? A multitude of amazing photos of the place, already taken and shared by countless others. We recently returned from a 6 week trip to Italy, which was amazing, but I felt like I was often shooting the same thing that has been shot a thousand times before.
It gets frustrating, doesn’t it? It seems like you can never be the first one somewhere, or be the one to capture the “defining” shot of a place, even if you end up capturing an amazing photo from there. You can’t exactly control the weather so that stunning sunset you are hoping for might end up being just another unfulfilled wish, and you likely don’t have time to return to that same spot again and again, in hopes of that sunset you dreamed of actually coming together for you.
You are not alone in feeling this way - I suspect we all have those moments when we just want to scream. These days there are fairly low barriers to entry in this world of photography, and a lot of creative minds in the world, and some amazing tools, and thus a lot of fantastic pictures that are already taken of all these awesome places. It happens.
Now, of course you didn’t expect to the first one to get a great shot of whichever place you are heading to, but you also didn’t expect to find SO MANY EXCELLENT photos that already exist of it, did you?
Sometimes, it feels like there is nothing left to shoot. I know I feel that way occasionally. I just spent 6 weeks feeling that way, every single day. It’s almost depressing.

But, I have decided that I don’t care that I will never be the first one somewhere or that I will not be the one to take the defining shot of a place. I have realized that luckily there are some ways to resolve this conundrum, and it’s not just to lower your expectations (that works, of course - though I don’t recommend it). It’s about finding and following your inner vision and getting creative on site. It's about breaking free of any artificial restraints you may have imposed on yourself and just doing what makes you happy. Isn't that what this should be about anyway?
So how do you do that?
Well, there are probably a million books and articles that can give you way better advice about this than I can (see, someone has already done that, too!). But here are some things I try to do either onsite or in the digital darkroom to get creative and (hopefully) end up with photos that I am both proud of and that (hopefully) have a chance of being at least a little bit different than those that came before me. While there is nothing wrong with photographing something that has already been photographed (and photographing it in the same way - happens to me constantly), it sure feels good when you come up with something fairly original.
Here are 7 tips I try to employ in my photography to help me get creative in the field.
Am I succeeding in implementing them? Maybe. Sometimes. There are times I am well aware of being stuck in my old habits, and so I force myself to make some changes to get creative - but I don’t alway succeed. Art is tough, and being original is really tough. Being consistently creative and original is nearly impossible. We are creatures of habit. Such is the human condition, I guess. :-)
So like everyone else, I am trying. Some days are better than others, but getting out with the camera and giving it a go is always a good start.
1) Change your perspective
Sunset in Venice
A sculpture of Perseus in Florence
I shoot in landscape mode ALL THE TIME. You may not notice, since it’s generally the “standard” view of things, but I often find that when I switch it up and turn the camera into portrait orientation, something interesting happens - the image looks very different. This is a minor shift, physically, but a bigger one mentally. It really does impact the outcome of the shot, and it’s something I keep telling myself (and reminding myself) to try when I am out in the field.
Interestingly, I find that with my iPhone I shoot in portrait orientation a whole lot more. Perhaps that’s because that is my natural state for holding the phone, or maybe it’s something else. But I am working to get more shots with my real camera in portrait orientation. I like the look of those shots - I just have to remind myself to change it up. In the above examples, I used my Sony camera in Portrait orientation and I really liked the framing and the outcome. Usually I hold the camera horizontally, so switching to portrait orientation for these shots really helped isolate the subjects here. Of course I started shooting that Venetian sunset in landscape mode, capturing the grandeur of the scene, but I found that isolating the bell tower worked better for me.
2) Change your lenses (or your camera)
An iPhone image from Piazza Navona in Rome
I suspect we are all guilty of this at times. We find a lens that just “feels right”, or that offers a focal length (or zoom capability) that just really appeals to us in some way, so we stick with it again and again. I do this a lot. I went through a period of a couple of years where I shot everything with a wide angle lens. I was completely addicted. I’ve been able to break that addiction (thankfully), and now find myself using my mid-range zoom (a 24-70mm on my Sony A7II) more often, since it’s much more flexible in terms of focal length and I get a better variety of shots from it.
I am also getting out a lot more with my prime lens, the 28mm f/2. Since it’s a prime, it causes me to move a lot with my feet to frame the shot, which helps me look at things in different ways. I love that about the prime lens, since it makes me think more when I am out shooting, and that’s really what it’s all about.
But don't forget about your phone! I use my iPhone all the time, and often find that many of my iPhone shots from a trip are my favorites. I took a gazillion iPhone shots in Italy. I was shooting with it constantly, and I think I captured some nice photos with it. I also have a small point and shoot that I was toting around, and I fired away with that one, too. Using three cameras really caused me to mix things up quite a bit, and I think it resulted in more diversity in my shots, too.
So I am not suggesting that you go buy a new/extra camera, but do take advantage of that amazing piece of equipment in your pocket, at the very least. You might just get some seriously good shots out of it. Plus, I always find that I take a different type of shot with my iPhone or my point and shoot. Something about changing gear seems to change my approach to the shot, too.
But whatever your habit or addiction is, try and break it, at least at times. You may find that you are creating new and interesting shots that you hadn’t thought of previously.
Another iPhone shot - this one of some street art in Florence. I never shoot these subjects with my Sony, but frequently yank out my iPhone and start firing away.
3) Change your subjects
A vendor at the Rialto Market in Venice - totally different subject for me!
This is another hard one. I definitely have my favorite subjects. Namely, I love to shoot landscapes and cityscapes and architecture, with some graffiti and neon signs thrown in for fun. My eyes are naturally drawn to these subjects and I shoot them a LOT. In fact, that’s nearly everything that I shoot.
But I really need to mix it up and force myself to do things that I am not comfortable with, because it’s how you learn. This is probably the biggest one for me. I guess I’m really set in my ways, but I’m trying. It’s hard to break habits that you have accumulated over many years, but I find that when I do so, and succeed in capturing something new, it’s really rewarding.
On this trip in Italy, I tried some street photography as well as some more random shots that include locals. I find you really have to look harder to find things you aren’t naturally drawn to, but it is quite fun and certainly makes you think a lot. If nothing else, it's a great creative exercise and that always helps me expand my photographic experience base.
A vendor in the San Lorenzo Market in Florence. Sort of a slice of daily life type of shot. Different for me but fun nonetheless.
4) Change your processing
Something a bit different for me - heavy use of texture and major color shifts.
This one is not really that hard to do, but it’s really hard to get started (at least for me). I feel like our processing styles are ingrained in us a bit from years of practice and experience (and the weight of years of habit, likely), and so when I am ready to process something, I just start processing it in the same old tools, and the same old way. But it’s easy to make a shift here.
In fact, I completely changed my workflow when I adopted Aurora HDR from Macphun. It’s a wonderful tool and I am glad that I am now using it, both for HDR and single exposures. Previously I just went into auto-pilot with my other tools and became almost robotic about it.
But when it comes to processing, being robotic is not a good thing.
I need to be experimental and creative - it helps drive me forward - and Aurora is helping me explore new techniques (such as applying textures to photos). But this isn’t about getting you to use Aurora (although I highly recommend it - and you can download a free trial here). It’s about trying new tools, or new tricks in existing tools.
You see, this doesn’t mean you have to go buy more software. You can completely change the way you process images in whatever software you have. Just take the time to learn a new technique, or experiment and see what happens. Try new presets or filters. Click on something you have never clicked on before. You might find something amazing.
Try split toning. Convert a photo to black and white. Apply a texture. There are a million things you can experiment with, all pretty easily. I have been a "big color" sort of photographer for many years, but I am really loving the pure simple joy of a monochrome photo, and have been converting more and more of my shots to black and white. It's been a great creative outlet and one I continue to explore.
The bottom line is that there are many paths you can take on any photo, so try and be cognizant of what you habitually do, and stop yourself before you just do the same thing again and again. Try something new and you will be surprised how it alters your approach the next time.
The Vatican at Night - although I loved the color version, something about this in monochrome just really looked great.
5) Get up close/Fill the frame
A zoomed-in shot of Riomaggiore in Italy. Different but I found it interesting.
As I mentioned earlier, I used to be addicted to my wide angle lens. While it’s something that I love to shoot with, it’s not the only arrow in the quiver, so to speak. The thing I loved about the wide angle was that you could just get so much in the frame, at least from left to right. What I often found was that you also end up with a lot of empty space at the top, since the view is so wide.
These days I err more on the side of trying to fill the frame, which is likely a tip you’ve heard before. I think it’s a good one. There is absolutely nothing wrong with negative space (and sometimes it makes the image), but just don’t forget that you can go the other direction and get MORE in the photo, which could make it more impactful.
While I think you want to be careful that you don’t create an image that’s too busy, I think getting in closer allows you to really see something in a different light. Instead of an item being a small part of a wide angle shot, it can be the subject of a closer shot and really make an image pop.
I used the gondolas to anchor the foreground while still keeping focus through the entire image and including that lovely Venetian architecture in the background. A full frame but a beautiful one to my eyes.
6) Go minimal
I only shot with my iPhone in this market, and came away with some shots that I really like.
When traveling, we all pack our gear - even stuff we rarely use - just in case. Am I right? I have done many trips where I barely use a lens, for example, and it probably wasn’t worth even bringing it along. It was there “just in case”. What if I need it?
Well, I have also done some trips (and not just local outings - I’m talking about getting on an airplane and flying off somewhere distant) with just a single lens. Yes, one lens. It’s very hard to convince myself to do that, but I have to admit that it has worked out just fine EVERY. SINGLE. TIME. I have captured shots that I am proud of and that I genuinely like. (I have also done trips with just my iPhone - talk about feeling free!)
This exercise in minimalism is a great way to force yourself to think differently. You HAVE to get creative because you don’t have the safety net of other tools to lean on. It’s also incredibly freeing. I love to travel light - always have - and having just my camera with one lens (and no tripod, even!) has caused me to look at things differently, and while I frequently shoot things I would shoot with other gear, I have also shot new things, which is exactly the point.
I had several outings in Italy with just my iPhone, or just my Sony camera with no tripod, or just my small point & shoot camera. I feel free when I travel light, and I feel more willing to get experimental for some reason. Perhaps not being burdened with a large, heavy backpack is the reason, almost like you are a part of the scene and not just an observer there to document it. You feel like you can get deeper into it, since you aren't setting up a tripod and bumping into people. You can be quick and stealthy, and it's just plain fun. Plus your back doesn't hurt at the end of the day. ;-)
An iPhone shot from one evening in Florence. Even with a phone I was able to capture images that I like.
7) Change your expectations
Ah yes, expectations. We all have them. We all want them to be exceeded, don’t we? I dream of a magical sunset happening every night on every single trip and I visualize it happening, but that doesn’t mean Mother Nature is going to cooperate. I mentioned earlier that you can just lower your expectations, but that just feels like you are handing over the keys to fate and letting things happen, doesn’t it? It feels like a letdown. It feels like you are giving up.
I don’t think any of us want to do that. We want to take the wheel and drive it ourselves.
But I try to go into any trip with limited expectations. I hope for the best, but let’s be honest - hope is about all we can do, since we can’t control the weather.
However, we can work around the weather, dealing with issues like rain by shooting inside (many museums are camera-friendly, and architecturally-gorgeous), or dealing with crowds by shooting in off-hours (sunrise is the best for that) or by zooming in for detailed shots of a location. Or maybe we change up our subject matter and decide to create completely different photos of a place than we originally planned.
We just have to take a different approach. I don’t think of it as lowering my expectations as much as it is adjusting my expectations. I allow my expectations to be fluid. Don’t expect too much, but know that you can deal with any obstacle and find a way to get creative onsite so that you still get the shots you envisioned prior to arrival (and hopefully, many that you did not envision!).
Summary
So that’s it my friends. It’s easy to feel like you are the last one to see some famous landmark, and thus the last one to put your own creative stamp on an image of it. And while many may have come before you (and many will come after you), that doesn’t have to stop you from getting an interesting and creative photo of something. Sure, it may not be the first great photo of a place, but really, does it matter?
I think what matters is that you went out and created an image that means something to you. An image that you like. An image that you will cherish.
And for the record, I absolutely advocate that you take a shot of that famous landmark wherever you are, even though there are already a million shots of it. Who cares? You still need your own shot of it, don’t you? I shoot all the same stuff that everyone else shoots, though I try and get creative using the tips above, and I seek out other less-well-known spots in the places I visit, too.
Mix it up. Experiment. Get creative. Do something "weird". Who cares? This is art, and it is meant to be experimental.
These are tips I try to use on each outing, just to get me out of my comfort zone and into the creative zone. Sometimes it works, and admittedly, sometimes it doesn’t. But when I make the effort to change things up, I always feel better about it.
Creativity is its own reward. Get out there and create my friends! Thanks for stopping by!

1 photo, 5 looks - the versatility of Aurora HDR 2017
Today I explore creative options in Aurora HDR 2017 from Macphun. Many people think HDR photos all look the same, but I prove that you can get a wide range of outputs with this powerful product. Have a look and see which version you like best!
Aurora HDR 2017 is a lot more than "just" an HDR editor. It's a full solution to processing any image. Your creative output is limited only by your imagination.
I think that a lot of people - especially those that are not using HDR techniques in their photography - feel like all HDR photos look the same. I don’t feel that way at all, although of course it’s rather obvious why they may think that. I get it.
While I think we all end up with a particular look that we like, and thus employ in a lot of our images, HDR actually allows you quite a bit of latitude in processing and stylizing options. In other words, all HDR photos are not the same, it’s just that we aren’t often being imaginative enough (and I include myself in that diagnosis).
I have accumulated a lot of software over the years, perhaps in hopes of having different tools handy which would presumably allow me to achieve more variety and different looks in my photos. But having the tools and being good with them are entirely different stories.
I have just about everything there is, but I am no better with some of it than anyone else. In fact, some of it I have never even used. If you don’t use it, how are you going to get good at it? What difference does it make then? Sure, you have the option to use it, but that requires a time and effort investment to learn how to use it, and an even larger amount of time to get good enough at it that you could theoretically get really creative with it.
Back at the start of this year, I changed my philosophy about having a lot of tools, and decided that I would get more out of a product suite - and thus more creativity in my output - if I could just go deeper with a few programs and get really comfortable with them.
That’s when I decided on Macphun, and I haven't looked back. (You can read about that here.)
Since that decision, I have dropped use of all the other software that I used for years, and now I completely use Aurora HDR 2017 (you can read about the new version here and here) and the other Macphun products in their Creative Kit (prior to the release of Aurora 2017, I used the previous version exclusively). I use Aurora on about 99% of my images, so you might think that I would end up feeling limited in my processing options. You know, that I might feel a bit restricted, since I pretty much just use one product.
Truthfully, I feel completely the opposite. I feel much freer than before.
I no longer have multiple products to take an image into and experiment with, and multiple products that I have to spend time learning and staying up to date with. I have a single product that I can go incredibly deep with, and by going deep and focusing I can get more out of it. I can learn to be flexible and maintain control over my images by becoming a master of a single product. And the only way to get really good at something is to focus, right? How can you possibly master everything? I don’t have the time for that, or the interest, frankly.
I have learned that I can achieve ANYTHING I want to achieve with a single product - Aurora. It’s that good and that flexible. I loved the previous version, and Aurora HDR 2017 has gotten even better.
If you are interested in a free trial of Aurora HDR 2017, you can download that here. Give it a test drive!
So as I was thinking about this article, I figured that the best way to illustrate my point is to show you some photos. All of these were built upon the same 3 exposure HDR, and all edits were done strictly in Aurora. No Lightroom, no Photoshop, and not even any edits in other Macphun products. It’s all Aurora HDR 2017 (the one exception is the textured photo, because textures are not stored in Aurora, so I pulled that file in to apply to the image, but all adjustments were in Aurora).
I wanted to challenge myself to see just how creative I could get, and see if I could produce a variety of different looks to a photo - looks that I actually like. You know, not different for the sake of being different, but to push my creative self and explore options that are pleasing to my eye. And I hoped that I might expand my creative thinking in the process. Isn’t that what this photography thing is about, anyway?
Life isn't about finding yourself. Life is about creating yourself. -- George Bernard Shaw
I feel like I achieved exactly that, and truthfully I feel like I could pull off several more versions of this photo that are pleasant. It really does come down to experimenting, learning a product, and not being afraid to try something that you may not initially like. You could end up with many photos that you like, instead of just one.
So pick a product, go deep, experiment, explore, mess up and try again. Get out there and create something - anything - and then create it again, but differently. It’s an amazing exercise in creativity, and you will certainly learn something along the way.
Here are 5 versions of the photo, all created in Aurora HDR 2017. See how different they are? Variety is your friend, my friends. Don't hesitate to do some experimentation.
The Textured version
The moody version
The crisp and cheerful version
The blue hour version
The stark monochrome version
See the variety here? I even created the monochrome in Aurora HDR 2017, despite the fact that Macphun's Tonality product is the best black and white editor on the planet. I use Tonality for all my monochromes - except the one above, of course. That just further demonstrates the flexibility of Aurora HDR 2017.
Do you have a favorite? Let me know in the comments section below!
Download a free trial of Aurora!
If you are interested, take a test drive for free! You can download a free trial of Aurora by clicking here. No commitment and no worries - just try it out and discover for yourself just how flexible the product really is. I believe you will be blown away. Even if you don't do anything with HDR, the power and flexibility of Aurora is great for single exposures, too.
And if you need help while you are test driving it, check out my YouTube channel for videos that show you how I use it. Here's one that I think will help get you started:
Thanks for stopping by! Let me know if you have any questions!

7 Reasons Why You Should Get Aurora HDR 2017
Aurora HDR 2017 from Macphun is now available, and it's incredible. Here are 7 reasons why I think you should get this software to use for your image editing. You'll be glad you did!
The latest version of Aurora HDR from Macphun is now available, and it is awesome. These are the main reasons why I think you should try it out for yourself.

I’ve been using Aurora HDR 2017 for a while now, since I was fortunate enough to receive an early beta copy a while back. From the start I have loved it, and now that it is released I wanted to share some thoughts on what I consider the major reasons why you should buy this software for your image editing needs.
If you want to read my review of Aurora HDR 2017, you can find that here.
If you owned the previous version then much of this will be familiar to you, but there are some amazing new features that you will find very useful - and of course you can purchase an upgrade version which is slightly cheaper.
If you don’t own the previous version, I highly recommend you take a close look at what Macphun’s new product can offer you. It is in my opinion the best image editing product on the market, and not just for HDR photos. You don’t have to take or process HDR photos to benefit from this amazing software. It is incredibly powerful whether you are creating an HDR photo or making edits to a single exposure.
Here's a product tour video that I did, highlighting a lot of the features I mention below. Take a look, explore the product, and let me know if you have any questions.
It has layers, denoise, amazing image editing tools, the ability to add textures and more - all BUILT INTO THE PRODUCT. You honestly no longer need multiple other products to create your own masterpieces - you can do it all in Aurora. I use it for editing ALL of my photos, regardless of whether it is an HDR or not. Give it a trial run and see for yourself. I firmly believe you will be convinced that it is amazing, and you will want to use it. It’s that good.
You can download a free trial here.
So without further ado, here are the major reasons why I believe you should get Aurora HDR 2017 for your image editing needs.
1) Layers
Yes, the ability to add layers to your photos is not new, but it is THE killer feature of Aurora and one that essentially all other features derive and benefit from. This allows you to selectively edit your photos, whether it is something like making color adjustments, adding details or removing noise. But you can also use layers to get really creative by adding textures (even selectively by brushing it into a portion of your image), stacking multiple presets, brushing in part of a preset, and more. The only limit is your imagination. This feature is what initially convinced me to fully convert to Aurora last year, and I am glad that I did.
2) Luminosity Masking
In Aurora HDR 2017, the luminosity masking feature has been significantly upgraded and expanded. Instead of creating a luminosity mask like in the previous version, now you selectively create one based on zones, or light levels, that are present in the photo. This gives you more fine-tuned control over how the mask is created and applied.
This is another killer feature of Aurora and it’s only gotten better in the 2017 edition. You simply choose the zones that correspond to the parts of the photo where you want the mask to apply, and then create the mask. It’s very simple but powerful. Then you can apply a preset or use editing tools to adjust your photo, based on the luminosity mask. It’s very capable and an excellent feature.
Using luminosity masking allows you to create a very subtle look to your HDR, should that be of interest to you. Many people have criticized HDR for being too over the top, but by gently applying edits based on the use of a luminosity mask, your result is much more natural and subtle. This is a feature that many Photoshop users have employed over the years, but in Aurora it is a simple few clicks to create the mask, which is wonderful.
3) Presets
Prior to using the previous version of Aurora, I rarely ever used presets on my photos. I always preferred to make all my adjustments individually because I never felt like the presets on those other products would work for me. But I loved the presets in the first version of Aurora and used them all the time. I feel the same way about the new version.
Many of the presets from the previous version made their way into Aurora HDR 2017, and of course there are new presets, too. Additionally, there are custom presets made by some well-known HDR photographers included, so you have plenty of choices.
Of course, you can make your own just like in the first version, and export them to share with your friends if you wanted to. It’s a very simple process to create your own presets, and as well you can “favorite” the ones you use the most and they are quickly visible in a favorites folder.
4) Top & Bottom Adjustment
I loved this tool in the first version of Aurora, and I am happy to report that in the 2017 edition it has been expanded and upgraded and now is much more capable. It now includes the ability to adjust Exposure, Contrast, Vibrance and Warmth within either the Top or Bottom sections of your photo. You can change the Blend, Shift and Rotation as well, just as in the previous version. But the updates here make this tool much more capable. It’s something that I empty on many photos. It’s quick and easy and now even more powerful, and can have a profound impact on your photo, all in a simple to use tool.
5) Radial Gradient Mask
The addition of this tool is wonderful and it can come in really handy. You can creatively make adjustments using this tool that otherwise would be a bit more challenging to do. Use it to adjust saturation, details, add some blur and more. You just create the mask by clicking on the brush mode and then selecting this tool. It will lay the guides on top of your photo, and you just move them to get your desired size, shape and orientation. Then, you can invert the mask with a single click if you want to. While this isn’t something I use as much as layers or luminosity masks, it’s wonderful to have and saves me time having it here. It’s a great new feature added in this new version.
6) Polarizing Filter
Since I don’t use a polarizing filter on my camera, it’s great to have at my disposal. It’s a very simple but powerful tool. You just move the slider to the right to reduce the glare and intensity of the brightest parts of the image. Simple but powerful, and nice to have at your disposal. This is another wonderful update to the product.
7) Built-in DeNoise
No, this isn’t new, but I would be remiss if I didn’t mention it somewhere on this list. This feature is one of the major reasons that I switched over completely to Aurora last year. I always used noise reduction software, but I found most of it to be a bit unwieldy and I never liked the fact that all of those products are essentially global in terms of how they apply noise reduction. The fact that you can create a new layer in Aurora, add noise reduction, and then selectively brush it into only specific parts of the image is without a doubt a huge win for me. It saves me a significant amount of time - in addition to giving me better control over the result - because I no longer have to make a round-trip to another product to apply noise reduction. Just a couple of clicks and a couple of sliders, and I am done with it. Wonderful.
So that’s a quick hit-list of some of my favorite features in Aurora HDR 2017 and why I think it is the best product out there, period. Give it a test run and see for yourself. You’ll be glad you did!
And of course, here are some sample photos that I edited with Aurora HDR 2017.

No two zebras are alike
I'm normally a "big color" type of photographer, but I have been exploring a new creative path with black and white photography, and have both learned a lot and changed my mind about monochromes. It's all due to my recent use of Tonality by Macphun - and here are 10 examples of the same photo that show you just how versatile monochrome photography can be.
The versatility of monochrome photography with Macphun’s Tonality
10 versions of the same photo, all done in monochrome, via Tonality
I’ve been converting quite a few of my images to monochrome over the last couple of months. While I have always been a “big color” sort of photographer, I have come to really appreciate a good black and white, and I am starting to mix them into my own work quite frequently.
This all started earlier this year, when I converted over to all the Macphun tools for the majority of my post-processing. Of course most of my time is still spent in Aurora HDR, but it’s hard to NOT want to experiment with black and white when you start trying out Tonality. It’s just so good, so fun, and as you will soon see - so flexible.
While I think we can all appreciate the varying outputs you can get from an HDR editor like Aurora, I’m not sure everyone realizes that with monochrome shots you can also get a wide variety of outputs. Well ok, maybe I just didn’t realize it. :-)
Being a big color guy, I sort of thought that a black and white was a black and white. You know, that they were basically just a color shot converted to monochrome, and that was it. Oh, and that they were all basically the “same”.
Boy was I wrong.
I had no understanding of the wide variety of outputs you can get with a monochrome editor like Tonality. I’m not sure why I thought all you did was just click a button to remove color, but because I never spent time on this stuff before, that was sort of the extent of my experience with it. Sad, isn’t it? But the truth is that if you never do something, you are never going to understand it. So I dove in and have learned quite a bit! Oh, and I’m hooked. :-)
Now, after several months of experimenting with Tonality, I have come to realize that you can pretty much create any output that you want with the product. Sure, the key theme running through them all is that they are monochromes (although, not exactly - you can get some color if you want to), but you can get a huge variety of options if you just take the time and get to know the product. You can basically create anything you want - and it’s fabulous.
The world presented in monochrome is an entirely new and interesting one for me, and I’m having a great time exploring it, thanks to Tonality.
Why convert to monochrome?
Many photographers use black and white for fine art prints, to accentuate drama, and to create visually stunning images. We’ve all seen (and maybe created) images like this, and they look absolutely wonderful. But I think that many people convert a photo to black and white when it doesn’t work in color. You know, maybe there’s a blown out sky, or something else is “wrong” with it. Hide the flaws under a colorless veneer of old-school monochrome embellishment (or something like that).
(Before someone gets mad, the above is just a generalization - though it definitely applies to my past behavior.)
And you know what? That totally works. I’ve done it myself several times. It’s a way to “save” an otherwise useless pic. In my opinion, you have a little more leeway with a monochrome in terms of drama, details, noise/grain, and more. I don’t really know why that is - and it’s just an observation on my part - but it “feels” true. You can disagree though - I’m sort of riffing here. And I’m not saying EVERY black and white shot fits the above; it just seems like it’s frequent enough to be a thing.
And by the way, none of my above generalization applies to street photography (something I rarely try, but do have some interest in). I feel like street photography is MEANT to be photographed in monochrome, as it feels more spontaneous and random than other forms of photography. Maybe that’s just me, though. Anyways, I digress.
Here’s the thing - I feel totally different about all of that now, thanks to Tonality. It has literally changed how I think about monochromes.
I no longer look upon a black and white as an attempt to save an image from the trash can. I believe they are intentional creations, ones that were purposefully and artfully crafted in monochrome for any number of reasons. I get that big color isn’t everyones favorite thing, like it is mine, and that many people prefer black and white. And now I have a better understanding as to why.
I do have to admit that when you strip an image of color, it does make you look at it differently, and at different things in the images. Not having the distraction of saturation in front of you, I feel like you can actually examine the merits of the photograph: the lines, the details, the mood - whatever interests you.
“When you photograph people in color, you photograph their clothes. But when you photograph people in black and white, you photograph their souls.” - Ted Grant
Yeah, I know, these aren't photographs of people, but I just loved that quote. Appropriate, no?
Let’s see some examples, Jim!
I figured the best way to explain this is just to show you, so that’s what today’s post is all about. I have taken a single photo and offered up 10 different interpretations of it, all created in Tonality by Macphun. Some of them even have a touch of color. Old habits die hard, and all that. :-)
Just to make this simple, I didn’t even customize the photos each time. These are all just a single-click preset that is applied to the photo, and I have listed the preset below each photo for the preset-curious among you.
Ah, the power of Tonality!
Here is the base photo, which is a 3 exposure HDR of a cafe in Paris, in all it’s colorful glory. It’s a photo that I just love, and it seemed to be a good fit for this little article today, partly because for me the color just makes this shot. I would normally never convert a photo like this to monochrome, because I love it in color. I think it looks awesome. But after bringing it into Tonality, I really liked what I was able to do with it - all 10 of the below examples. While distinct from each other, I think they all look great, and for different reasons.
The original, base image as processed in Aurora HDR - in full color, of course. :-)
If you are interested in learning more about Tonality, you can read my review of it here. I also did a quick video a while back that outlines the basics of the product, and that is found here.
The best thing to do is click here to download a free trial of Tonality, because I'm pretty sure you are going to want to try it out on your own images.
Ok, here are all 10 versions of the above photo, straight from Tonality with a single click preset applied and no further adjustments. The name of the preset is below the photo. Take a moment and examine these, and see just how different they really are. Details, shadow, mood - there is a lot of variation here.
Preset = Architecture Details Strong
Preset = Basic, Boost Clarity
Preset = Dramatic, Forgotten Glory
Preset = Film Emulation, Kodak Tri-X 400 TX Pro
Preset = HDR Classic
Preset = Outdoor, Moonlit Landscape
Preset = Portrait, Old Hollywood Glamour
Preset = Street, Main Street
Preset = Toning, Copper Strong
Preset = Vintage, Pinhole Color
Tonality has around 160 presets included in the product, plus they have some created by other photographers that you can download for free. The world is your oyster with this product. You just have to get started.
And for those of you curious about how it works, here is a screenshot from Tonality. Note all the menu adjustments on the right hand side. You can move any of these on any image. You can click on the word Presets at the bottom to bring up the preset menu. You can add layers and make adjustments across multiple layers and blend them together. You can do so much that I can't even cover it all here. Just download it and try it out yourself!
Parting thoughts
The key thing about all of these photos is that taking my base photo and converting it to one of these outcomes - any of them, actually - was simply just a single click preset. While all of these may not appeal to your tastes (although they do to mine), just know that the amount of customization in Tonality is huge and you can pretty much end up with anything you want. It’s flexible, fun (or is that “phun”?) and very capable.
I could have a million different versions of this photo, if I wanted to. And that brings me full circle. Black and white photography is unique, interesting, and none of the photographs are the same. Sure, there’s the common thread of them all lacking saturation, but that’s where the similarities end.
If you have been on the fence about the whole monochrome thing, I highly recommend you give it a go - even if you don’t use Tonality (although I think you should). You just might find that you start to look at things a bit differently than before! It’s certainly given me a new creative alternative to explore, and I'm having a hell of a good time with it.
What are your thoughts on black and white photography? Let me know by leaving a comment below!


100 completely random observations about photography
I spend a lot of time thinking about photography, and sometimes I write these thoughts down. Usually it's in a coherent (at least to me) form with a clear purpose, but not this time. This is all just off-the-top-of-my-head, so consider that fair warning. ;-)
Here's a bunch of random thoughts, loosely tied together by photography, written down hastily in a stream of consciousness format. And no, I'm not sure why I did this either. :-)
I started writing up this list for no apparent reason, and I just kept going and going. I guess that I have a lot of stuff in my head, and honestly, there’s not anywhere else to really dump it all. So, lucky you?
Though I have several photography friends here in Austin, I really don’t see them very often, so I don’t get a chance to discuss this stuff, and why bother? It’s pretty much a bunch of odd ramblings, which don’t really make for interesting conversation.
A lot of this is just my opinions, so don’t read too much into it. This is just me commenting on my photography, the photography market, gear, software, life and more. I decided I might as well share it before I change my mind and decide not to share it, because I do that a lot (see #62 below).
Agree? Disagree? Feel the same? Let me know in the comments.
- Whether it’s work or play, photography is an absolute joy.
- I’m often concerned that my photos aren’t “good enough”.
- Sony makes a damn fine camera, and I am happy to have one.
- I spend so much time on my computer, and not enough time in nature. I get excited when I am out shooting, almost giddy. It’s way better than being on the computer, even though I absolutely love to process photos.
- Sunset is probably the most popular time of day to shoot. Being a bit introverted, I prefer sunrise so I can be alone.
- I love to travel.
- Lightroom is totally kick ass. The first time I moved the Clarity slider I was hooked.
- I can’t believe I stuck with Aperture for as long as I did.
- I hear great things about the Fuji mirrorless cameras, but I have no plans to change.
- I don’t shoot with my iPhone as much as I used to. The quality is only fair, and the noise in iPhone shots really bugs me - but you can’t beat the convenience for a quick snap.
- HDR is ugly to some people but I don’t care. Sometimes I overcook my HDR shots but I don’t care.
- More photographers use HDR or HDR-like techniques than most people probably realize.
- I think of photography as art, not journalism, so I like to craft my images based on how the place felt to me, as opposed to how it may have looked.
- I am often torn between creating more photographs, and creating better photographs. I see a HUGE benefit in both, and after all these years I am still not sure which direction I lean.
- Photoshop feels like a big mess and I rarely use it. I feel like I am “supposed” to be a Photoshop guy though.
- I use Aurora HDR on just about every single photograph, even iPhone shots and single exposures. I think it’s by far the most capable product out there. I call it “the magic shop”. It totally feels like I am doing magic in there, and I love that.
- It’s incredibly hard to draw attention to your photographs. There is just SO MUCH great photography on the web these days.
- Metering still seems like a strange word and strange concept to me at times. I don’t know why, because I feel like I understand it, but still. Maybe it’s just the word that feels weird.
- Long exposures are cool. Really long exposures are really cool.
- I sometimes wonder if I should try street photography.
- I’ve been serious about photography for roughly 6 years - whatever “serious” means.
- I wish I had started younger.
- I never was into film photography so my whole photographic life has been digital. Many folks seem to pick up film and experiment with it now, but I’m not interested. There’s nothing wrong it, I just don’t feel like I have enough time to try something else when there are still a million other things I want to do.
- I really want to try some composite work someday, but I haven’t had the time for that either.
- I put pressure on myself with deadlines to get things done, yet this is art. I should slow down sometimes because I always feel like I am hurrying.
- I only started messing around with textures when I started using Aurora HDR, but I love them now and have started “collecting” my own.
- In my Lightroom library, I create folders based on location, not year/date like most people. That makes sense to me, because I don't really care about dates. When I need to find a photo, it's a photo taken in a certain place, not on a certain date.
- I still use Flickr everyday.
- Social media is a huge time suck but I don’t see how you get by without it as a photographer. Though I must admit there are aspects of it that I like, and chief among them is connecting with photographers from around the globe.
- Having a blog is like a full time job that pays much less than minimum wage. It’s totally worth it to me though because I love to create and write, and I can do whatever I want to do with it because it’s all mine.
- I have totally gotten hooked on creating videos for YouTube.
- I get decent blog traffic from Pinterest although I spend very little time there. I should pin more stuff, but there are always others things I find myself doing.
- I keep notes on my iPhone about things I want to write about on the blog or create videos about, or even eBooks that I want to author. I read those notes and add to them all the time. I always have a huge to-do list for my photography, but that’s fine with me. I'm never bored or lacking in ideas, which is a blessing.
- I ignored black and white photography for so long, but now I kind of like it. Tonality from Macphun is the reason I am converting some of my shots to monochrome now - that’s a great product.
- Grungy old stuff is fun to shoot, and processing those shots in HDR is fun as hell.
- I have only taken a few portraits in my entire life, outside of family gatherings. They were ok but not really that great. I could never do that for a living. I would be bored to death, plus I would starve because I suck at it and no one would hire me.
- I’m so glad that I learned about split toning - it’s one of my favorite techniques.
- I used to shoot an Olympus EM-1 and my favorite lens was a tiny little Panasonic/Leica 15mm f/1.7 prime. It was perfect for handheld shots in low light, and since I love to travel light, it was perfect for me. Though I loved it at the time, I don’t really miss my Olympus camera, but I miss that little lens. Since converting to Sony, I picked up their 28mm f/2 and it’s nearly the same thing, so I am happy about that.
- It seems like everyone gets the “Photo of the Week” award on Pixoto. I’ve never been to that site, but these things are always shared on Facebook. It’s kind of annoying, because when someone wins it appears to auto-post onto Facebook but it never shows the photo. What’s the point? Does the “Photo of the Week” award give you anything beside a nice feeling?
- Is Leica really THAT good, because they sure are expensive?
- Sometimes I am too lazy to get out the tripod so I shoot handheld, even in lower light - and I still shoot brackets. Occasionally this works out fine, but I get my share of blurry crap too, and then I chide myself for being lazy.
- I always feel better after shooting, even if the shots aren’t very good. There’s something about going out with the intent to create that is just so satisfying.
- I have a weird love of graffiti and neon signs, and get a huge kick out of photographing them, especially when I travel. No one is ever interested in these types of photos though, but I will always take them because I just love them.
- I have had an iPhone shot published once before. Isn’t that kind of weird?
- I dropped a lens cap in a canal in Amsterdam.
- Someone asked me to shoot a wedding but I declined. I am completely afraid of something like that. I feel like I would end up being one of those “you get what you pay for” type of stories on PetaPixel or somewhere like that. I fear it would have been a disaster, because the one thing I almost never shoot is people and I generally suck at it.
- It seems like every photographer has been to Iceland and/or New Zealand, except for me.
- If I had to pick one part of the world to live in and photograph, it would likely be Europe.
- If I had to pick one part of the US to live in and photograph, it would likely be the Pacific Northwest (and more specifically, Oregon) - although my favorite US city is San Francisco.
- I’m having fun writing up this list. It's almost therapeutic.
- There are two photographers that I admire a LOT - and I won’t name them - but they are so freakin’ talented it’s amazing. Yet, they are totally different. That makes me wonder about my own style. Do I lean towards one or the other? Does it matter, really?
- I haven’t yet figured out what I want to be known as in photographic terms. You know, like “what kind of photographer” I am, or what my style is, if I have one. I think this is a lifelong process of discovery. Hopefully I look back some years hence and I have left something of meaning.
- I don’t have a favorite photography blog that I read very often, but there are some great ones out there, depending on what you are interested in. But feel free to let me know if you have a favorite, because I love to read this stuff.
- Maybe I should get a drone.
- I’m not even remotely interested in the technical bits of photography or camera gear. I just want to make and use “nice stuff” and not get into the weeds.
- I could never do a 365 project. It feels like too much work.
- I usually edit quite a few photos at a time, and often won’t be back in my library to edit again for several days or longer. I actually enjoy these breaks.
- There are some parts of Norway that look absolutely breath-taking, and I want to go shoot them.
- I have about 3-4 eBooks that I want to write, one of which is about half done, but I haven’t been motivated to work on it lately, so it’s just sitting there.
- Does anyone use Google Plus anymore? It was so great at the beginning but it feels like it just died.
- I’ve begun to license photos with a couple of stock agencies. I declined these invites in years past, but I figured why not give it a go? Time will tell whether it works for me or not.
- At any point in time, I have about 5 different articles for the blog that are half-written, just sitting on my desktop. I usually start a new one before I finish an older one, so my desktop gets cluttered with all these documents that I am writing. I always start strong, but then they just sit there for a while until I decide it’s done and I get up the courage to post it on the blog. I often feel that what I have to say is kind of dumb, so I delay sharing it.
- Do you consider it cheating when someone replaces a sky in their photo? I don’t, although I do think they should disclose that.
- Sometimes I come across photographers that have HUGE followings, but I had never heard of them. It makes me wonder where I have been, because they are usually super talented and I am not sure how I missed them.
- For a while, I was completely addicted to shooting with my wide angle lens. I would never take it off. Now I look back on those days and while I love many of the shots, I realize I missed so many other shots because I wouldn’t change lenses. These days, I am more addicted to the mid-range zoom lens on my Sony (the 24-70mm).
- Prime lenses can be both challenging and interesting to use.
- I sometimes question why I spend so much time working on all this photography stuff.
- Once I shot the Milky Way, and needed help figuring out how to do so. I keep thinking about giving it a go again, but now I don’t need the help, I just need to be away from the city.
- I don’t shoot much in the summer here in Texas because sunrise is so early and sunset is so late. It’s somewhat depressing because it’s also very hot and humid. In other words, I pretty much want to stay indoors for 3-4 months.
- I taught myself nearly everything that I know about photography, which may not be all that much really, but it sounds cool to say it.
- Perhaps someday I will lead photo workshops and photo tours in cool places. I would love to do that; it sure seems like a lot of fun. I’m sure it’s a ton of work, too, but fun work.
- My blog started as somewhere to just post a “nearly daily” photo online. That was the first 4 years or so, and I did it because I thought that was the logical step for someone that was into photography. In other words, I was just copying those that came before me. Then I started sprinkling in longer-form articles, and I loved doing that. Then I cut back on the daily photo thing, and went to 4 posts per week, then 3 per week, and then 2 per week - but each of these posts had multiple photos. So it was more photos per week, but fewer posts. Now I just post 2-3 times per week, depending on what I have ready and what I feel like saying - and the number of photos in each posts varies. I also share news and other updates, and I write, add educational content, and do whatever. I feel like I finally found a bit of a groove for myself and my blog. This is fun. I hope I can do this forever.
- I could shoot waterfalls every week and maybe never tire of it, as long as they weren’t the same ones. However, I would have to live somewhere else to do that.
- European street scenes are just about my favorite thing to shoot, but of course I’m a long way from them, and rarely get to shoot them. But still, I freakin’ love them!
- SmugMug is a great place to host your portfolio site, and I’ve used it for several years now. I really don’t sell many prints, and I put absolutely zero effort into trying to sell my prints. But I think of it as cloud backup for my finished work, which is something like 4,000 photos now.
- My traffic on SmugMug is weird - some days I get 3,000 views and the next day I get 13. I’m not sure if it’s regular SmugMug users just poking around or folks that may be genuinely interested in buying prints, but I should look into that.
- I still think Flickr is much better than 500px (at least in terms of what I want to get out of the site), but everyone who joins 500px considers themself a serious photographer and will probably disagree with me.
- 500px feels mostly like a popularity contest, or at it least it did when I used it. Then again, so does the rest of social media so what’s the difference?
- I have purchased just about every single one of the big photo editing product suites. I always thought I needed something new to try because I like to experiment, but really I don’t need all the stuff I have now.
- Photos for Mac is pretty good for managing my iPhone shots, but that’s about it. I’m so glad I dumped Aperture and went to Lightroom.
- When I first started photography, I had read that f/22 was good for getting everything in focus, so I shot every single photo at f/22 for a long time. I had no understanding of aperture or really anything else at the time. I also had absolutely no creativity around my shot selection or my editing. Hopefully I’ve improved since then!
- Having photography as a creative outlet has significantly changed the course of my life in a good way.
- I love gear, although I don’t have a lot of it. I always sell my old stuff when I buy new stuff, so I only have 3 lenses that I use with my Sony camera. I’m not sure if I want any more. I like to travel light. Well, maybe one more. :-)
- If someone gave me a chunk of money to spend on photography gear, I don’t know what I would buy.
- While grain in a black and white film photo may look cool, most digital noise bugs me - though it does depend on the photograph.
- I need to go take some photos now - I’ve been typing for way too long. I get like that after too much computer time. I need to take a break, go outside, take a photo, whatever. It’s like the electricity of the computer wears me down, and I have to recharge somewhere without it.
- I have lost count of how many businesses have asked to use my photos for free. It’s still an insult, frankly. They don’t give away their stuff for free, do they?
- It’s sad when a business asks for a quote on licensing an image, and after you provide it you never hear back, not even a “thanks but…” response. My prices are reasonable based on many conversations I’ve had with other photogs, but I guess not reasonable enough.
- One of my photos is enlarged and hanging in the window of a convenience store here in Austin, though I never sold them a copy. I'm not sure how or where they got it. I keep intending to go speak with them about it, but I am always headed somewhere when I pass by, and I tell myself I will stop the next time.
- I always insure all of my photography gear. When I see someone lose theirs or have it stolen and then they start a GoFundMe page to ask for donations, I want to scream. Why don’t they insure it? If they can afford the gear, they can afford the insurance, right? Am I missing something here?
- I get a laugh out of looking at some of my old photos. I scratch my head and wonder why I processed some shots in certain ways.
- I used to purposefully blur street shots in cities in the evening (the whole shot was blurry), that way you get all the little “bokeh balls” in a photo from the city lights, and I think it looks cool. I had forgotten about that.
- Blue hour after sunset is possibly my favorite time of day to shoot. Or, maybe sunrise. Call it a draw.
- I think I am a pretty decent photographer, but then sometimes I see a shot that just blows me away, and I feel like a total newbie. That’s actually inspiring to me, not depressing.
- I have tried the vintage look a couple of times with my shots, but it’s not me. Some folks pull it off incredibly well, but I haven’t liked most of my attempts.
- I’m not even remotely interested in the selfie thing.
- I wish I had access to some cool urbex locations. I see a ton of great shots online from around the world, but there aren’t any around here, at least to my knowledge.
- Roof-topping produces some killer shots, but I don’t know if I’m willing to break into a place to try it.
- I currently have 87 photos that are processed, finished, and ready to share online. They sit in a folder on my desktop and I post a few to Flickr each day. I only pick a few each week to put on Facebook - but everything goes on Flickr. Flickr is essentially my entire photo archive of published shots.
- I have a Facebook page for my blog, but it’s nearly impossible to drive engagement there. I spent years trying to build it up, only to get to the point where I feel like it’s fairly useless. I keep thinking I am going to just delete it, but then I worry that maybe FB will change something and I might wish I hadn’t.