Dear Yahoo buyer, please don't screw up Flickr
Do you use Flickr? Are you reading the news about Yahoo, Flickr's parent company, being sold off and possibly dismantled? I am reading it, and I don't like what I hear. But, maybe there's a silver lining in there.

Dear Yahoo buyer, please don’t screw up Flickr.
I like Flickr. In fact, I like it a lot. Maybe it’s not as popular as it used to be - and sure, some people pick on it - but I think it’s still a wonderful site for photography and photographers. I have made many friends there over the years, I have discovered other photographers who I learn from, and I have discovered many photographers and photographs there that inspire me. The quantity and quality of the content there is a constant source of amazement and inspiration for many, including myself.
In the news, we keep hearing that Yahoo is up for sale, and several big websites have already predicted the demise of Flickr, and suggested that we move on. They tell us it will get sold off, or abandoned, and that we are better off moving to another platform.
I sure hope they are wrong.
I like Flickr, and I want to keep using it. I don’t want it to get screwed up. The organization system of Sets and Collections is just so perfect, and being a bit OCD myself, I like that - a lot. I think it’s the best out there. The mobile app is pretty solid all-around, and the Stats page works great for me.
Sure, you could make all sorts of improvements to the site, but considering the state of things at Yahoo, we all know that isn’t happening at this time, and that’s ok. It’s still incredibly functional in it’s current state.
It has brought me customers, friends, and inspiration - sort of the holy trinity in the art world.
I recently uploaded my 5,000th photo there, and I think it’s the best site on the web for sharing a wide collection of photographs and keeping them organized. I love being able to go look at my photos from years ago, all organized both by Sets but also chronologically. Seeing how my work and my processing choices and skills have changed over the years is educational and inspirational for me.
I don’t even want to consider having to move them and start over on another service. This is THE catalog of my work. It’s not just a place I post photos. Plus, I’ve already “released” the photos that are there - starting somewhere new is like re-releasing them. It’s a waste. I’ve got better things to do with my time, like process some of the nearly 200,000 other photos in my library. ;-)
I may host my portfolio elsewhere (it’s on SmugMug, which offers a great e-commerce engine), but Flickr provides great search functionality and people find me and my blog through Flickr rather often. It has brought me opportunities that I doubt would have come my way otherwise. It probably helps that Yahoo has a search engine - of course, I’m assuming it’s connected in some way. If Flickr is sold off I assume that would go away, but I don’t care. It still works for me.
Come to think of it, maybe it’s better if you do sell it off when Yahoo gets sold/dismantled. It could be a great asset to the right buyer, with a huge archive of amazing photographs and a passionate and engaged user base. Perhaps it could stand alone?
The point is, there is a ton of value in the site and the brand, and besides little old me, there are surely thousands (and probably millions) of other folks out there that feel the same way.
Please don’t hang us out to dry. That would suck.
Thanks,
The Photography Community
p.s. You can find me on Flick here if you would like to connect.
Editor's note: Hat tip to Thomas Hawk, who has written extensively about Flickr on his blog, has some wonderful insights into the site and is surely the most prolific photographer that I know. He has somewhere around 120,000 photos on Flickr (no, that is not a typo) and has a stated goal of reaching 1 million published photos in his lifetime.

Why I switched to Aurora HDR Pro
Recently, I made the switch from using Photomatix to create my HDR photos over to Aurora HDR Pro. Today, I share my thoughts with you about why I made the switch and what I gained from it. I think you will enjoy this.
I completely stopped using Photomatix, and here's why.
I’ve spent years using Photomatix to create my HDR photos. Over the last 7 years of crafting HDR images, I have created over 1500 of them in Photomatix. While that may not sound like a lot of photos, it equates to a lot of time spent using Photomatix. It was the first product that I ever used for HDR, and except for a short-term departure to use HDR Efex Pro (which I later reversed to return to Photomatix), I have stuck with it ever since.
Until I tried Aurora HDR Pro.
To be clear, there is nothing wrong with Photomatix (or HDR Efex Pro, or any of the other products you can use to create an HDR photo). It’s a good product for creating an HDR photo. It’s just that it has been surpassed by Aurora HDR Pro, and not just marginally. It’s been surpassed by miles. It’s been lapped, basically. Maybe twice.
You see, I am a creature of habit and I was just cruising along, using Photomatix with no issue, blissfully ignorant about Aurora HDR Pro. I exported my photos to Photomatix, then made several roundtrips to other programs to apply filters or certain effects, and then another roundtrip to a different program for noise reduction. I thought that was the only way to get it all done. I didn’t think about the process being inefficient, because I just assumed that everyone did the same thing, and had no choice in the matter.
I was wrong. I had no idea what I was missing, or that my photo-editing was about to get better - and simpler - in countless ways.
The truth is that I wasn’t looking for a new HDR editor, and I don’t make a big change on a whim - especially a change that is the key first step in my HDR workflow. And to me, here’s the best part - it’s not just another HDR editor. It so much more than that. It’s my go-to editor for EVERYTHING now: HDR, single exposure, heck I even process iPhone images in Aurora!
Here's a cool little video I made with Macphun that explains my move...
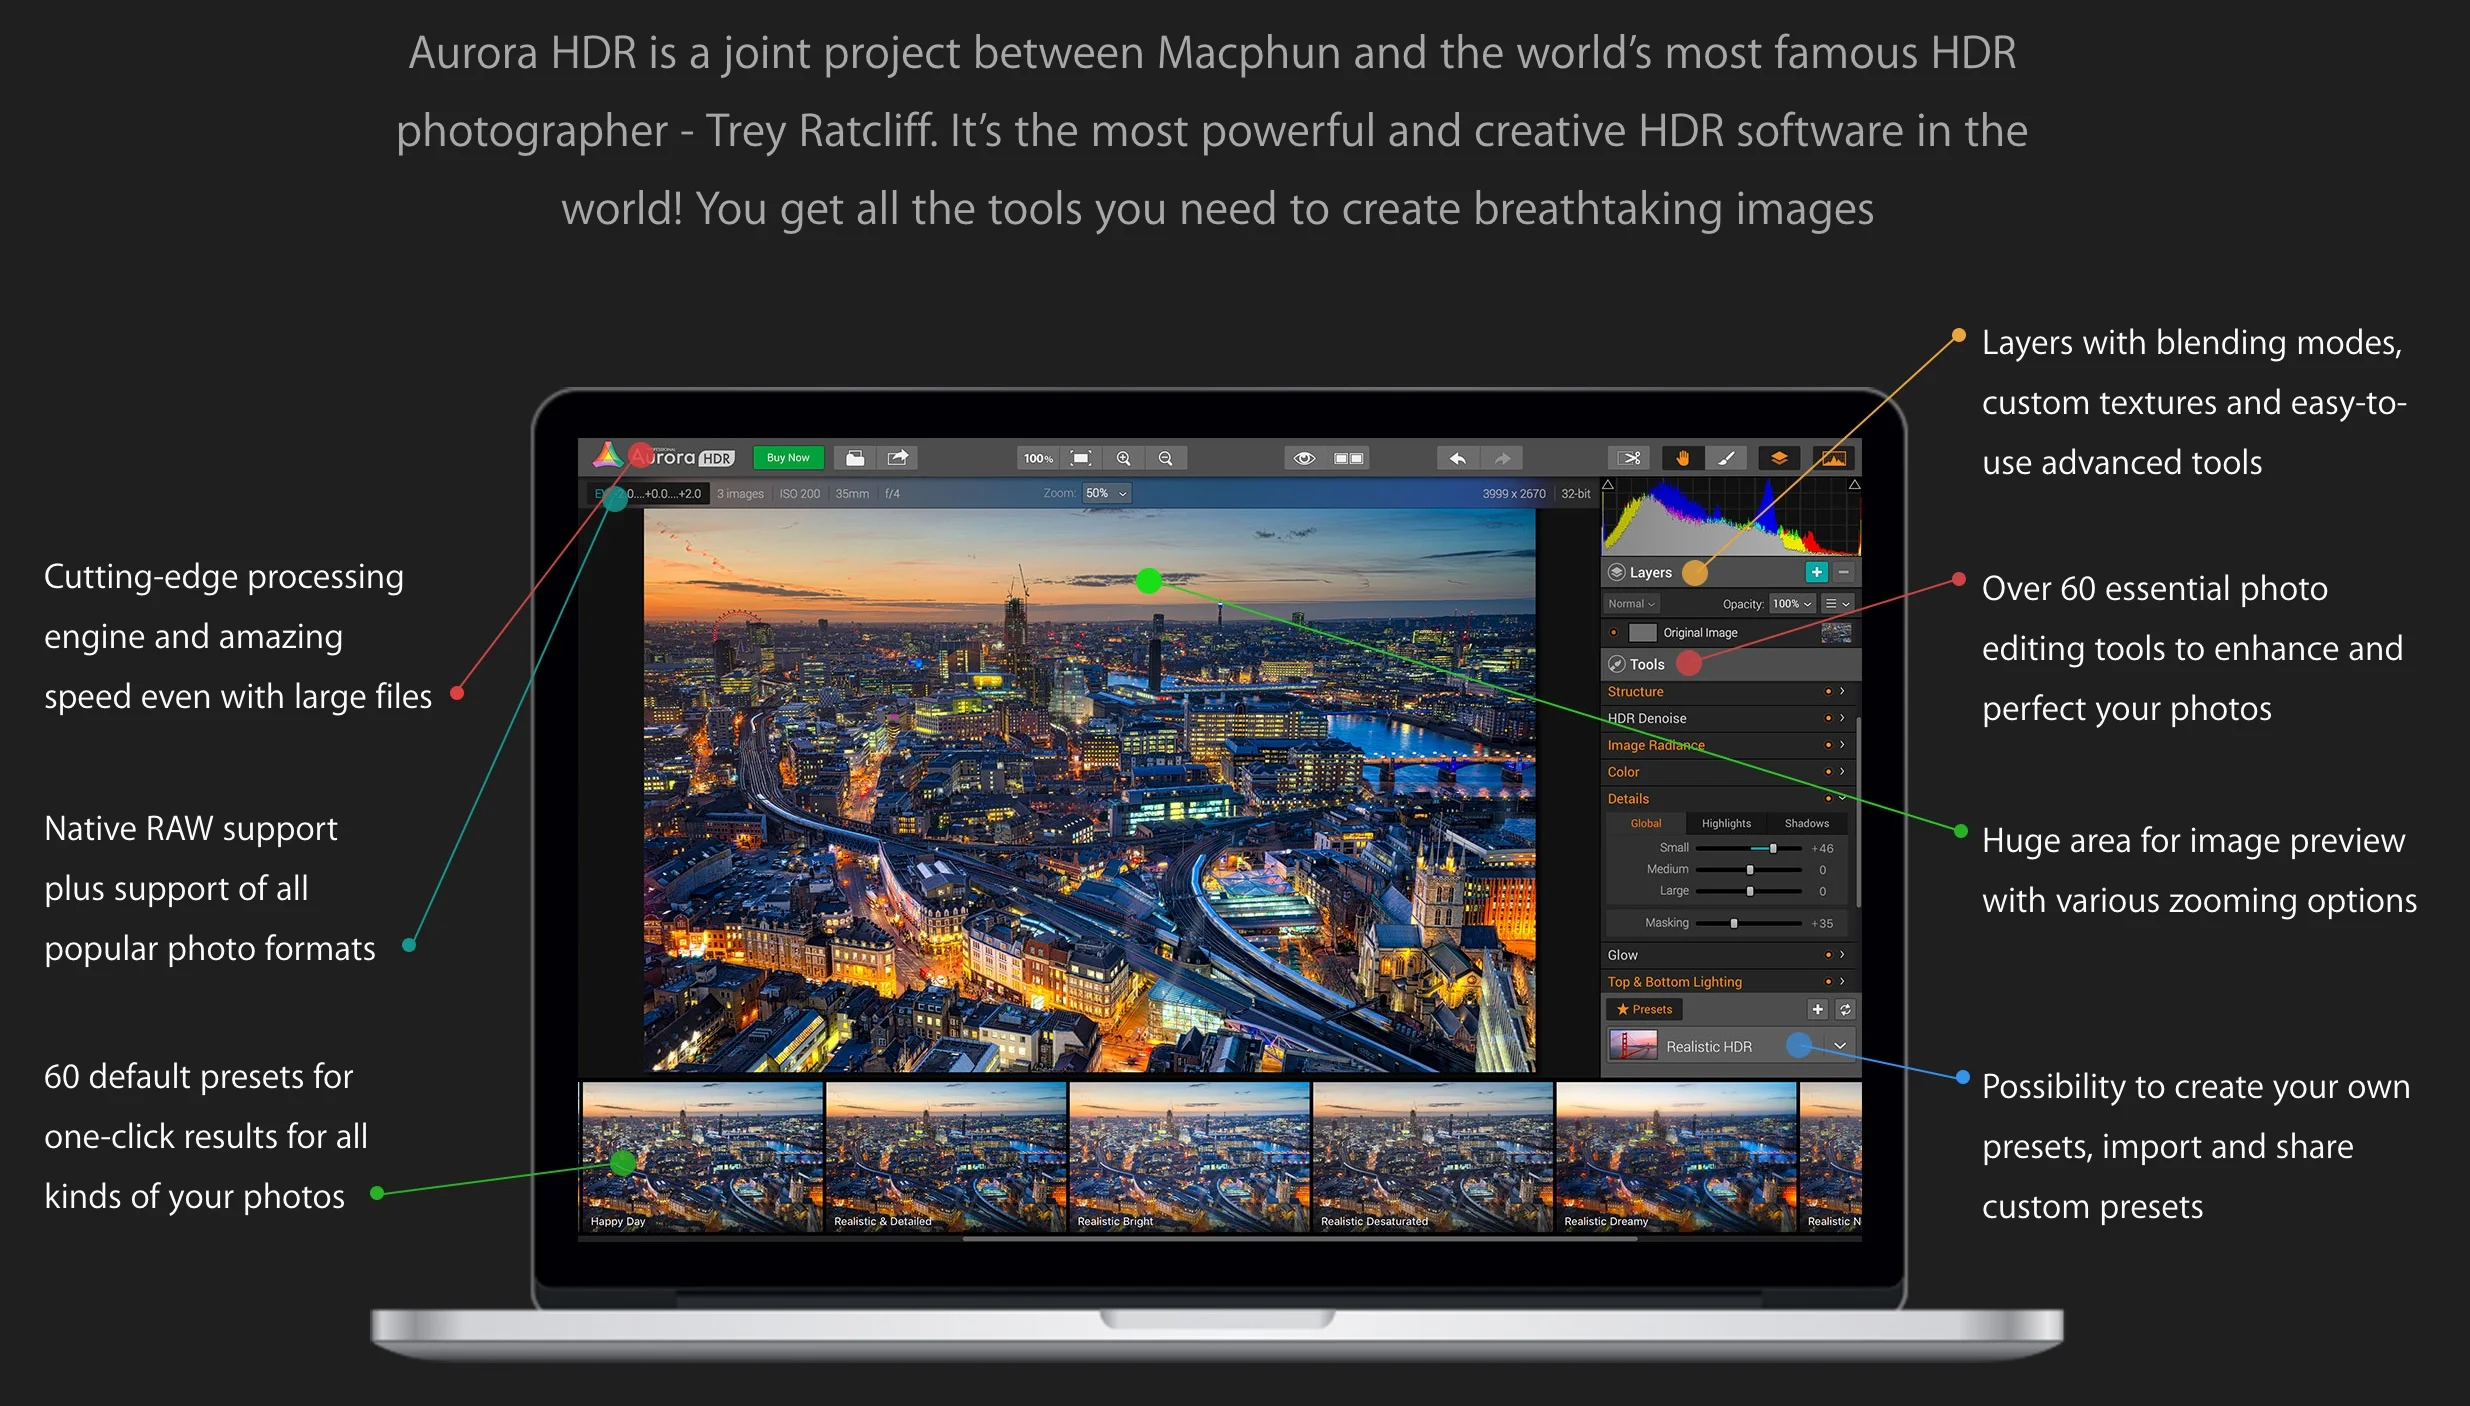
A crazy-long feature list
Once I started creating images in Aurora HDR Pro, it was obvious IMMEDIATELY that this is a game-changing product. It’s an “all-in-one” solution for post-processing any image - not just for creating HDRs - and it just happens to be the best HDR editor on the planet. It has layers, filters/presets, noise reduction, textures, luminosity masks and more. There is really nothing else like it. It’s almost unbelievable, except that I believe it, because I use it so I know that this is all true.
I am still amazed that Aurora has such an extensive feature list, and it all fits comfortably in the product, and yet it’s still intuitive and easy to use. It doesn’t feel crowded or bloated, and it just works. I can’t imagine life without it now. It completes me. :-)
It took just a moment to realize that I needed to switch
After processing only 2 or 3 images, I knew immediately that I had to switch from Photomatix to Aurora, and I had to do it right then. What’s the point in waiting? Why drag it out? And more importantly, why resist making a change that I knew would benefit me immediately? I may be slow to change at times, but I'm not crazy. I know an opportunity when it's staring me in the face (though some times it has to slap me to get my attention!).
I saw significant advancements in the product, an opportunity to streamline my workflow, and an opportunity to make my photo editing much simpler and better - so I switched. Right there, in that moment, I switched. I completely cast aside over 7 years of experience with Photomatix and immediately embraced Aurora HDR Pro - and I am so glad that I did.
I knew that I had to go deep with Aurora so I could learn the product well. I knew it was a new direction for me and my photography, and I was eager to get started. I dove in headfirst, absorbing everything I could find on Macphun’s websites - blog posts, tutorials, videos, and more. I read everything and tried everything, and guess what?
In no time at all, I was extremely comfortable with Aurora, and I haven’t looked back since. It’s been a fabulous few months since I switched over, and I wanted to share the reasons that caused me to have this realization, and make an immediate switch from Photomatix to Aurora.
Here are the major reasons that I switched to Aurora, and why you should too:
1) Layers
When I used Photomatix, I used to export my files to Photomatix, and once my HDR was built I would bring them back into Lightroom. That was a roundtrip and all I did was get the base HDR put together. In Aurora HDR Pro, I build my base HDR first, but thanks to the beauty of layers, I can do so much more right there in Aurora.
I can add Presets (more on that in #2 below), then create a new layer and stack another one on top of it (I frequently stack presets and use 5-7 layers per photo on average). I can make selective brush adjustments. I can adjust the opacity of any layer that I create to increase or soften the effect. I can add textures. I can bring out details. I can adjust colors. I can remove NOISE! I can even replace a sky if I want to!
Yes, it is all there in Aurora, and I love it. It saves me a lot of time by eliminating the need to go elsewhere for layers and selective adjustments. The time savings from that alone is worth it, not to mention the simplification of my workflow - and there’s no need to buy other products! I can get it all done in Aurora!
2) Filter programs not needed
After I had built my HDR in Photomatix, I would then make another roundtrip to some other program to apply filters to the photo, in order to realize my vision for the shot. This usually meant that I went to Color Efex Pro or Topaz Adjust and made some edits (and sometimes, both), and then returned back to Lightroom for final touch-up.
With Aurora HDR Pro, I no longer need those programs because all of that is built right into the product! It has color filters, presets, split toning and more - and it’s all a standard part of the product. So now instead of making another roundtrip to another external editor, I just make all these adjustments right here in Aurora. Easy. I save time and my creative process is un-interrupted because I never have to leave Aurora. It’s a one-stop shop for all of my needs!
I do realize that Photomatix has Presets too, that allow for “one-click” HDR looks for your photos, but truthfully, I have never used them. I just always wanted to have greater control over the HDR look in my images. A Photomatix preset might look good on some parts of an image, but it never seemed to work for the whole thing, at least for me.
But with Aurora HDR Pro, I enjoy the presets quite a lot, and often apply them across an entire image. And, since Layers and Brushes are built into the product (#1 above), I can easily adjust/remove any part of a Preset that may not complement my image. Using Presets in Aurora may be a radical departure from my old Photomatix ways, but it works so well and the ability to apply them selectively is just HUGE.
And as with Photomatix, there is nothing wrong with those other filter programs that I mentioned (Color Efex Pro, Topaz Adjust, etc). They are great products, it’s just that with Aurora they have become a bit redundant to my workflow. I no longer need them, and thus have simplified my workflow considerably by accomplishing everything I need to do to the image right in Aurora (though at times I may make minor adjustments in Lightroom, or use another Macphun product if I need to remove large objects, or convert to black and white, etc).
3) Noise reduction is built-in
But wait, there’s more!
Typically my final step when creating an HDR was to make one more roundtrip (at a minimum, this was my 3rd roundtrip, if you are counting), this time for noise reduction. Whenever you bump up the details in a photo, you run the risk of creating some noise, and usually it’s most visible where you don’t want it - in the sky and water.
Personally, I like my skies and water to be pretty smooth, so this was basically an essential step for me. But now, I just add a new layer in Aurora, make my noise reduction adjustments, and use a brush to paint it into the image wherever it’s needed.
This is a simple, awesome step that I absolutely love about Aurora.
It’s also unique, because generally noise reduction programs apply their “smoothing” across the entire image. That’s what I love about Aurora - I make the adjustments and then just brush it onto the image where I need it. In other words, noise reduction is a selective, localized adjustment thanks to layers and brushes. It’s so much better this way, believe me.
Even more benefits
The list of reasons why I have chosen Aurora over Photomatix is pretty long, but those first three are the big ones. They have significantly affected my workflow in very positive ways. I can do everything I want to do to a photo in Aurora, which saves me time.
But the other, less tangible benefit is that it makes me better at photo editing. Here’s what I mean by that. In the “old days”, because of all the various round trips that I had to make, this meant I also had to be pretty educated about how to use multiple products. This equated to a lot of time using the various products, or reading about them, or watching tutorials, so I knew enough to accomplish what I wanted to accomplish each time I went in to edit an image. So I had to keep up to date on each product, new changes that came out for the product, and so on.
While it may sound like fun - and truthfully, it is - in reality it’s a lot of extra work, just trying to keep up with everyone’s tools (and I had all the major product suites, so that’s a LOT - and I never felt like I was "deep" enough with most of them). Perhaps you have all the time in the world and you don’t mind spending it keeping up with all this stuff, but I don't want every waking moment to be spent on my computer (which is what it felt like it took). I prefer to get my photos edited so I can move on to the next thing, which is editing more photos, or going out to take new ones.
With Aurora, I am keeping up with a single product, because it has replaced at least 3 other products for me. So my life is simpler, and my workflow is streamlined. No more time spent experimenting with some other tool. Now that I have devoted myself to Aurora, I get it and I can get in and get my photo editing done efficiently. Then I can edit more. :-)
Here are several more reasons why I made the switch, in no particular order:
- A cleaner, more intuitive interface - everything is contained in a single window, unlike the "floating windows" in Photomatix
- Graduated filter is built in - this is great for making local adjustments across a section of your photo
- Top & bottom lighting sliders - easily adjust brightness levels in targeted areas of the photo
- Luminosity masks - create masks based on luminosity values
- Cropping and straightening - fix that pesky crooked horizon!
- Social sharing built in - if you are done with the image, post it somewhere!
- Open in Creative Kit for further adjustments - a great family of products, easily reached from Aurora, that give you further creative control over your images
As you can see, I am a big fan of Aurora HDR Pro and it has completely changed my photographic workflow for the better. I am quicker and more efficient with my HDR processing now, and it’s all simplified as well. I absolutely love it.
I highly recommend that you take a look at Aurora HDR Pro. Even if you are not yet creating HDR photos, give it a test run for your single exposure photos. Let’s face it - all the above points are just as helpful with single exposures, too - right? Right!
If you want to see me using Aurora HDR Pro, you can follow me on YouTube here. I create tutorials that demonstrate the power of this product. I think you will enjoy them!
Get a deal on Aurora when you switch!
The good people at Macphun are running a campaign right now, working to convince others to switch from their current HDR editor over to Aurora. Having made the switch, I can attest to the fact that it was the best move I have made in years. Based on what all you have read above, I trust that once you are using it you will feel the same way.
Download a free trial by clicking the banner below, or click here. Why not? It doesn't hurt to take a test run, does it? I truly believe you will enjoy it, and benefit from it. Or click the screenshot below to see the special offer! It's $20 off!
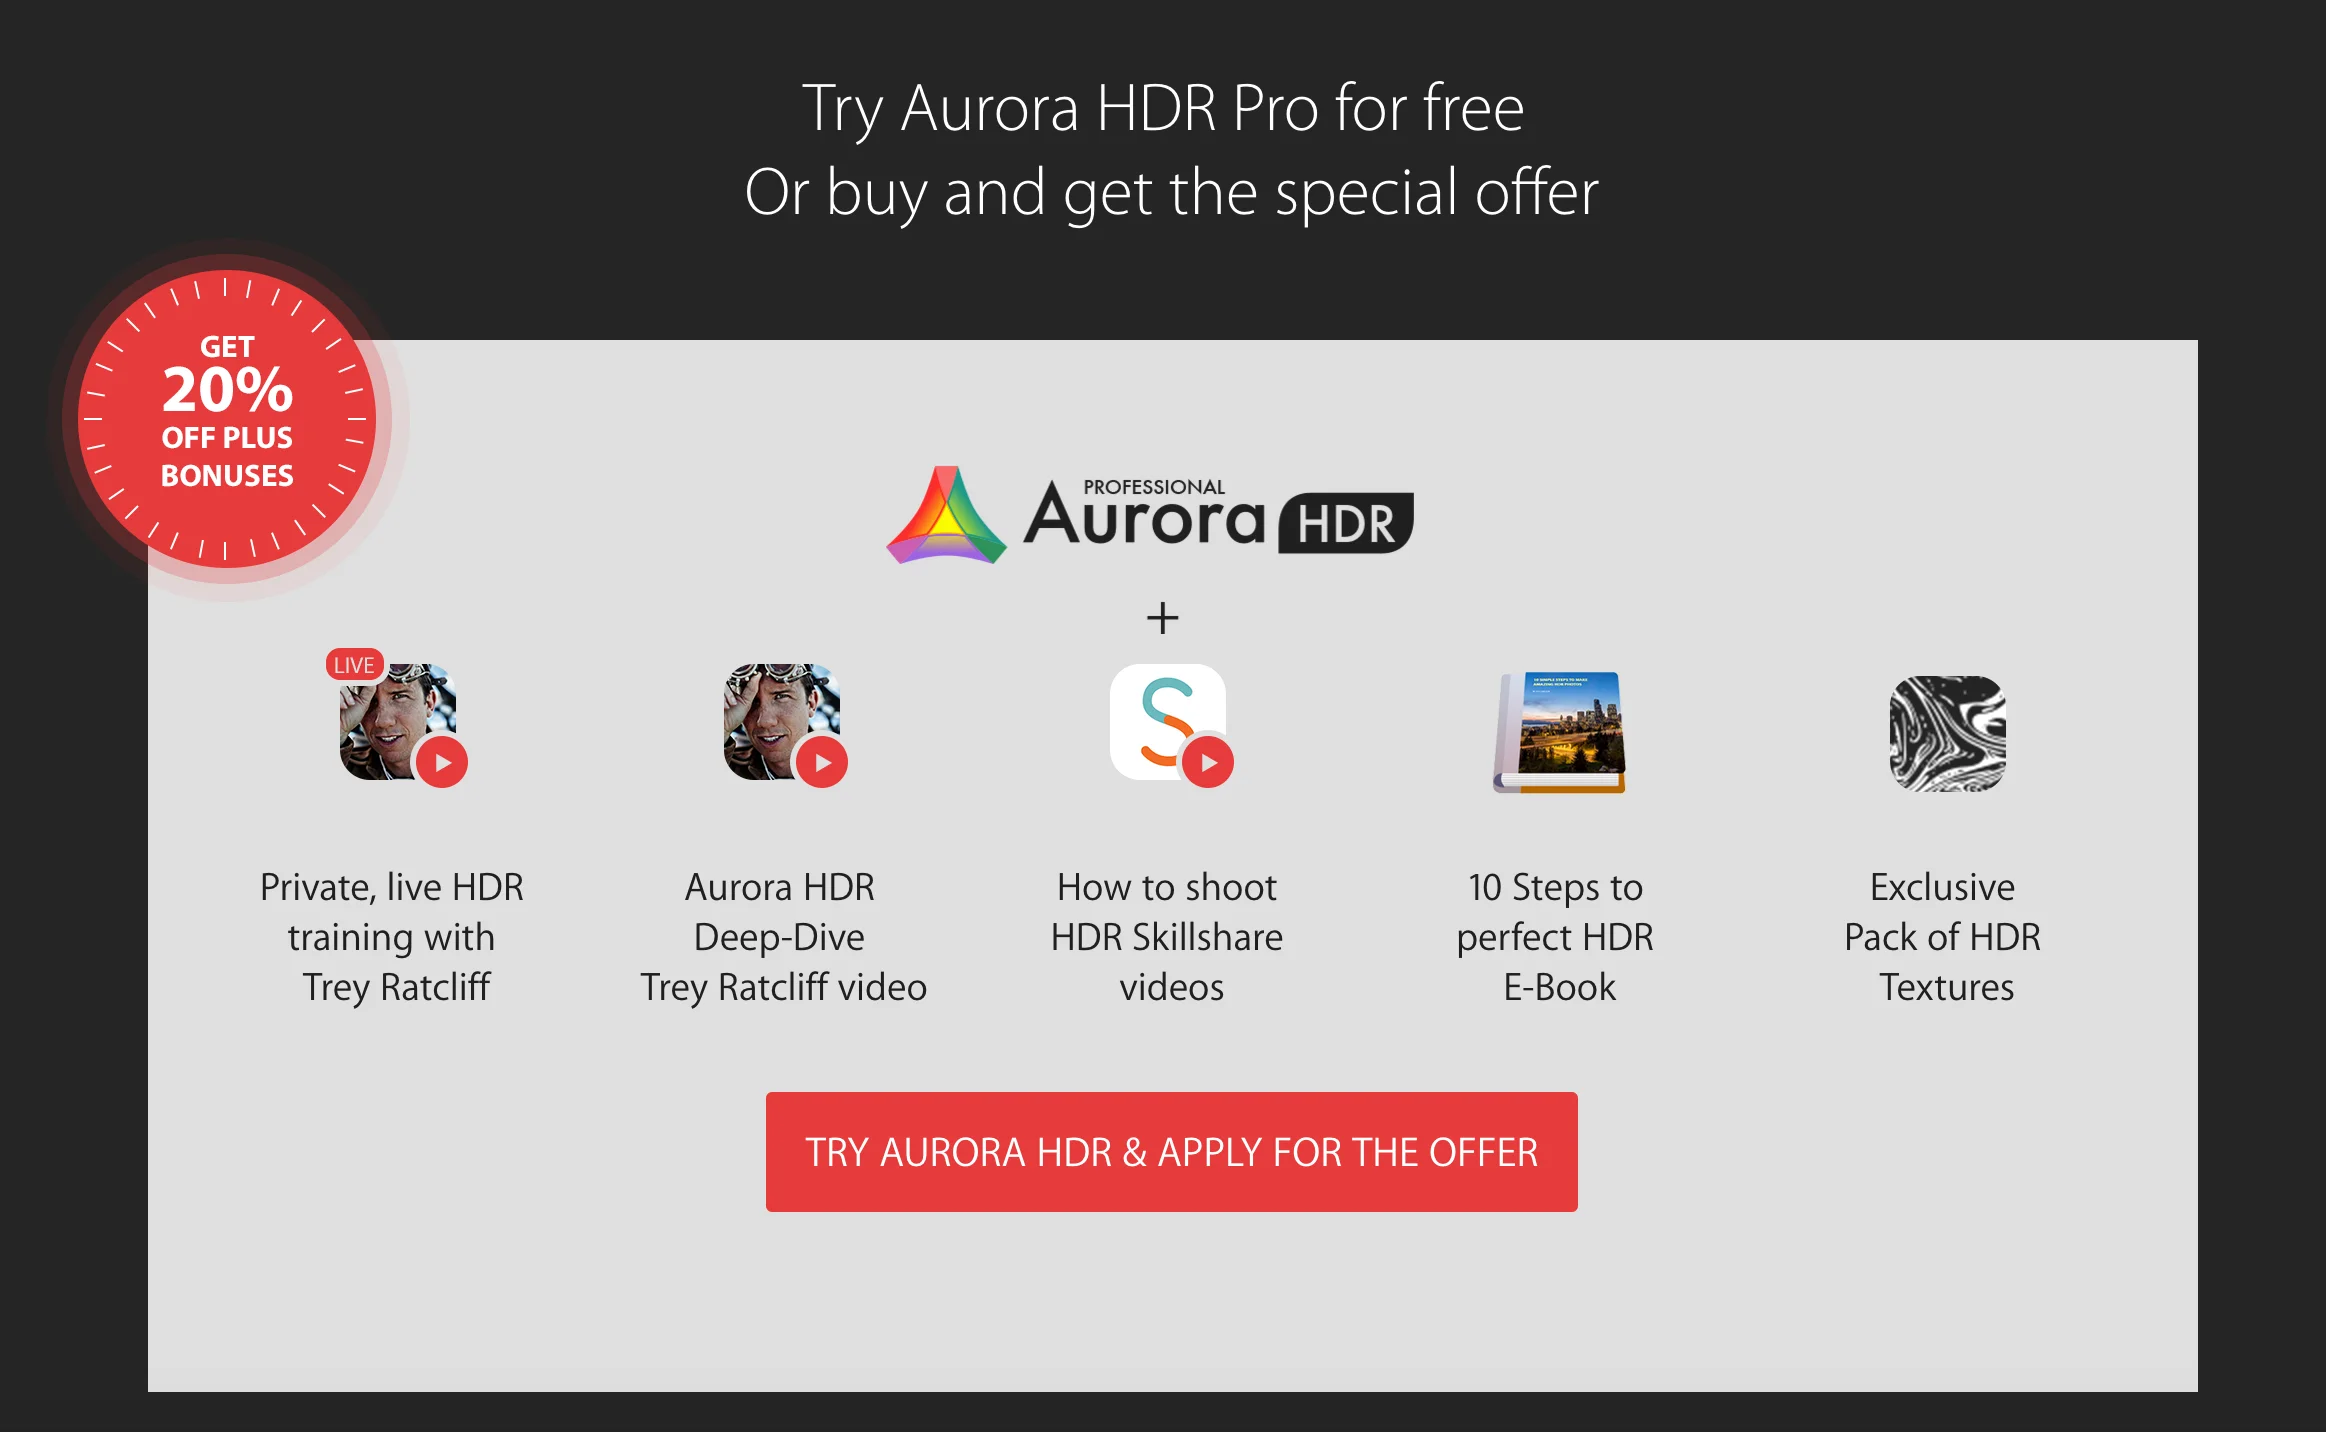
Key Features of the "Switch to Aurora" offer:
- Exclusive live webinar with Trey Ratcliff
- *Special Competitive upgrade price: $79.99 (a $20 Savings)
- 20 Minute Deep Dive Aurora HDR tutorial with Trey
- Jeff Carlson HDR ebook
- A collection of full resolution textures from Flypaper textures
- How to HDR with Matt Suess
*competitive upgrade pricing requires screenshot of your existing HDR app to qualify
Thank you for stopping by, and please don't hesitate to leave comments or questions for me! I hope this helps you in your decision process!
Disclosure: I am an affiliate of Macphun, and if you purchase anything from them using the links on this site, I get a small commission which I reinvest in the growth of this blog (or, maybe I will buy a pony!). However, your price is the same whether you use my links or not. Please let me know if you have any questions about this - and thank you for your ongoing support!

The best place to watch sunset in Austin
Today on the blog I settle the age-old debate about where to get the best sunset view in Austin. The discussion is over, people. I have proven why in today's post. ;-)
Everybody loves a great sunset!
I’ve been photographing Austin for a LONG time. I am talking about many years worth of photos that number in the thousands. In fact, I accumulated so many Austin photos that I ended up writing an eBook about it, which you can find here. It’s entitled The Photographer’s Guide to Austin, and it’s awesome. Ok, I’m a little biased. ;-)
I also have a list here on the blog of the best places to take photos in Austin. It's a very comprehensive list of what I consider the best places to shoot in Austin. Even if you aren't a photographer, this list is like a virtual guide to some excellent spots in this town that is full of them. You can find that list here.
Anyways, back to this sunset thing.
Everyone loves sunset, and as a photographer I guess you could say I have a particular interest in them. The fading light can help create a dramatic end to the day, and I am always hopeful that when it does, I will be standing there with my camera, firing away.
So, where do you go to shoot the best sunset in Austin? Great question.
I have heard so many different ideas about the best place to shoot sunset here in Austin over the years, from downtown to way out West of town, and seemingly everywhere in between. Having shot at every one of them, (cue self-important deep voice) I felt like this could be my contribution to the future of mankind. I could weigh in and settle this age-old dilemma once and for all! (end voice)
Well, maybe it’s not that big of a deal, but some of you may find this important, so if you do, please read on.
By the way, some of you may completely disagree with me, and that’s cool. I’m laid back about this anyways, and certainly won’t force my opinion on you. So you can choose to go elsewhere if you’d like to, which means one less person in my way when I am capturing sunset. ;-)
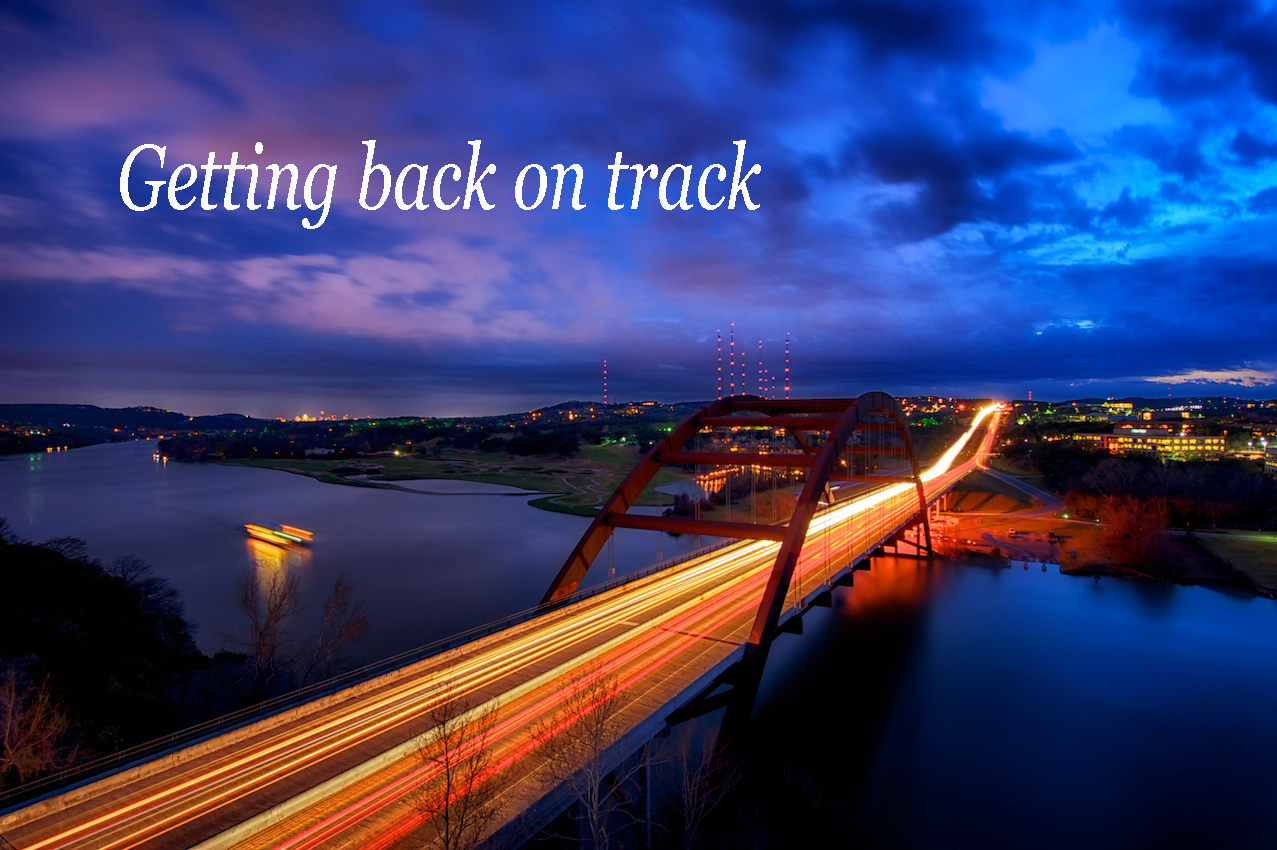
In my opinion, the very best spot to watch the sunset in Austin (and of course take photos of it, too!) is at the Loop 360 Bridge Overlook, on the west side of town.
Yes, the Loop 360 Bridge Overlook is the winner!
Why? Well, let me list the reasons…and provide some visual proof of my claim.
- You are elevated and get a commanding view down the lake/river in both directions.
- You can even see the skyline of Austin in the distance.
- The Pennybacker Bridge (aka The Loop 360 Bridge) is a gorgeous architectural structure, it gracefully arches over the river, and it looks great with the golden light of sunset shining on it.
- Because of the traffic moving on Loop 360 below you, you also have the option of capturing some long exposures, blurring out the lights of the passing cars. Should the sunset be less than stellar, this is a great second option.
- Because you are west of town already, you are clear of other obstructions which would otherwise get in the way of seeing the sunset (such as the skyscrapers downtown).
- You have several choices of locations on both the East and West sides of Loop 360, so although this is one spot, it’s really more like a few spots. Variety is good. Note: the East side is always WAY less crowded.
- You can stand down next to the bridge on the south side of the river for a new and interesting perspective, while still witnessing the sunset.
Click on any image below to enlarge and view in a lightbox. If you are interested in purchasing a print of any of these images, you can find them all on my portfolio site here (along with 400+ more images of Austin).
Now, some locals may want to argue about my choice, and that’s ok, we are all entitled to our own opinion. Here are some other popular spots that I did NOT choose, and why I did not choose them:
- Downtown - While the position of the sun at sunset will vary through the year, I feel like downtown is generally not well positioned for a sunset view. You can’t really capture downtown (the skyline, that is) and the sunset at the same time (unless you have a drone). You can stand on a bridge (1st Street, Pfluger Pedestrian Bridge, Lamar St Bridge) and look upriver, which might give you a decent shot at some nice light (and that's happened a few times for me), but I don’t feel it is even close to how nice of a view you get over at the Loop 360 Bridge. The Boardwalk is a nice spot, but again it's not quite the spot that the Loop 360 Bridge is.
- Mount Bonnell - While this is an enjoyable spot, and you can get a decent view, it’s not as dramatic in my opinion, and in photography, more drama is generally better. Also, when you are up here, there’s not nearly as much variety in terms of how you can compose your shots as you get at the Loop 360 Bridge. It’s pretty much one view. It’s a nice one, but it’s one.
- The Oasis - Yes, I know they call this The Sunset Capital of Texas. Yes, I know it sits right on Lake Travis and you have that big, wide view of the lake. And yes, I have captured sunset there several times, and one of them was flipping fantastic. However, kind of like Mount Bonnell, it’s pretty much one shot. There’s no variety. You climb up to the viewing platform next to the restaurant and fire away. It’s great, but it’s limited. Sure, you can turn a little and look out over the lake (instead of facing The Oasis Restaurant), so maybe this is two shots instead of one. Still. On the plus side, you CAN get margaritas here. ;-)
So, does that mean you shouldn’t go to these other places? Nope, not at all. They are nice. Great, even. In fact, I included them all in my eBook. I love to shoot them, and they are definitely worth seeing. However, since I wrote this about the BEST place to watch sunset in Austin, and I can only choose ONE PLACE as the BEST, then the Loop 360 Bridge gets my vote for that.
Between the dramatic setting up above the bridge, the commanding view of the river, and being able to watch the sun descend over the distant hills, it’s the best sunset view in Austin. Pack a picnic and enjoy the view! Bring a bottle of wine and your significant other. It's beautiful! I’ll see you up there sometime!
Agree? Disagree? Have more to add? Feel free to leave your thoughts in the Comments below.
The Nik Collection is now free. Is that a good thing?
The Nik Collection of software for post-processing your images is now free. Everyone has been rushing to download it. While that sounds great on the surface, I have some concerns about the whole thing. Just because it's free doesn't mean it's worth your time. Read on and let me know your position on this.
The good, the bad, and why I'm nervous
Unless you are living under a rock in the photography world, you have heard that Google recently announced that they are offering the Nik Collection for free. No, that is not a typo. It is now free. You can go get it here if you are interested:
https://www.google.com/nikcollection/
If you don’t have it, you should probably go get it, considering it is free. It is a great suite of products that will do wonders for your post-processing (though I have some concerns which I will get to below).
I have used the Nik Collection for years, and it’s a great suite for post-processing your images. In particular, I have processed SO MANY IMAGES in Color Efex Pro (one of the products in the suite) that I could never count them all. Literally, it was my go-to product for editing my shots. I was dependent upon it. It was where I spent most of my processing time.
Note that I said “was”. Let me explain.
I first purchased the product suite many years ago, when Nik Software was still an independent company, and I spent maybe $500 on the suite (after the Google acquisition, the price was dropped to $149). It was money well spent, and I don’t regret it for a second. In fact, I had also purchased their iPhone app, Snapseed (for $4.99 at the time, which later became free under Google), and still to this day use it on nearly all my iPhone images.
In late 2012, Google acquired the company. At the time, Google+ was going strong and with this acquisition it seemed that Google was getting serious about photography and embracing the photography community. I was excited.
But over time I became a bit nervous about Google owning a product that I essentially depended upon to process my images. That’s nothing against Google. I like Google and of course use many of their products each day, but I knew in my heart that this whole photography thing would never be a big enough piece of their gigantic company to really “matter” to them. Would they really invest in the tools with an eye on continual improvement? Would this product suite be shepherded carefully into the future? Would it even be around some years hence? Let’s face it, they have a history of killing off good, well-known products. And what is their strategy around photography anyways?
So that is what has brought me to the present day, and here’s why I am nervous about depending on the Nik Collection: if they are giving it away for free, can we really expect them to continually provide updates and enhancements to the products?
This article says it well, and really cements my thoughts:
I think it’s doubtful that the Nik Collection will continue to get investment (assuming it has gotten any in the last few years). They’ve been making money from it for several years and yet we’ve seen nothing new. Meanwhile, other photo apps from other companies are continuing to evolve with the times. New stuff comes out all the time. Older stuff gets a facelift or even a full upgrade.
Conversely, I see nothing new on the Nik Collection YouTube channel. I see no blog posts about things you can do with Nik. It’s a black hole, basically. Now that it’s free, I doubt they will reverse course and start innovating. What would be their motivation to do so? I hope they do, but I doubt it. It's kind of a shame, really. It's been such a great product for so many years. I would hate to see it wither, but I fear that it will.
You see, I have been down this one-way street before.
I was a heavy user of Apple’s Aperture product. I loved it, and managed my entire library of photos in Aperture for many years. It was a great product, early on. I had version 2, then version 3, then...oh yeah. There never was a version 4. And that’s the issue.
Aperture was a tiny thing for big old Apple. It wasn’t even remotely core to their business. They stopped innovating and investing in Aperture, and it languished...and it didn't really matter to them. Lightroom zoomed ahead to fill the void, and I felt like I was falling behind the times. And no, I don't consider Photos a replacement for Aperture.
So eventually, I made the hard decision to switch from Aperture to Lightroom. I’m glad that I did. Lightroom is amazing and they continue to invest in the product and add new features. I use it every day and it’s fantastic.
So I’m now a little gun-shy about being dependent upon a company who hasn’t demonstrated a clear desire to innovate and invest in developing new tools. It makes me nervous. Sure, the Nik Collection may continue to be here for years to come, but will it grow and change with the times? Will it get new features and product updates? Will it work with new operating systems that come out? Who knows. I, for one, don’t want to wait around and have to scramble for a solution, should the Nik Collection begin a long, painful slide to obscurity. I’m taking action now.
Farewell Nik Collection; Hello Macphun!
I’ve actually been looking for a replacement for Nik for a long time because of what I've said above. To be fair, there is a lot to choose from, and it’s all good. I have used the majority of the Topaz Labs suite, and I like the products. I have purchased the On1 Software bundle as well, and though I don’t use it much, I find it to be pretty interesting and powerful. There’s a lot of stuff out there, and I have tried most of it.
I have been casting around for the right solution for a while, but I have yet to find something that just feels right across the board. Something that just clicks. Something that suits my processing style, gives me new capabilities, causes me to stretch my imagination and skill level, and that is just plain fun to work with.
But I'm not searching anymore.
Recently, I reconnected with Macphun and I started working with their products again (I first tried their Intensify product a couple of years ago and loved it, but got distracted with life and stuff, and never got into using the full Macphun suite). The first thing I did after reconnecting with Macphun was try out Aurora HDR Pro, which you can read about here. I wasn’t looking for a new “HDR editor” but Aurora is so powerful that it has become my default editor for all my photos, HDR or not.
But even so, it wasn’t until I really dove into their entire product suite that I realized this is the path forward for me. I have seen the light! :-) The products are so powerful yet very easy to use, and after just a few weeks I am very comfortable with them and using them all the time now.
They offer everything that I was getting out of Nik Software, and then some. Macphun is a young and growing company and they are continuing to innovate and bring new products to market (Aurora HDR Pro, for example). I'm loving their products, and I’m excited about what lies ahead.
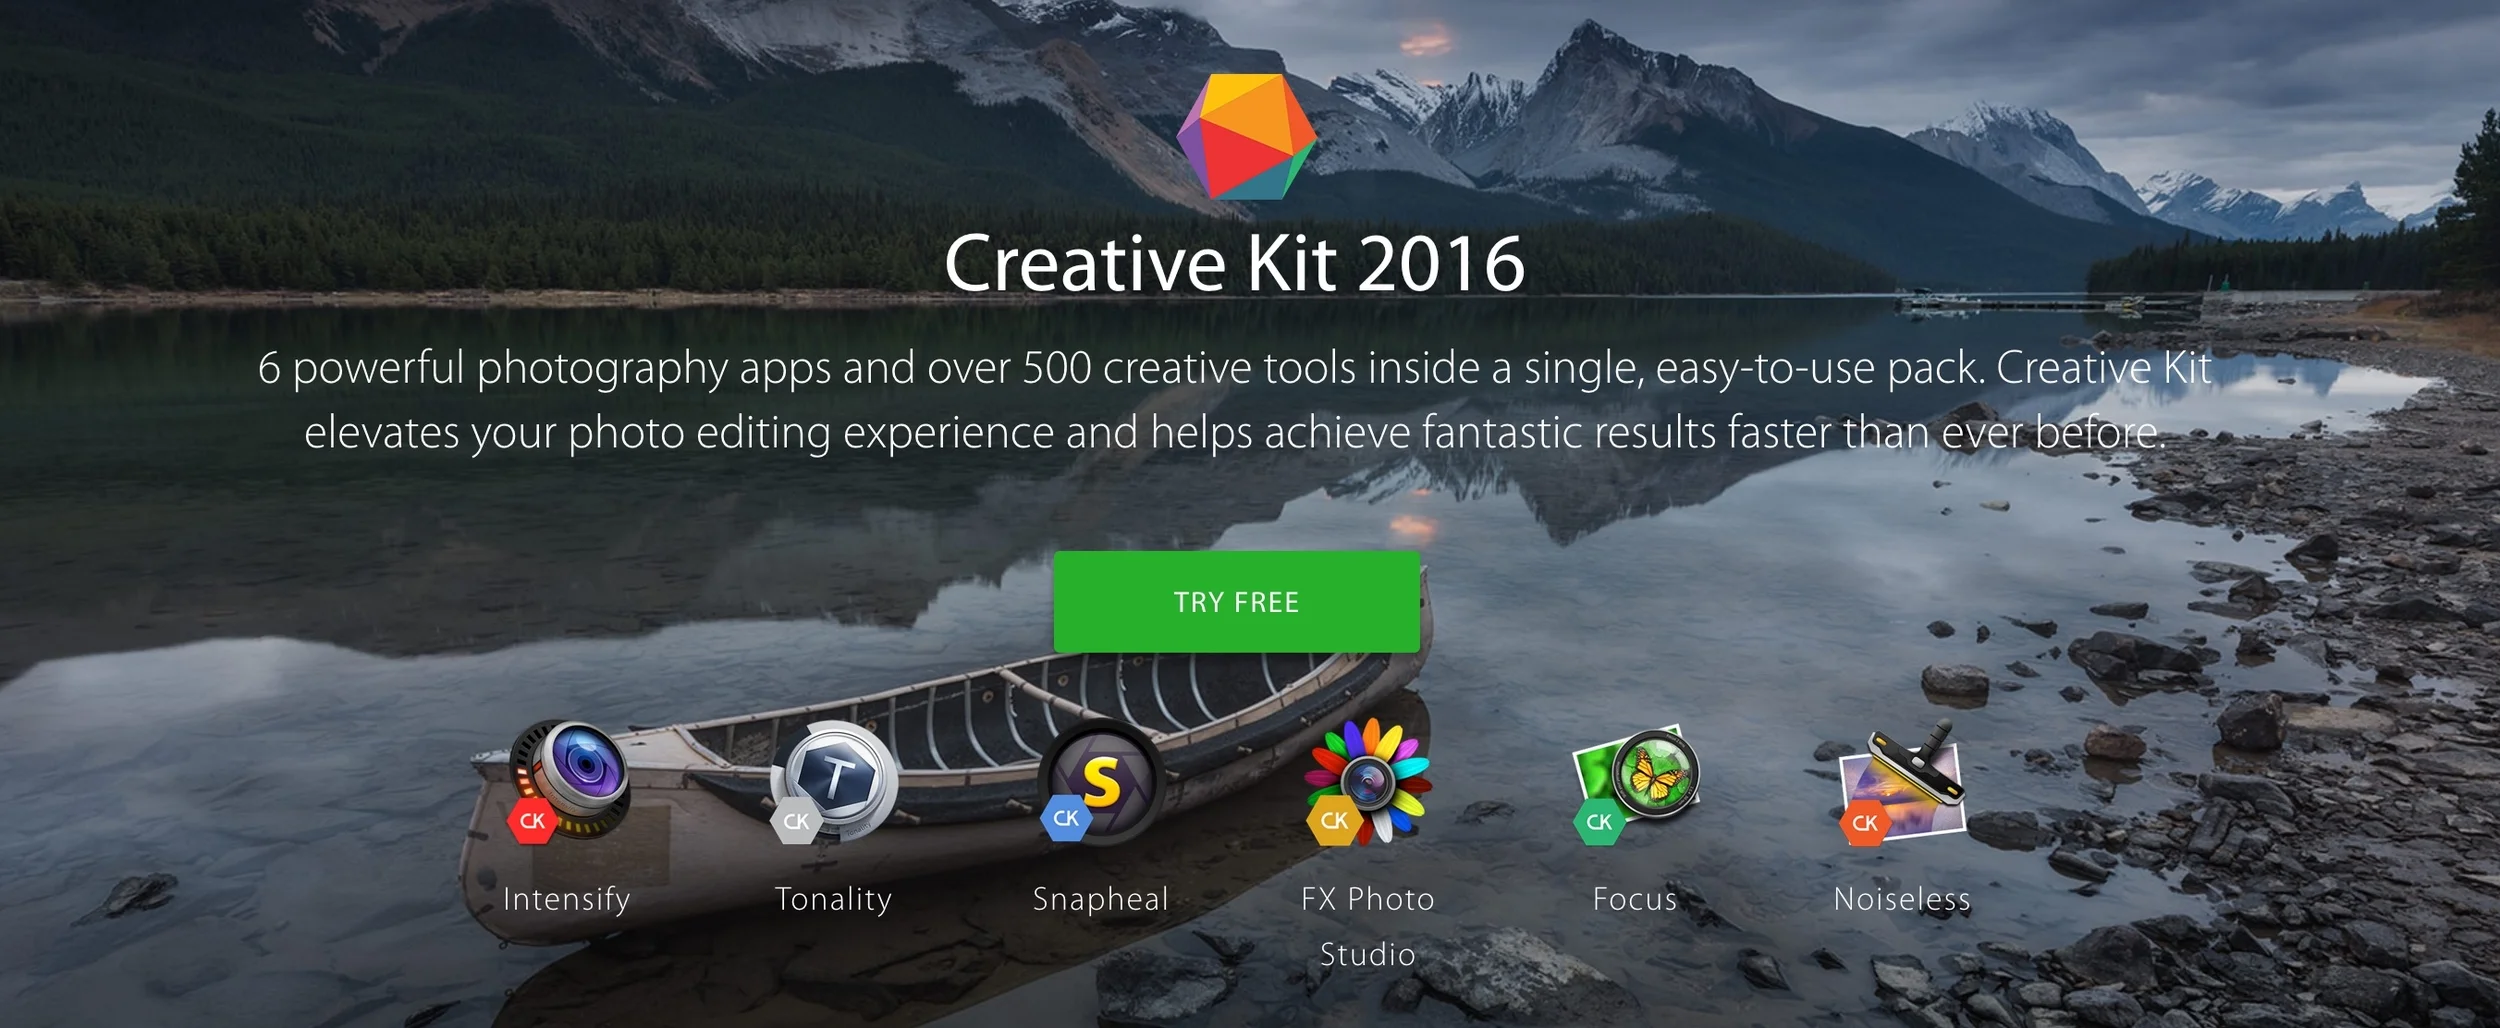
Here is their product list and what it does for you:
- Aurora HDR Pro - create amazing HDR photos, easily add layers, textures and more
- Intensify - easily enhance Structure, Sharpness, Detail, Contrast and more
- Snapheal - easily remove unwanted objects from your photos
- Tonality - a powerful black and white conversion tool/photo editor
- Focus - pro lens effects, blur, motion, tilt shift, etc
- Noiseless - powerful noise reduction
- FX Photo Studio - a large collection of filters and effects
I highly recommend that you take a look at the Macphun product suite. (Note that it does only work on a Mac, so if you are on Windows, sorry.) You can find everything you need to know on their website.
It has rejuvenated my post-processing, streamlined my workflow, and brought a new level of fun back into the time I sit in front of my computer (which admittedly is a lot). Now when I sit down to process some photos, I am excited about the creative possibilities with the Macphun suite. It makes me think differently about my images, and that's a good thing.
I’ve already shared a few videos on YouTube that I made about using Aurora HDR Pro, and I will continue to add more, including the other products as well. I will write more about it here on the blog and create more instructional content, as I get deeper into the Macphun suite. So, stay tuned and come back often. ;-)
And although it may sound like it, I'm actually not trying to tell you that Macphun is the answer for everyone. It happens to be the answer for me, and I highly recommend you give it a try. But, you may be in a different place than I am, and that's cool. I've spent a lot of time trying out different product suites, or "flipping rocks" if you will. You will probably want to do the same. We all have different needs.
Try Topaz Labs. Try On1. Try something. Sure, go ahead and download the Nik Collection, because it is a nice product suite, and you can't beat the price. I'm just offering up my opinion, which is that I wouldn't get too dependent on it. It would suck to invest tons of time learning it and using it, only to find out that you are on a ride down a dead end street. You never know if it will be around tomorrow.
If you have any questions, don’t hesitate to send me a note via the Contact Form or just leave a comment here. I’ll do my best to assist. Good luck in your search!

First impressions: Aurora HDR Pro
Today I share some insight into Aurora HDR Pro - a new product I am using to create my HDR photos with (and my single exposures too). It's incredibly versatile and powerful, and I am having a great time with it. Read my quick review, see some screenshots and finished photos, and let me know if you have any questions!
I've just spent the last few days immersed in Macphun's Aurora HDR Pro (co-designed with world-renowned photographer and all-around nice guy Trey Ratcliff) - and I'm incredibly impressed!
Like everyone else, I saw the news of this new software come across my social feeds a while back when it was announced. It sounded interesting, but honestly, I thought I was going to pass. The truth is, I have PLENTY of software tools already, and I couldn't imagine that I would need or want to add to my arsenal. You see, I don't even use everything I have.
If anything, I would rather pare down the amount of software I have. I already have more stuff than I really need, and certainly more than I use on a frequent basis. I've actually been giving some serious thought to completely dropping a few things (and I mean a full-on delete from the Mac sort of drop) - I just wasn't sure what it was going to be. Well, I'm quite a few steps closer to figuring that out now!
After hours spent using Aurora HDR Pro over the last few days and editing a bunch of photos, I actually do think I can pare down the software I have - because Aurora HDR Pro can replace nearly all of it!
You see, I am a simpleton in many ways when it comes to photography and post-processing my images. That's probably not something most photographers would admit, but it's true in my case. I like things to be simple. I want things to be easy and straightforward, and I don't want to read a book or two in order to figure out how to use something.
Plus, I don't want to spend hours on a single photo - that feels like a total waste of time for me, and when I see photographers brag about doing so, I don't understand it. It's impressive in a technical sense of course, but I'm not interested in that sort of thing. I've never used Photoshop in any serious manner, as I always found it clunky and difficult (and truthfully, a little intimidating). But, I liked the idea of layers and so I always told myself it was something that I needed to get a better understanding of.
Recently, I reconnected with the fine folks at Macphun about their Affiliate Program. You see, I signed up as an affiliate there a couple of years back, and started using their excellent product Intensify Pro (now known as Intensify CK, part of their Creative Kit - and I need to make some updates to that review, but it's still 99% accurate). I loved the product (as you can tell by the review) but for some reason I got distracted with other things and sort of fell out of their orbit as they changed their program. Turns out, I wasn't in their program anymore, and didn't even know it. Shame on me.
Thankfully, I am back in the program and since this is their fresh, new product, I decided to dive in and see what the fuss is all about. Well, I am glad that I did.
This product is ABSOLUTELY FABULOUS and I can see that it is going to replace several products that I have used a bunch in the past, but don't get as much use from today. In my opinion, some of those other products haven't kept up with the advances that are so evident in Aurora HDR Pro (and no, I will not name those products) and thus they seem to keep falling behind. That has prompted me to try and consolidate my portfolio of products - and now I feel like I can do so.
In case you are a pinner, here's a handy Pinterest graphic for you.
In short, you can do SO MUCH with Aurora HDR Pro that it's impossible to describe it all in this (relatively) short blog post. While this isn't a tutorial (though I plan to create one), I will show you a few photos that I edited with Aurora HDR Pro and a couple of screenshots too.
But first, here are some key features that I love about this product:
The tone mapping algorithm is excellent - I am loving the results that I get.
The presets are great! While I tend to prefer to alter any preset, I have found several that I like "as is".
Layers!! This is probably the most powerful aspect of Aurora HDR Pro. You can create layers and just mask in edits to portions of a photo. For example, you can create a mask for the sky and then apply noise reduction and smoothing just to that area - so easy!
The clarity and detail controls are excellent.
This is a great editor for single exposures too! In other words, you don't even have to care about HDR to get HUGE benefits from using Aurora HDR Pro. I'm using it on a LOT of single exposures.
So, time to get onto some photos, right?
I was in Scotland late last year, and came home with a bunch of photos that I have been getting to slowly. So I thought that for this post today, I would jump in and edit a few of them with Aurora HDR Pro. I was in Aberdeen and took a day to head out to the little coastal town of Stonehaven, primarily because I wanted to visit Dunnottar Castle (which like all castles is awesome). But before I got to the castle (which I hiked to from the town), I passed by this little harbor area. I loved the look of it, and stopped to fire off a set of brackets. This photo below is the middle exposure, straight out of the camera with absolutely no adjustments done to it yet. It's a little too dark and certainly lacks any pop. But, I like the scene, so I figured I could get something useful out of it if I spent a little time on it. And obviously, it didn't look this flat in person.
Stonehaven, Scotland - straight out of camera, before I make my adjustments
I took that single exposure above and, from Lightroom (which I use as my library manager), went over to Aurora HDR Pro to see about messing around with it. This was my very first photo that I adjusted in Aurora HDR Pro, even before I had watched any of the excellent videos on the Aurora website. I was just trying to apply some presets and make a few minor adjustments. No masking, no brush work, just a single preset with some minor adjustments to that preset. I liked it so much that I kept it! Plus, this was about 10 minutes worth of work, in total. Not a bad first effort in my opinion, considering I was sort of flying blind. Way more pop in this one, much brighter, better colors and contrast - it's much improved!
A single exposure after applying one preset and making a few minor tweaks to the sliders
Next, I watched some of those videos so I could get a better handle on how to use masking and brushes, etc. Most of the videos are pretty short, and the tools are VERY EASY to use. In no time at all, I was stacking layers and brushing in stuff here and there with the use of masks. Easy and quick!
Next I took the below photo (again, a single exposure straight out of camera with no adjustments applied yet) and went over to Aurora HDR Pro for another test run. Once again, I used a preset and made a few minor adjustments, and the second photo below was the result. Simple and a worthy result. Here's the base photo before any adjustments:
Single exposure with no adjustments yet made to it
And here is the result of about 5-7 minutes in Aurora HDR Pro (which was mostly spent trying different presets and moving a few sliders left and right):
Here I applied a single preset and made a few minor tweaks to the sliders
I like that result, but it was pretty basic, all things considered. So I decided to try again but with a couple of new tricks I picked up in their videos.
This last photo was created with the use of a couple of layers applied. I separately warmed up the sky and made some color shifts in the ground, causing the yellow grass to pop a little more.
Down below is a screenshot from the editing of that last photo. In the upper right you can see the different layers I have created to make the selective edits to this photo (Ground, Sky, Sky DeNoise). I name them based on the edits I plan for that layer to make it easier to keep them straight (especially helpful after I have moved on to something else on the photo). Plus, if you want to change something, you just click on that layer and go back and edit it further (and I find myself doing that a lot, because I may want to alter previous changes based on subsequent changes I added to the photo).
Also, here's a great feature of the masks - you can just copy and paste a mask to a new layer if you want to . For example, I created a mask for the Sky layer that, as the name implies, covers the whole sky. While working on that layer, I made some color adjustments to warm it up a bit. Next, I wanted to take some of the noise out of the sky, so I just copied the mask from the Sky layer and pasted it onto a new layer that I called Sky DeNoise. So easy, and it keeps you from having to re-mask everything when you decide to make multiple edits to a single area. I love that!
And one other thing - after you copy a mask like I just mentioned above, you could actually invert it too if you just wanted to mask the rest of the image. That's another time saver and a great feature.
This next photo was the next scene I encountered after walking past and photographing that monument from the last shot above. It was the first good view of Dunnottar Castle that I had as I approached it. I love the dramatic setting there - so awesome! However, the photos straight out of camera were pretty flat. This time, I decided to create a full-on HDR by merging all three frames. So in Lightroom I highlighted the ones I wanted to merge, and headed over to Aurora HDR Pro for some fun.
Here's the screenshot which shows the photo after I have applied some adjustments (a preset with some minor tweaks, and then a layer to DeNoise the sky). I was able to get the colors and textures to pop quite a bit more, which is the look that I wanted for this photograph. Quick and easy - done in way less than 10 minutes.
Here's the final photo, after I took it back into Lightroom and straightened that crooked horizon. :-)
In summary, the power of Aurora HDR Pro is vast and I have to say that I will be using it on just about everything now. I love it, and this is more than just some "ooh, a new toy" kind of reaction. It's incredibly powerful and allows me to get rid of many other products that I either don't use, or don't like to depend on (or that have fallen behind).
It gives me the power to create HDRs and make fine-tuned adjustments in the same product. It allows me to take a single exposure and edit it with this powerful software, so you don't even have to merge multiple photos (or take them, for that matter, if you are so inclined) if you have a single exposure that's usable.
I can make every adjustment that I can think of in this one product: layers and masks, color adjustments, graduated filters, brushes for fine-tuned adjustments, details, clarity, structure - the list goes on! You can even do luminosity masking and custom textures. It's crazy!
I wouldn't have believed it prior to using it, but Aurora HDR Pro not only crams all this awesomeness in a single product, but it does so in a way that is not intimidating, overwhelming, or even crowded. It just all fits in there and works great. I highly recommend this product and as soon as I can find the time, I will be sharing more about how I use it and some tips and tricks I pick up along the way! And I will be editing a LOT more photos with it too!
Oh yeah, I also have an announcement to make
Here's some news - I started a YouTube channel! It's something I've been thinking about for a long time, and finally found the time to get the right equipment and teach myself how to do it. So I figured that starting out with a review of Aurora HDR Pro would be the perfect start - so, here it is! Enjoy! I plan to do more videos, and share a lot of workflow stuff, processing tips, and more. It will be fun! Click through to subscribe to my channel if you are interested! You can find me here:
**************************************************************************************************************
FULL DISCLOSURE: As an affiliate of Macphun, I received this software for free. However, all opinions expressed here are my own, and are not dependent upon my relationship with Macphun. This is not an ad for Macphun and they did not compensate me to publish this mini review. I wrote this because I like to share my experiences with products, and I simply love the software. When you consider what all it can do (and what all it can replace), I feel it's a great value for $99.
If you are interested in purchasing Aurora HDR Pro, you can use the discount code JimNix and get 10% off your order. Just click the banner below to be directed to their website. If you use that link to purchase the software, I earn a small commission which I reinvest in the growth of this website. Thank you for your support.
Please let me know if you have any questions and have fun with it!

My plan for 2016
It's a New Year, and I'm already busy. I am planning on doing a lot this year, taking my photography business to new levels, and enjoying the heck out of it. Here's a personal post about what I am thinking. I welcome your feedback, and look forward to a productive 2016! Thanks for following along!
What does 2016 hold in store for me?
I’ve been thinking about my photography a lot lately. No, really - a LOT. More than normal. I don’t just mean “oh it would be cool to shoot this or that location this year” or “I would like to learn this trick or technique in 2016” or even the more basic “wouldn’t it be awesome to have THAT piece of gear soon?”. No, I mean seriously THINKING. Bigger thinking.
I’m trying to determine what my value is as a photographer and what my “brand identity” in this profession really is - and that’s a lot harder than you might think. There are a LOT of people that take great photos, and I hope that I am one of them. But what value do I bring? How am I different? What can I offer? What is my brand? And the one big question: What do I want this to be for me?
You see, I have always thought of my photography as art - not business. Sure, I sell some prints to people who hang them in their homes, and I license prints to some businesses that use them in their marketing. But I have yet to really devise a business plan and put any serious thought into turning this into my profession. I’ve just been taking photos, sharing photos, and having fun. On purpose, I’ve kept somewhat of a line between the business and the art, as though they are incompatible.
They’re not. They are very compatible in fact, and I am going to work hard to merge those two in 2016.
Historically, I have said that I don’t want photography to be my profession because I fear it would start to feel like work, and thus lose it’s allure to me. Wouldn’t that be terrible? But over the last 6 months I have been thinking about this more and more, and I’m not sure I feel that way anymore. In fact, I don't feel that way.
No, I am not going to start shooting weddings or portraits - that is not at all what I am thinking about. I’ve never done those things, and honestly don’t have much interest. That actually would feel like work. I prefer to stay with my interests and strengths, which are travel-related photography, cityscapes, landscapes, and that sort of thing.
I am talking here about (and have been working on) creating products and services that would provide good value to people and that would help them with something. This could be a whole lot of things and come in a lot of different formats. But the bottom line is that I have been getting more serious about it all, putting a lot of thought into it, and working on creating and getting my head around treating this as a business.
It’s exciting, actually - and I am having a lot of fun already.
So when I asked myself what I planned to do in 2016, it was a much different list than in previous years. My list last year was basically me using the word “more” a lot. More photos, more reviews, more numbers. It was almost exhausting for me just to read it again. It felt like I set quotas for myself in 2015, and that makes this sound like work, not fun (it’s technically both, but more fun than work!). Though I exceeded my numbers goals by a wide margin (not sure that’s a cause worth celebrating), I fell short of some of the other ones, namely investing in myself. I was just too busy trying to process a lot of photos. I didn’t get to much else.
Quality over quantity
So for 2016, I decided that simple is best and quality is job one. That does not mean I am not ambitious in my approach to the New Year - quite the contrary, in fact - it just means that I am not setting quotas for myself like last year. While having numbers-related goals motivates me to “get things done”, I mentioned here before that I became more interested in getting them done than getting them right. That’s not the way to do things and that is certainly not the way to create a brand identity for my photography.
My goals for 2016:
Decide upon my brand identity and begin to build it in earnest
Create valuable products that help people
Write and share personal experiences
Update and expand the site’s content
So let me examine those four things for a moment and provide some detail.
1) Decide upon my brand identity and begin to build it in earnest
This is the big question that I am wrestling with, and it’s a tough one. It sort of gets to the very core of things, and that is hard to think about. I don’t mind sitting with the questions - in fact, it’s fun in some ways and definitely interesting. But I am having challenges coming up with answers. I just don’t know what they are right now, and I’m not sure how to get that clarity.
Am I a travel blogger with a lot of photos? Am I a photo blogger that travels? Am I a writer, or blogger, or some combination of the two? Am I a teacher in some way? Am I an “HDR photographer” or just a “travel photographer that happens to do some HDR”? (and truthfully, I'm not sure I want to be known as an HDR photographer - certainly not exclusively, as my interests are broader than that)
You see? There are a lot of things to think about, and few answers at the moment. I do know what I like to do, and I have realized that I cannot and will not be all things to all people. I’m just going to be me, and see how it all sorts out, I guess.
2) Create valuable products that help people
I already mentioned taking my photography to the next level and treating it like a business, and I intend to do just that. I expect it to go well - I’m an eternal optimist, by the way - and already have plans for several creations in the works. My first foray into this will be with eBooks. I will launch my first one for sale in late January (I believe) and several more are sketched out, too. I’ve been busy! I will be back with more details on that as soon as it is ready, but I am very excited about this first step in that direction. I have several other ideas too, but won’t be sharing those until I am a bit more certain that I am willing to commit to them.
3) Write and share personal experiences
I really love to sit down and write longer posts, but I don’t do it often enough. It’s a combination of it taking me a while to get my thoughts down in a (hopefully) logical way for the reader, and making sure it’s something that anyone may actually want to read - and then editing, editing, editing. I also feel like I sometimes rush things to “get it out there” when in fact I could take a little more time and get it done better the first time.
This also includes product reviews. I have a couple I am planning and I intend to do them a bit less hurriedly than before. Perhaps you haven’t noticed, but I have. Lastly, I want to incorporate more of “me” into what I share here. I’m not sure how to put that into words, other than to tell you that sometimes I feel like I am just putting words on the page, so to speak, and not putting me into the words. I am working to change that.
Oh, and one more thing. I intend to share more "behind the scenes" type things, such as my workflow for a particular photograph, or how I handle certain processes in my photography, from capture to online sharing. There's a lot of opportunity here for me to share my insights, which I enjoy doing, and hope they would be helpful to those that are perhaps just getting started in photography.
4) Update and expand the site’s content
I have a ton of pages here on the site - and I’m not talking about individual blog post entries (though I have 5+ years worth of those, too). I am talking about separate pages that I have created to house a particular thing (maybe a photo list for Austin or London or Paris) or a product review (a camera, a lens, or a bit of software), or even a page for great travel quotes. I have been working to organize all of this better and have also added more to these various pages - and will continue to do so. I realized this year that I cannot be all things to all people, so I am going deeper on what I can offer that is valuable, and (hopefully) making it more of a resource for people.
This includes completely redoing some reviews and tutorials here, because they are both out of date and not good enough, in my opinion. I am also re-categorizing some pages and getting things together in a more logical order. Some of these I have already done, having gotten all my iPhone pages together here, and all of my quotes & inspiration stuff onto this page - and I even got all my gear summarized here on this page. I may remove some pages entirely (and have done a bit of that already, too). So this will be a continual work in progress, but I have done some already and honestly, it’s rather fun to go back and rewrite some of these things. Some of these pages are nearly 6 years old! So yeah, there’s a big need for some updating.
I also plan to add more educational content. I get a number of questions about how I did this or that on a particular image. I am comfortable with a number of post-processing software packages, and so I feel like I can add some value in that regard. Plus, I actually just love helping people get better at this stuff. So I will be working to add more of that into the mix as well.
Pretty straightforward goals for the year, right?
So that’s it, although that is a lot of stuff. Sure, it’s just 4 “things” but each of them is deep, complex and involved, so I will be hammering away at them all year I suspect (and perhaps longer), which I am very much looking forward to I might add!
I’m looking forward to launching my first eBook, and will NOT set a quota for myself for how many more I can launch in 2016. I will launch something when it is ready, and not hurry to get it done. Although I have to admit, my head is swimming with ideas and I plan to spend a lot of time on this stuff. It’s very tempting to put a goal out there, but based on how I handled last year, I feel like I will be in a big hurry if I do so, and I don’t want to rush something like that.
Of course, there will be a lot of travel and photography for me in 2016, so although I didn’t technically include “take photos” as a goal for the year, I hope that by now you realize that is a given. I will continue to share my photos and travel stories here each week. Some weeks may have more blog posts than others, but again, I am focusing on quality over quantity. There are already some travel plans in place for 2016 and I am sure that more will come up, so I expect it will be a busy year, a productive year, and a fun year. I'm looking forward to it!
I like the symbolic rolling over into the New Year and all that is associated with it. In reality it’s just another day on the calendar, but for me it feels like a fresh start with some new ideas, a reset of sorts, and I’m looking forward to running down my dreams in 2016.
See you out there! Keep on shooting!

Highlights from 2015
It's fun to look back on the year that just ended, and today's post is exactly that - a look back. 2015 was a year of photography, travel, and change - and I hope I did it justice in this summary. Grab a cup of coffee, sit back, and enjoy the review - there's a LOT here! Thanks for visiting my blog this year!
2015 - you were a great year! You'll be remembered fondly!

2015 was a great year for me both personally and photographically. I traveled a lot (though not as much as in previous years) and took a lot of pictures. Those two things are core to what I love to do, and what this blog is all about. I continued to grow readership here, as well as on social media channels. And I continued to have a great time doing all this, which is a requirement. If it’s not fun, why spend all this time on it?
2015 was also a year of significant change. I made many changes to the blog, with the intention of making it more aesthetically pleasing to the eye (at least my eye - hopefully yours as well!). I made changes to my photography style, and then sort of changed back (I stopped processing in HDR for many months, then had an epiphany and came back to it). I made changes to my goals for the year, and realized that goal setting isn’t all it’s cracked up to be. I changed camera gear, returning to full-frame with the Sony A7II system, which is absolutely amazing. And I also changed jobs at work, which is partly responsible for the slight reduction in travel. That’s a lot of change when you think about it, but it’s all good.
As I mentioned above, I didn’t travel quite as much as I did in previous years, although I was still motoring around quite a bit. I took about a dozen trips in the US, some short and some long, and took quite a few pics along the way. I took 3 trips to Europe, which is less than previous years, although that covered 6 different cities (and countless photo spots) in 4 different countries.
I started out the year focused on taking a LOT of photos - and did so - but by September I had decided that I was getting too focused on quantity and ignoring quality, so I scaled it back a little bit. I still take a ton of photos, but fewer than before, and I judge the outcome of a trip based on “winning” images, as opposed to a straight unit count. But as you will see below, all this still resulted in a lot of photos in 2015.
I took a much needed break from Facebook. As a family we had pretty much the best summer ever, which was based around an epic road trip across 10 states in the Western US. And I had the most amazing surprise recently when I was named one of the Top 100 Travel Photographers in the World for 2015. I feel incredibly honored and blessed to be included on that list among other photographers that I have admired and looked up to for years!
Jim, what about the pics?
Oh yes, as I said above, I did take a lot of pictures in 2015. As far as I can tell, I took about 30,000 photos this year (Unlike many photographers, I don’t catalog my photos by year. I catalog then by location first and then month/year. So going through my Lightroom catalog and adding them up is how I got to that number. More work that way when trying to get a summary, but easier to manage for me on a daily basis.) That’s a pretty solid amount of production, averaging out to about 600 photos per week.
And to be clear, these are just photos taken with my Olympus gear (up until about September) and then my Sony gear starting in September and going through year end. I took probably another 5,000 or more with my iPhone, although I haven’t organized them well enough to count them up quickly. Let’s just say it’s a shitload, ok? :-) I did shift somewhat away from creating iPhone-specific trip posts here on the blog though.
I still shoot a lot with my iPhone and love to do so, but I decided that I have so many "real" images backlogged from so many trips, that I would rather process and share those instead of iPhone-specific posts. I may still do iPhone posts from time to time, but not often. However, I still share many of them on Flickr and on Instagram, and have a page dedicated to my iPhoneography here on the blog.
So here is a summary of the trips I took in 2015 and a pic or two from each trip that are among my favorites. To be clear, I have many photos still to process from these trips, so although these are my current faves, it’s hard to say that they are "the best" with 100% confidence since I have so much more to process. Call them highlights if you like. (and click on any photo to enlarge and view in a lightbox)
Jan/Feb: Las Vegas (~1500 photos) - I went twice this year to Sin City - actually, just realized I went three times. I like the town, but I’m not a Vegas kind of guy, despite going there 3 times. My first trip was in January for a company meeting, and I didn’t even bring the camera as there’s just no time. The second trip was in February for a customer event, and I got out a couple of times and fired away. The third time was a brief one-nighter on our summer road trip, and I left the camera in the car that day. We literally spent one night there just to show it to our daughter and take her to Cirque du Soleil. She loved Cirque but isn't a big fan of Vegas. I love shooting there (how can you NOT love all those signs?!) but I would never choose to vacation there.
blue hour on the strip
i finally got to shoot this sign!
March: Abiquiu, New Mexico (~1900 photos) - We took a trip for Spring Break over to New Mexico, opting this time to stay out in the country a bit in Abiquiu (instead of Santa Fe, where we have stayed many times). It’s about 45 minutes from Santa Fe and is best known as the place where the artist Georgia O’Keeffe spent much of her working life as a painter. The landscapes are beautiful and I caught some images I’m very fond of while there. It's a rugged place without a lot of amenities you get in the city, but it's quite fun for hiking and photography, two things I love to do!
a stunning sunrise in abiquiu, nm
plaza blanca, or white place - amazing!
March: Copenhagen, Denmark (~3300 photos) - A day after arriving home from Spring Break, I hopped on a plane to Copenhagen. I barely got to dump my New Mexico photos into my library before I was off again! This was a great week in a wonderful city that I really love to visit, despite being a little tired upon arrival. I shot like a maniac all around the town, and then took a day to visit an amazing castle about an hour away. So much awesomeness here! I would happily visit Copenhagen yearly - it's just beautiful and peaceful there, and I love it.
sunrise at nyhavn - so beautiful!
a trip to Frederiksborg castle
April: Dublin and Howth, Ireland (~1800 photos) - Ah, wonderful Dublin! I made a return visit to this city I love. I think this was my 6th trip there over the years. I hope for many more trips because it’s a place that I really adore. There’s so much to shoot, the people are wonderful, and you just have to love all the little pubs! This is another city I could visit at least once a year. I find it especially beautiful at sunrise, when all the tourists are asleep and I can prowl the historic Temple Bar area alone. It's pretty amazing.
I also took a day trip over to the little fishing village of Howth while there. It was great to hike around the edge of it, staring at the Irish Sea and taking a lot of photos, of course. Well worth a detour over to Howth if you are interested in exploring outside of Dublin. Probably my favorite part was the ruins of the old church you see below - so cool!
sunrise at the ha'penny bridge in dublin
ruins of an old church in howth
April: Glasgow, Scotland (~2000 photos) - From Dublin, I headed over to Glasgow and ended up with a weekend in the city. I was joined by my good friend Mike Murphy, who came up from London. We shot around town quite a bit and then spent the next day exploring nearby Falkirk, where we photographed The Kelpies and the Falkirk Wheel. Really a great time in every respect! I have also been to Glasgow many times, and despite it being a little "rougher around the edges" than Edinburgh, it's a great city and quite photogenic. This was my first time out to Falkirk, which is a place where I have always wanted to visit. It just worked out well and I was able to grab a LOT of photos at both The Kelpies and The Falkirk Wheel. They are both just super interesting and photogenic spots!
sunset along the river clyde in downtown glasgow
the kelpies in falkirk - so big!!
May - home! Time to process some of that backlog! And rest! And do laundry!
June: San Francisco (~1200 photos) - This is my favorite US city. I’ve been to many of them, many times, but I continue to like San Fran the best. It’s just so beautiful and I find so much photographic inspiration here! I love to get up early (which is easy since my time clock is always askew while I am there) and wander around downtown. It's always cool outside (which I love, being a Texas guy) and I tend to find myself in front of the Ferry Building, which is my favorite structure in town. It's just gorgeous that time of day, and very few people are out.
blue hour one morning at the ferry building
just after sunset one evening overlooking the ferry building
June: Nashville and Oklahoma City (~1300 photos) - Nashville is a great town and I always enjoy my visits here - and generally come away with photos that I am proud of. I caught this most memorable sunset one evening while there which made it all worthwhile! I was shooting from the Shelby Pedestrian Bridge, which provides an incredible vantage point for capturing the skyline, and the sunset behind it. I shoot it on every Nashville trip!
Oklahoma City was the second half of that week, and I just realized I still haven’t processed any of the pics from there yet, LOL. I was with my friend Mark and we headed out to the portion of Route 66 that is north of OKC. While it's not the typical Route 66 stuff you see in places like Arizona, it's still pretty interesting and I am looking forward to sharing some of those pics.
I'm always inspired by this fabulous view of nashville!
Late June to mid-August: Our great Western US road trip! There’s still just so much to say about this trip and as you can see below, so many photos to process and share. This will keep me busy for quite some time I expect. So while I could spend ages sharing photos from all these spots, I thought it best to share a couple of my favorites from Oregon, since that was the main destination of our trip. Of the 7 weeks we were on the road, about 4 of them were spent in northern Oregon near the popular resort town of Cannon Beach. It's incredibly photogenic in that area, and well worth a visit, even if you are in Portland (just over an hour drive away).
- Arizona, ~1200 photos (most of these are around the Grand Canyon and Flagstaff area)
- California up to Oregon, ~1700 photos (from Hearst Castle up to Mendocino/Ft Bragg)
- Northern Oregon, ~4400 photos (we were here about a month and I caught some real beauties!)
- San Juan Islands, Washington State, ~ 1600 photos (we spent ~6 days here)
- The drive home from Seattle to Texas, ~650 photos (limited shooting because we were heading home)
an incredible sunset at ecola state park
golden hour at haystack rock
Late August: Boston, MA (~400 photos) - This was a quick 2 day trip, only one of which allowed me time to shoot, since I was there on business. But I made the most of it, firing away at Fan Pier (a place I had always wanted to shoot) with my friend Bob Lussier, who I have wanted to meet in person for a long time. It was a wonderful evening of shooting, trading stories over beers, and talking about photography. And Bob lent me his wide angle lens for my Olympus camera, which was quite fun. This was the last trip I took with the Olympus though, converting to Sony just a few weeks later (and in time for my next trip, which was a big one).
blue hour in boston as seen from fan pier
September: Stavanger, Norway (~800 photos) and Aberdeen, Scotland (~250 photos) - OMG Norway you are AMAZING!! I fell in love with it right away, before I even left the town and headed out to the fjords. It’s a gorgeous place. But once I climbed up to the top of Lysefjord and stared at Pulpit Rock, I can honestly say it had a profound impact on me. Just staring at this landscape below me filled my soul. I could have sat there for hours, except that I had so many photos I wanted to capture. So after some gawking at the views, I got busy hiking around and firing away!
And of course my visit to Aberdeen was rewarding as well, though limiting in terms of photography. I didn't even take any photos in the city. It's a nice place, but I didn't find anything that really got me excited. I mostly just got one afternoon to shoot anyways, and made the most of it by heading out on a train to nearby Stonehaven so that I could visit Dunnottar Castle, which is jaw-droppingly beautiful. It was well worth the short trip over here to see this castle perched on the edge of the sea. So beautiful! This entire week, visiting these two places, was just unbelievable.
lysefjord in all her majesty
pulpit rock as viewed from the side
pulpit rock as viewed from above
dunnottar castle in stonehaven, Scotland - so awesome!
October: New York City (~2300 photos) - While I have never been a huge fan of NYC, after this trip it really grew on me, and I became one. It really is an amazing place, even if it took a while to grow on me. I had an entire week here for work, which thankfully stretched over a weekend, allowing me plenty of time to fire away. My family came with me and we seriously enjoyed the city. Luckily, it was Fall and the colors in Central Park were amazing. I was pretty fired up about capturing Fall color, because we don’t get much of a chance to do that here in central Texas. But of course I also love to shoot cityscapes, and there's no better place for that than in NYC.
central park displaying a lot of fall color
sunset from top of the rock!
November: San Francisco (~1600 photos) - And as the year started to wind down, I had another trip to this city that I love, and I made the most of it. I returned to a few familiar haunts but also found new ones and recaptured some things that I didn’t do justice to on previous trips. It was a very quick 2 nights here, but I’m happy with the shots I did get and the sites that I saw. I have plenty of things still to work on and it feels fitting that my last trip this year was to San Francisco, since I am such a fan of the place.
a gorgeous sunset at the palace of fine arts
In addition to all that travel, I made it a point to get out and shoot here in Austin quite a bit, especially in the last couple of months (and thus you have seen several posts here on the blog from Austin, which in my opinion is a nice change). Part of that is that I have been inspired to capture this town with my Sony gear, but some of it is that I had a list a mile long of spots that I still wanted and needed to shoot here (and they are being added to this list). As far as I can tell, I captured about 2500 photos in Austin this year, which isn’t really all that much in the scheme of things, and it has been mostly concentrated in the last 2 months, because I have been home more and focused on things here. But there’s a reason for capturing all those Austin images, and I will be sharing that as soon as I can finish the little project I have been working on! I'm excited to announce it, and I hope that you will like it!
where I spend all my extra money here in austin! Great store!
the austin skyline on a cold winter morning during a colorful sunrise!
the Austin skyline on a recent wintry, cloudy afternoon
looking down over austin
the paramount theater in downtown austin during blue hour - i love that sign!
And lastly, I had a few quick trips to some other spots in Texas, mostly nearby ones like San Antonio, and though none of those photos made the list, it did contribute another 650 or so pics to the yearly tally! It also means I have some more things to work on, which is always fun!
Well that's it folks - a summary of my year in photography and travel. It was a great year in both respects (and many others - I feel very blessed), and I can honestly say that I am proud of what I have done, where I've been, and where I am in life. I know the future is never guaranteed, yet I am always hopeful when I look ahead and grateful when I look behind me.
I will keep working to produce new images that you will enjoy viewing (and catching up on my backlog!), and there are plans in motion for new things to come to the blog in 2016. I am looking forward to that as well! You'll be the first to hear about it, right here on the blog! Have a wonderful Holiday Season, wherever you are! Thank you for stopping by today, and all year long. I really do appreciate it. You have no idea how much so.
So all in all, I will look back on 2015 as a year of great change, great adventure, and great accomplishment. I will remember it fondly. Here’s to a great 2016!
Quotas, epiphanies, and advice from Dad
Today's post is an essay about goal-setting and getting caught up in the goals for the sake of achieving them. I lost my creative direction earlier this year, but I have found it again and am back on track. Oh, and I had an epiphany this summer that set it all in motion. Read on and let me know your thoughts!
I started out this year with a lengthy list of goals, one of which was to significantly increase the amount of photos that I have published. I think that it was a good idea to put a goal out there for myself, because no one can buy a print or license a photo if it is just sitting in my Lightroom library collecting virtual dust. And these photos don’t just make themselves available. It requires me to do something, because when you shoot RAW, the captured files don’t exactly mirror reality.
However, I have to admit that I got sidetracked along the way and lost focus (photographic pun only slightly intended).
Let me explain.
Quotas can be helpful...
Having spent the better part of my corporate career in what is generally called “sales”, I am no stranger to having a quota. I’ve carried one around at work for the better part of twenty-five years, and it’s just a part of work to me. I don’t get stressed about it - I just do the things that need to be done, and try to do them well, and try to help my customers solve their problems. I assume things will sort themselves out in the end, and they usually do.
So when this year started, and I was sitting at just under 2300 photos published (I use my Flickr account as the basis for my numbers), I realized that getting more of my work published would theoretically give me more opportunity to earn some sort of living from my photography. It makes sense that the more things you have available, the more likely you are to find someone interested in at least one of them.
I still believe that to be true.
...but quotas can be dangerous to the creation process.
However, I found myself getting caught up in how many photos I had processed each week, and how many I still had to go to reach my goal, and so forth. If one blog entry had 10 photos, then I figured I should have 12 photos for the next one. If I had a blog entry with 17 photos, then I should follow that with 20 photos on the next post. More is better, right? That’s the American way, Jim - produce, produce, produce!
Wrong.
I got caught up in the achievement of the goal itself (just focusing on the numbers), and lost sight of the reason for having the goal in the first place, which was to create more photographic art and make it available. I got caught up in making my (self-imposed) quota. It became a numbers game for me. All that mattered were the numbers of photos I created.
And that’s a crying shame, because it became “work” instead of “art”.
I would actually be proud of how many photos I would take on a trip. Instead of thinking "wow, I got a couple of real beauties", I would think, "man this is awesome, I took 2500 photos this week" or something like that. It almost didn't matter how good the photos were, just that there were a lot of them. Isn't that terrible?
Art should be enjoyable
This IS art, and as such it should be an enjoyable thing for all parties involved: enjoyment for the artist during the process of creation (from preparing to shoot, to pressing the shutter, to post-processing), and enjoyment by the viewer when they view it. While I have no control over the viewer’s reaction, I certainly can do things to ensure that I enjoy the creative process. And I should enjoy it, because it fills my soul. I love this stuff!
And the first thing you can do to ensure you enjoy the process of creation? Take your time, experiment, learn something new, and immerse yourself in it. Guess what else I figured out? When you are enjoying the creation process, you are more likely to create compelling images. I was completely missing that point. I got away from the enjoyment, and in many ways it became “my job” to crank out more photos. It became work. It was all about the quantity and not the quality. I was in a hurry. It was a chore.
Trying to force creativity doesn’t work
So I made a change, and have been operating under this change for a while now. I am still working on getting more photos published, but I am not trying to get 10 or more photos on each blog entry. Some may have 10, and some may have 3. Heck some might even be a single photograph (or zero, like today's post). It depends on what it is I am posting about and what I am feeling when I craft these images.
And I have changed things when I go out to shoot, too. I'm not just trying to grab anything and everything. I am slowing down and thinking more about my shots. I came home from my recent Norway and Scotland trip with far fewer photos than on any previous trip to Europe, but I have some shots that I absolutely love.
And I think it is WAY more important to have a few images that you love than to have a million that are ok.
I’m focused less on a quota, and more on creating things that I love. I’m afraid to admit that in some of the pics I have posted this year, I do not love my processing - instead I was posting them because “more is better”. I was just trying to get more stuff published, instead of publishing things that I loved.
And a lot of this comes down to processing choices too. I nearly stopped processing my photos in HDR because it takes longer to go through the HDR creation process than it does for me to make adjustments to a single exposure. But I missed HDR in a big way, and am happy to be processing more of my recent work in HDR. It's fun.
The wisdom of my late Father
So this means that I may be going back to the well, so to speak, and taking some of these photos you have seen here previously and reprocessing them, but with an emphasis on quality this time. I will just have to make time for it, because there are some that would look really fabulous if I came back to them with the idea of crafting a quality image front and center, instead of just rushing through it to get more stuff out the door.
It reminds me of something my dad used to say to me, when I was looking for a shortcut to getting some chore done, presumably so I could get back to doing something I loved. He would say “Son, if you don’t have the time to do it right the first time, when are you going to find the time to do it again?”. Amen to that, Dad, and thanks.
The epiphany in Park City
Much of this thought process occurred this past summer while we were making our way home from our extended stay in Oregon. We were in Park City, UT for a weekend, and walked into a photography gallery there that contained the most amazing work. It was awe-inspiring, and it reminded me of how I felt when I first started seeing (and creating) HDR photos. I was inspired again, and decided there and then that chasing numbers was not going to cut it anymore. I wanted to create beautiful images to the best of my ability, not rush around just getting a large quantity of average stuff out there. I was nearing burnout, anyways.
To be clear, I am not saying that HDR is the only way to do things, or that everything I do will be HDR - I simply want to take my time, enjoy the process, and create stuff I love. It just so happens that HDR is something that I still love.
This thought process is also partly responsible for me moving back into a full frame camera system - having recently bought the Sony A7II and sold all my Olympus gear. Obviously there is nothing wrong with Olympus, but I just felt the need to return to full frame. There is just something about it, but again that’s a discussion for another time.
Looking ahead
I am still cranking out images - though at a slower pace these days. Some of my recent posts have been multiple images and some have been just a few, but either way, they are images that I took my time on, and I feel better about it - and I am only sharing it here if I love it.
Oh, and about my goals for the year? Yeah, I achieved them many months ago. I am sitting at nearly 4400 images on Flickr, and just about to hit 3000 on my portfolio site at SmugMug. I already upped them once about mid-year and then hit those targets too. Like I said, I was pretty focused on the numbers.
But I’m done with setting goals. I made my goals for the year, and then over-achieved my stretch goals too. I am getting back to the art of it all, the love of the creative process and the crafting of things that I am proud of. Now I am going to take my time and share images that I love with you here. I hope you enjoy them, and I am always open to feedback.
Thanks for listening.
p.s. Kind of funny that I talked so much about creating a lot of images, and I didn't include any here, huh? Well, I'm off to process some new images - but just a couple. No sense in rushing things. :-)

The summer of awesomeness
Today's post is a bit personal. We recently returned from a 7 week journey around the western US, and I have come home a changed man. Now the question is - in what direction does this change lead me?
We just had the best summer of our lives. We left austin for 7 weeks to escape the summer heat, and returned home with different ideas about what we want our lives to look like.
(this is a somewhat personal post, and it doesn't have any pics - just a fair warning)
To get away from one's working environment is, in a sense, to get away from one's self; and this is often the chief advantage of travel and change. ~Charles H. Cooley
As you have read here before, I spent a good chunk of this summer on a cross-country road trip with my wife, my daughter, and our dog - and a car so stuffed I thought it would burst. But it was a fantastic trip. We saw so much, did so much, and I shot so much that it will be hard to put into words...but of course I am going to try. :-)
I thought it would be fun to share a summary of what all we did, because I can't think of any other way to summarize than to just give you some basic quick facts, which puts it all in perspective. (Plus, I have fun putting these things together.) I will be coming back here with lots more photos as I get time to process them. I’ve posted quite a few already actually, but I’ve only scratched the surface. Hopefully you've enjoyed what I have shared so far, because there is plenty more coming.
In case you missed those posts, you can click the links below to check them out...and they are in the reverse order from which they were posted (oldest is at the bottom):
Catching a ferry to the islands -- I grabbed a bunch of pics on a ferry ride to the San Juan Islands in Washington.
A stunning sunset in Cannon Beach -- I love Cannon Beach, and this sunset will help explain why!
Sunset at Hug Point -- We stayed right near this spot, and I shot it A LOT. Here's a beautiful sunset for ya!
Golden hour at Haystack Rock -- Haystack Rock in Cannon Beach is very touristy, but oh so worth it!
Driving Highway 1 -- Everyone loves driving up Highway 1 in California and these pics illustrate why.
An unbelievable sunset in Bandon, Oregon -- My first great sunset of the trip, and what a stunner it was! Wow!
Sedona seduces -- This was my first visit to Sedona, but I sure hope it's not my last!
My 2015 summer plans -- An overview of what we intended to do with a few iPhone pics thrown in for fun!
And now that I just provided those links, I didn't even realize that I have shared that many posts about the trip yet, so I'm kinda impressed with myself! I'm usually months or years behind LOL. I feel like I am accomplishing some things!
Here are some quick stats from the trip:
52 days of travel (25 nights in hotels, and 27 nights in a VRBO rental in Arch Cape, OR)
10 states visited or driven through, not counting Texas (NM, AZ, NV, CA, OR, WA, ID, MT, UT, CO)
5700+ miles of driving (roundtrip) - and countless tanks of gas!
9368 photos taken with my Olympus
1900+ photos taken with my iPhone 6
3 jump starts for our car, resulting in 1 new battery
1 oil change somewhere in Idaho
More Subway sandwiches than I can count!
Our route took us from Austin, TX up to Arch Cape, Oregon (that was the main destination), with many stops in between, and then a little further into the Pacific Northwest (Friday Harbor, WA in the San Juan Islands, to be specific) before turning back towards Texas. Here’s a map of our route that I cobbled together on Google Maps:
we took the southern route across NM and AZ on the way out, and returned on the northern route through UT and CO.
Apart from the main destination of Arch Cape, OR the primary stops were Sedona, a couple of spots along the California coast (San Simeon to visit Hearst Castle and Mendocino area to finally see that place!), Bandon in southern Oregon (OMG what a gorgeous coastline!), Friday Harbor in the San Juan Islands and Park City, UT although of course we stopped en route in many other places for matters of convenience (or exhaustion).
To say this was a monster trip would be an understatement. We planned it for months and months (and saved up for it for months and months too), and tried our best to plot our route for maximum viewing of awesomeness along the way. In some cases we were genuinely surprised by the beauty (Sedona, AZ for example) and in some cases we got within a few miles of something that we've always heard is awesome but did not have the time to stop and take it all in (Moab, UT for example - we'll have to go back).
Change is good my friends
It would also be way off base to say that we all returned as the same people, just 52 days older. There is something about an epic trip (especially an extended one) that really does change you, deep inside, regardless of where it is you went. You return feeling somewhat displaced, not in your element, like a fish out of water - call it whatever feels right to you. The bottom line is that you are different, and when you return home, it feels like everything else is still the same.
This is not to say that we are better than we were before - we're just different. And I am not saying that the "same old stuff" in Austin is bad in any way (and for the record, I absolutely love Austin) - it's just that we have moved in a different direction. And in which direction we have moved is still not decided...but it's clear to us all that we want something new. We want something different. We enjoy consuming new experiences and we enjoy traveling.
I soon realized that no journey carries one far unless, as it extends into the world around us, it goes an equal distance into the world within. ~Lillian Smith
We have reunited with friends and family, and it's been great. We missed them. But all of us can't help thinking that there is something more out there, something grander and more fulfilling than the life we typically lead in Austin. To be clear, that is not a comment on our friends, our family or the city of Austin - it's just that we are all yearning for something new and different. It's difficult to come back to what you know from the past and to just hop right back into that routine. We are sort of straining against it.
And in many ways, we don't want to hop back into that routine. We enjoyed being on a different, more flexible routine, and we liked it. We liked it a LOT. And admittedly, the scenery and everything else we saw was INSPIRING. And who doesn't want to be inspired? (Hey, I can't help that Dead Poets Society is one of my favorite movies.)
When we tire of well-worn ways, we seek for new. This restless craving in the souls of men spurs them to climb, and to seek the mountain view. ~ Ella Wheeler Wilcox
One thing we were abundantly clear on during this road trip is that we enjoy being able to quickly get to "new stuff". Since we live in the center of Texas, it's a damn long drive to get to any other state. You can't get anywhere on a weekend trip. It's ~9 hours to New Orleans, for example. I can drive for about 6 hours and get to Oklahoma City. Or I can drive for a good 10 hours and get to Albuquerque.
But here's the thing - I have been to all of those places many times, and want to see something new instead (apart from New Orleans, which we are actually talking about planning a trip to). I've been to OKC numerous times, and it's nice, but it's not inspiring. New Mexico is very beautiful, but it isn't new to me. When we talk about "new" we really mean new - like some of the places we saw on this trip, or some that we missed but wanted to see. It's a big country out there, and there's a lot to take in.
And this isn't all about the great Western US. The Eastern US is chock full of awesomeness. There are a million spots I want to go experience in the Eastern US. Perhaps we can do a similar trip or two towards the East? Who knows?
And just for comparison purposes, if you lived in Zurich, Switzerland for example (I chose this as a starting point since it is fairly central in Europe), in 10 hours or less you can get to any number of amazing places: Rome, Budapest, Berlin, Amsterdam, Vienna, anywhere in France...the list goes on and on. The point is that in the center of Texas, our ability to quickly drive in search of new experiences is somewhat limited, based on geography. And let's face it, you don't head off to Dallas or Houston in search of inspiration. :-)
So all of this inevitably leads one to think of "big picture things", such as the biggest one of all: what do you want to do with your life? That's a big question we all ask ourselves, then some years hence find ourselves working in some job and realizing you never answered yourself. Hell, maybe you forgot the question. That doesn't mean the job is bad, or you're bad, it's just that a trip like this one causes you to think, and think a lot.
I'm still thinking. And admittedly, there is a lot to think about.
The truth is that I will probably be digesting all of this for a while. When you are on a trip, you are very much in "consumption mode". You are consuming sights and experiences at a rapid pace (and I am accumulating a lot of photos, of course). That's often the point of a trip. You want to go and consume, and you don't have the time while you are gone to digest what all you are taking in, because you are consuming more new stuff all the time. Every day is a new adventure, with something awesome around the bend, or at the next exit (or train station, if you are in Europe).
This accumulation of experiences eventually stops, and - at least for me - that's when I can start to look back upon my experiences, form opinions, decide which things I liked and didn't like (and what I liked or didn't like about them), and start to form conclusions about it all. That's where I find myself now - trying to digest it all. And I am also asking myself a lot of questions, such as:
Did I learn anything about myself? Did I learn anything about photography? Did I expand upon my vision as a photographer? Are there changes I want to make in my photography? In my life??
And the answer to all of these is a resounding "Yes". That's where we are now, and it's electric with possibility.
Thanks for stopping by and listening. I guess I just had a few things to say. :-)
Travel is more than the seeing of sights; it is a change that goes on, deep and permanent, in the ideas of living. ~Miriam Beard

6 weeks without Facebook
I've been taking a break from Facebook, and it's been great. Here's what I am doing instead, and here's what I have learned.
4 Things I Have Learned, and 5 Things I Have Been Doing Instead of Logging Into Facebook

I accidentally quit using Facebook for the past 6 weeks. I didn’t have a meltdown, get pissed, and storm away. I just sorta quit looking at stuff there and slipped away quietly. It’s been nice not being there. I will go back at some point - I’m not quitting the site, and this isn’t a rant about the horrors of Facebook - but I’m not in a hurry to jump back in, either. Life is too short, and there are other things I want to do.
I’m not really anti-social per se, but I have become more introverted and less social-media-engaged as I’ve gotten older. And that’s a funny thing, considering that my passion is to take photos, blog about them and the associated travels, and then share them. Online.
In some ways, what I like to do and what I “need to do” to promote my photography are not aligned. I like (love, actually) taking the photos and processing them, and writing about them, and all that goodness. It fills my soul, actually. I need to do it.
But all the social media stuff is exhausting, and feels like a “supposed to”. And truthfully, it’s not that fun. It’s work. While I am not opposed to the idea of work, usually work has a tangible return, or at least an emotional reward of some sort. Social media doesn’t really do that for me. Or at least Facebook doesn’t.
I was on a business trip at the end of June (which kept me really busy), and as soon as I returned we took off on our family road trip. Before I knew it I came to the realization that I had not gone to the site or shared any of my posts on Facebook in a while.
I also realized that I didn’t care. So I just kept not going to the site.
One of my big concerns over the years was that if I did not share my photography on social media (with Facebook being the primary place) that no one would find my “stuff” and my blog would dwindle and die a horrible, neglected death in a dark corner of the internet. So I dutifully logged in and shared things.
But I have learned a couple of things over this 6 week period that are worth knowing:
- Search is way more important than social media in driving my blog traffic (~80% of traffic comes from search vs ~3% from all social media sites combined)
- Popularity on social media isn’t my goal
- I’m happier, more productive and have more free time to invest in my creativity
- I don’t miss all the meaningless updates
Do I miss any of it? Sure. I miss seeing all the great photos and updates from all the great photography friends I have and photographers that I follow on the site. I miss seeing and occasionally participating in the various conversations around photography, travel, gear, and the like.
And...that’s about it. So yeah, maybe I am a little anti-social after all.
So what have I been doing instead? Loads of stuff. I am with my family on a multi-week road trip across the US, which has been fabulous in a lot of ways.
Here’s how I am spending my time:
1) Taking photos
This may be very obvious, but it’s true - I have been taking loads of photos on the road trip. Arizona, the California coast, southern Oregon, and now along the coast in northern Oregon. After here, we are headed to Seattle and Friday Harbor, WA and then turning back towards Texas (with a few stops planned on the way home). I’ve shot amazing sunsets and so much more. So far I am well over 4,000 photos with quite a bit more coming (and over 1,000 with the iPhone, many of which have already made it onto Flickr).
2) Processing photos
As I tend to be a morning person, I get up earlier than everyone else and start processing photos. I’ve been doing that every morning, and it’s awesome. I’m getting 10-15 processed each day. I get a creative start to my day, then go explore stuff with the family the rest of the day and have fun. It’s a great way to kick off each day, and it’s getting me further ahead of my goals for the year.
3) Writing
In some ways I have gotten away from writing as much here on the blog as I intend to. Part of it is time constraints, and part is that I have so many photos to share, which are quicker and easier for me to prepare and post than writing up a lengthy article. But I have been writing more lately, and it feels great. I’m also coming up with more things to write about, which I will be working on and sharing when ready!
4) Reading
I used to read a lot, but my photography has consumed so much of my free time that reading has taken a back seat. But I’ve been doing more of it lately, and it’s pretty awesome. The simple joy of reading for pleasure is something I had forgotten about.
5) Thinking
With my usual hectic schedule, I rarely spend time just thinking about stuff. But I’ve had more time for that lately and - just like reading - this is a great way to disengage from the “have to” stuff and just chill. And my thoughts flow between thinking about the little stuff (I hope sunset is nice; I’m hungry; where did the dog run off to?) to the bigger things (do we want to live somewhere else? where else do we want to travel to? what do I want to do with my life?), and everything in between.
(In addition to the above, we hike a lot, do touristy things like ride bikes on the beach, and just hang out. And guess what? IT'S AWESOME.)
While many people manage all of the above AND post frequently on Facebook, I did not. It just seemed like I was mindlessly scrolling on the site and really not getting much in return - and not getting some things done (which quite frankly are more important to me and certainly more rewarding).
I will say that I have been sharing photos all this time on Flickr, and will continue to do so. I really enjoy that site, though I will admit that I am not super-engaged there. I have put more photos on Pinterest, which isn’t so bad after all and the nice thing is that the posts there seem to have a longer shelf-life than on FB. I drop a photo here and there on Trover, which is an interesting site and has been fun so far. Once in a while I will post on Instagram. Otherwise, I just blog here and work on personal photography projects. It’s been great.
What does all this mean? I don’t really know.
I’m changing and continuing to figure out what I want to do in this short life we are all given, and mindlessly logging into FB isn’t what I want to spend much time on. I’ve realized that I don’t want to be dependent on social media for my blog, and at 3% of my blog traffic, you could say that I have achieved it already. LOL
I don’t know where I am going with this post, other than just sharing my thoughts on why I haven’t been on Facebook for a while. I doubt I have been missed though, with all the other noise there. I will return at some point, I just don't know when. I guess I felt compelled to write about this, since some of you may follow my posts there. I just wanted to say that instead of scrolling through the stuff on FB, I have been out in the wide world working on my craft, traveling, hiking, enjoying my family and having a life. It's pretty refreshing, actually!
And no, I'm not going to go share this post on Facebook. That would be ironic, wouldn't it? :-)
Thanks for listening. I’m going to do something creative now. See you back here on the blog real soon!


5 Things To Do Before Firing The Shutter
Here are 5 things I try and do every time I go shoot - well technically, before I go shoot. It's important to plan ahead so you avoid delays or errors when you are standing in front of something awesome. Plan ahead, be smart, and get the shot you want!
You’re in a new place and you are very excited to go take some photos. You are ready to go. You’re eager - hyper, even (ok, maybe that’s just me). You have all your gear in your bag - including your tripod - and your batteries are charged up. You even have extra memory cards just in case (right?). It’s all done, so you head out the door.
You arrive at your destination and immediately start firing away. That’s all good, right?
Wrong.
I’ve done this wrong so many times I can’t even count them. It’s very easy and normal to get all excited about where you are and what you are looking at that you may overlook the very basics before you even get started. Excitement takes over and logic and planning take a back seat.
Sadly, overlooking some of those basics can have a profound impact on the photos you end up with.
While I still do things wrong many times, I try hard to remember these 5 things before I head out and shoot:
1.) Do your research
Google is your friend, as are countless other resources you can find on the internet. I always do a lot of research before I go to a new place (heck, even when I return to places I have shot before). In fact, I have a bunch of lists here on the blog showing you countless great spots in multiple cities. Or use someone else’s list if you prefer. The point is to dig in a little ahead of your trip and see what you can unearth. Each place, no matter how “bland” on the surface, has a wealth of photo opportunities to offer. Chances are someone has been there before you and shared it. Why not put their experience to work for you? Once you get there, you can find your own take on it (more on that in #4 below).
2.) Check your camera settings
Oh man, this is a big one isn’t it? I am very prone to losing all thought due to excitement over what/where I am shooting. If I am in Paris and see something (ok, really anything there gets me fired up!), I just start shooting without any other thought in mind, including my camera settings. It’s usually later that I happen to look at them, and then it’s too late (thankfully, some of those things you can correct later - but not all).
For example, the big one for me is my ISO setting. Just the other day I was firing away and 10 minutes later realized my ISO was too high. Thankfully I was still in the same place and could easily redo some of the shots (and the light change was minimal). The other one I hear about is whether you are set to record RAW or JPG files. I have heard of photographers going through an entire shoot in JPG when they meant to be shooting RAW. Oops.
Bottom line - turn on the camera and check your settings, before you even step outside!
3.) Figure out where the light is coming from
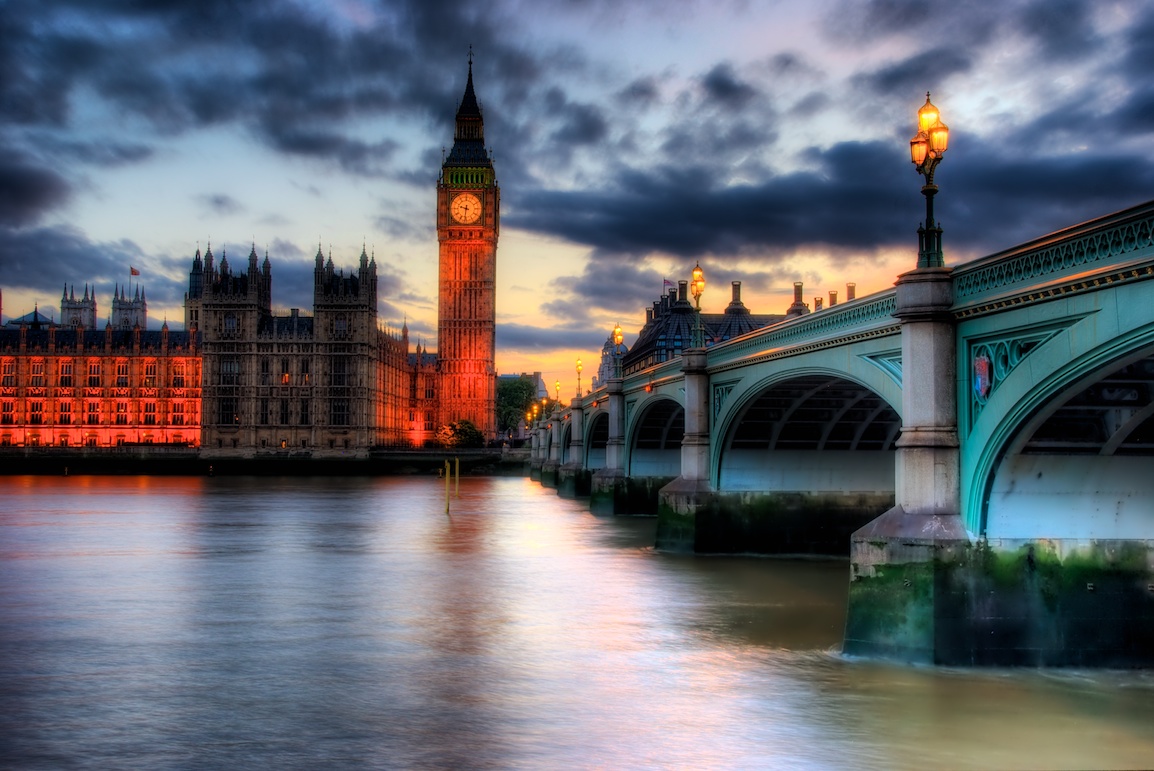
Most people, to the extent that they do plan, have the intent to capture sunset at a particular place (which is why I prefer sunrise, because it’s much less crowded, usually). So they may have a mental vision of a stunning sunset behind, say, Big Ben in London. But what if the sunset isn’t behind Big Ben? What if the light is coming from a completely different direction?
One thing I do for my trips to European cities like London (being so big and sprawling, and so full of a multitude of subjects) is to print out a map and mark all the spots I want to go see. This has the added value of giving you an idea which direction is which. In other words, you can easily tell where West is if you are looking at a map. When you are standing there it’s much harder, at least for me. That way you can get a sense of where sunset or sunrise is likely going to be best, instead of showing up and being disappointed.
There is also a great app known as The Photographer’s Ephemeris that can do this for you!
4.) Focus on composition
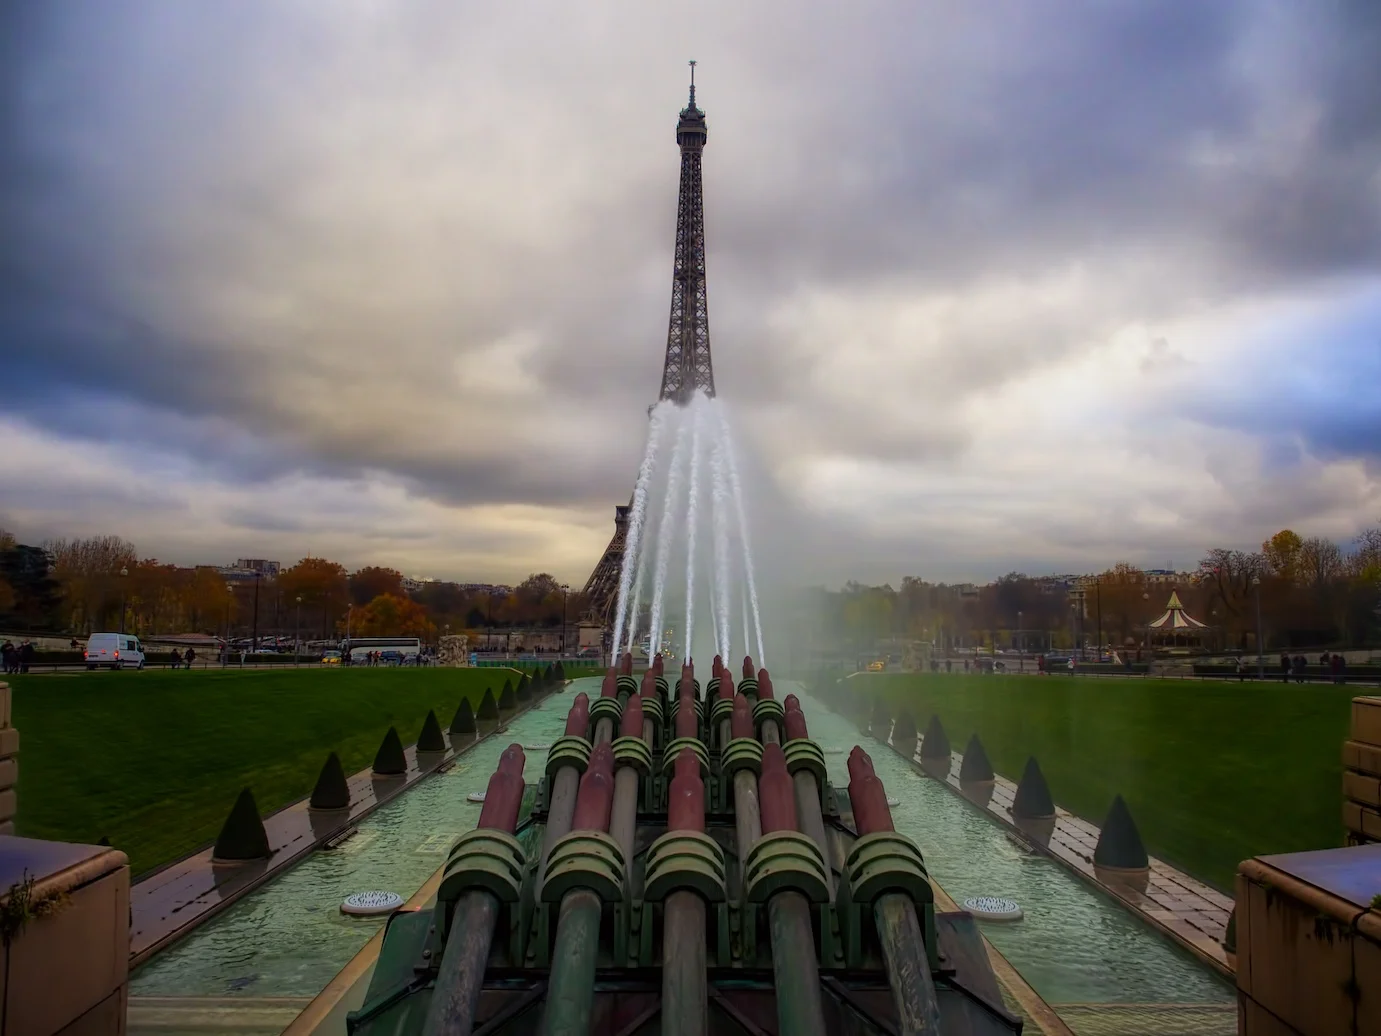
Composition is key in photography - we all know that. But how much time and effort do you put into making sure yours is “good”? There are general guidelines for better composition (I hate to call them rules because I think it’s great to experiment and not follow the rules all the time) such as the Rule of Thirds or the Golden Ratio. Understanding and utilizing these can be very helpful and can make the difference between a so-so photo and something that really leads the eye.
But as I said above, don’t hesitate to experiment and find something that is truly yours. We have all seen a million pics of The Eiffel Tower, for example, and while we want to capture the classic view, I think we are better served to also spend time looking for a different view that, while maybe not totally original, isn’t the same shot everyone else always takes.
5.) Enjoy
Here’s perhaps the biggest one: go enjoy yourself. You’re in a far-flung place you’ve never been to, and have always dreamed of visiting. Yes, you want to capture great photos - and you will - but don’t forget to enjoy the experience. It’s easy to get too focused on the photo-making (pun only somewhat intended) and forget that the trip is a life experience. It’s bigger than the photo itself. Don’t be overly militaristic in your approach. Be flexible. Go with the flow. Take a moment, at least briefly, to step back and soak up the scene. It’s a beautiful place, and while taking home great photos is a huge deal to us, I believe it’s equally important to take home great memories.
Well folks, thanks for reading through and for stopping by. Remember to calm down and slow down before you start firing away indiscriminately. It’s easy to get all fired up because, HEY YOU’RE IN LONDON! or HEY YOU'RE IN PARIS!, but I think you will get better photos and enjoy the trip more if you use these guidelines.
Have fun out there, be safe, and go make some memories.

A mid-year update
I have been really busy with my photography and blogging this year, and am well on my way to achieving my goals (and in some cases I am way ahead!). Today's post is a summary of what all I have been doing. It's hard to tell just by stopping by and reading the blog every once in a while, so I thought I would summarize it all. I really did it so I could see how I was doing against my goals, but if it's interesting for you to read then great. If not, umm, sorry? :-)
Here's a summary of what I have been up to so far this year!
Way back in January of this year, I wrote a post about what I intended to accomplish this year. Now that it is nearly the halfway mark of 2015, I thought I would update you all on my progress. You know, stop halfway and take a look around, make sure I am going in the right direction (or even on the right road) – that sort of thing.
To save you the effort of looking for that post, you can find it here.
http://nomadicpursuits.com/blog/2014/12/29/my-plan-for-2015
Basically, here is what I said I wanted to accomplish this year:
- More photos
- More product reviews
- Invest in myself
- More travel-related content
- More musings
So far, I am doing pretty well against my goals. In some cases I am way ahead, and in some others…not so much. Read on for an update and heck, I went ahead and assigned a grade to myself. It’s really not about that of course, but it helps me quickly focus in on what I need to focus in on. LOL
More Photos (Mid-Year Grade: A+)
Back at the start of January, I had already published about 2275 photos on Flickr, with a goal then to take that total to 3500 by year’s end (with a stretch goal of 4000 pics). Right now, I am over 3700 photos on Flickr, so I am way ahead of the yearly goal, and nearly to the stretch goal. So being a bit goal-oriented in my daily life, I am going to raise it to 4500 pics with a stretch of 5000. Getting to 5000 will require nearly 8 photos per day, every day, for the rest of the year. This won’t be easy, but will sure as hell be fun – wish me luck (and send coffee)!
I also stated that I would take my portfolio site on SmugMug from about 1250 photos to 2000 by yearend. I’m sitting now somewhere north of 2500, so I completed that already too. I am raising that goal to 3000 with a stretch of 3250. Fingers crossed! And I need to go edit some photos!! :-)
More Product Reviews (Mid-Year Grade: C)
So far in 2015 I have published only a single product review, and it was a lens review. It’s the Panasonic Leica Summilux 15mm f1.7 prime lens, in case you were curious. And that is a great lens. I use it all the time and absolutely love it.
Back in January, my initial thinking was that I would be trying several new software products, and assuming I felt I could add value, I would review them. But truthfully I haven’t had enough time for that, hence my grade of a C. I don’t plan to turn this into a review site by any means, but it is fun to write these things down and share them. It helps me better understand how I use a product too, which is useful to me. I have a few things in mind that I still want to review, and time-permitting, will get another 1 or 2 reviews up on the site this year.
Part of the miss here is that I left Aperture and converted to Lightroom, so a lot of my “free time” to learn new things went into learning LR. It was a good use of time, as I am now very comfortable using LR, but it’s taken a while. And actually, I have about 20 hours of video on LR that I still need to watch. I plan to do that soon. I want to really “master” it, so I am investing in that. That conversion has kept me from getting deep into the On1 Software suite, which I have had for quite some time. Sadly, I rarely use it and that is something I intend to change. I hear great things about those products, and want to experience it myself.
Invest in Myself (Mid-Year Grade: B+)
I want to be better at taking photos, using various bits of software to process them, and writing content for the blog. I seriously enjoy all three, and have spent a good chunk of time thus far in 2015 investing in all three. That's all good. The biggest thing I did was finally move off of Aperture and into Lightroom (as I mentioned above), and it’s been great. That was a major shift for me – and long overdue – but boy am I glad I did it. Now that I am on this side of things, I am much more confident that I made the right decision.
Heck, the Clarity Slider in Lightroom alone was worth changing for! :-)
And while I have spent a lot of time learning this year, I feel like I can do better, hence the B+ grade instead of an A. But hey I should get an A for the Aperture to Lightroom conversion, because that was a LOT of work! LOL You can read about my conversion at the link below.
http://nomadicpursuits.com/blog/2015/5/19/farewell-aperture-hello-lightroom
More Travel-Related Content (Mid-Year Grade: B)
This one has gone pretty well, but not great. Nearly all my posts are travel-related, so it’s somewhat hard to judge. I have not been to any new cities this year – although I have traveled quite a bit – so there are no new lists on the blog yet. But I did a summary post of a trip to Paris (which was LONG overdue!), I had a 4 week stretch wherein I took 3 trips and 9000 photos, and I shared several posts that summarized trips (like this one and this one), each with a boatload of photos attached. I enjoy going new places and then writing up posts where I share my feelings, experiences, and photos of a place. I will get that done. More to come on that one.
We have some big family travel plans for the summer, and I will sharing that soon. That will give me plenty to document here as well, which I am looking forward to!
More Musings (Mid-Year Grade: A)
Writing extended posts is actually one of my favorite things to do here on the blog, although obviously I can’t do that every week. Like everyone else, I am busy with work and family (and processing photos so I can hit goal #1 above!), so I do all this when I can make time. But it’s so enjoyable, and I work hard to get it done.
In 2015, I have thus far shared 4 of these longer “musing” sorts of posts, where I just write about something that I want to write about. Sometimes these are popular, and sometimes they aren’t, but I love doing it anyways, and will keep at it, whether you like it or not (haha). Here are the links to them:
http://nomadicpursuits.com/blog/2015/1/4/how-a-mirrorless-camera-changed-my-photography
http://nomadicpursuits.com/blog/2015/2/7/old-photos-new-results
http://nomadicpursuits.com/blog/2015/3/1/revealing-the-artist-within
http://nomadicpursuits.com/blog/2015/5/19/farewell-aperture-hello-lightroom
So that’s it. It’s been a busy half year so far, and I suspect (and you can expect) that there is a lot more goodness coming. In fact, I know there is, because we are leaving on that big family trip soon. I’ll be back to update you on that one (and you will probably see a lot of photos too!).
If you are interested, you can follow me on Flickr, which is where all these photos end up, and the iPhone shots from the road get there first! So follow along and see you out there! Keep shooting people!
Thanks for stopping by!

Farewell Aperture, Hello Lightroom!
Well, I finally have left Aperture behind and moved over to Lightroom. It was a challenging process in several ways, but I am on the other side of it now and Lightroom is great! Click on in to read about all the fun I had making the switch! (That was a joke - it wasn't really very fun at all. But it's behind me now, YAY!)
It’s official - I have finally switched to Lightroom - and it’s great!! (and the move was long overdue)

After about 5 years of using Aperture, I recently made the switch to Lightroom, and so far am really glad that I did. It was a bit trying, and even a little painful at times, but it’s behind me now, and the future looks bright!
A little history
I have used Apple’s Aperture software for years now. It goes way back to about 2010 or so when I picked up version 2. And at that time, it was great for me. It was WAY beyond what iPhoto could do (which was all I had prior to that), and I was learning more and more and trying to develop my skills and my style, so it fit right in. Plus, I loved the way Aperture helped me organize all my files. Before that, I didn’t have much of an organizational system. But luckily, I didn’t have too many files either! :-)
Then I moved up to version 3 and continued to be happy. But version 4 never came, and in fact version 3 just fell further and further behind Lightroom, and like everyone else, I feared that Apple was going to abandon it.
Then, it happened.
The news broke in late June last year that Apple was going to cease development of Aperture in favor of a new app called Photos. Photos was supposedly going to be geared to both consumers and professionals, but let’s be honest here - that’s a very fine line to walk. Making both camps happy is virtually impossible. And while I am not a full-time pro, I treat my work that way and want the best tools available. Who doesn’t, really?
Initially, after I got used to the idea of Aperture going away, I sat down and wrote out my thoughts at the time, which I shared here:
http://nomadicpursuits.com/blog/2014/6/30/some-thoughts-on-the-demise-of-aperture
Basically, I decided that I would try out Lightroom but that I was not in a hurry to move over. I had plenty of time, since Apple committed to supporting the product for a while. And frankly, I was a little scared.
So I did buy Lightroom 5 last year, but I never found the time (or more accurately, made the time) to really get in there and learn it. It basically just sat there, virtually untouched. I dragged a photo in there from time and time and moved some sliders around, but really I was just playing. That was the easy part. Apart from the obvious things that sliders did, I really didn’t understand how to use the product.
Lightroom v6 hits the street - and so does Photos
About a month ago (late April 2015), Adobe finally announced availability of Lightroom 6, also known as Lightroom CC. I read about it with interest, and saw many comments across social media and various blogs about the product. It all sounded really great.
I was intrigued - again - and I like that Adobe continues to invest in and develop the product. This is a market they are very interested in, and that gives me confidence.
Also pretty recently, Apple made Photos for OSX available. While I was tempted to take a look at it, I ended up deciding against it. I didn’t even want to try it out. Some things I read indicated that it was really just a consumer app, and while there is absolutely nothing wrong with that, I didn’t want to go down that road with Apple. They make great products - and I am sure that Photos is great in some ways (maybe even many ways) - but they are not focused on the professional photography market, and I want to stick with someone that is. So while it may be short-sighted (or lazy, or both), it is what it is.

AAAARRRRGGGHHHH!!!
And over the last 6 months, Aperture has been giving me fits. It would crash unexpectedly, for no apparent reason. Every time I launched it (which was nearly every day), it would start “generating previews” which would slow the system to a crawl. I had to go in and manually cancel the task or it would just sit there, generating previews. I searched but could not find a way to stop it permanently. I am a reasonably patient person, but it almost became unbearable to open Aperture and start processing photos - and that’s clearly a bad thing.
So what did I do next?
I jumped back into Lightroom 5 to take a much closer look at it. I figured that there is no time like the present, and if I am not learning something, I am falling behind the rest of the world. I’ve had Lightroom 5 for nearly a year and basically wasted all that time, sadly. I could have mastered it by now, but life got in the way, I guess.
Then a few weeks ago, I got a curious little email from On1 Software. I have their suite of products, and though I have not spent enough time with them, I do enjoy them. (This is another thing I need to spend more time learning. That’s next on the agenda for me.) Anyways, the email was offering a course on the new Lightroom 6/CC with Matt Kloskowski. He’s well-known as a LR trainer, and the course was on sale for $50. (Buy it here.)
I bit.
I figured it was well worth $50 to see what the fuss was all about, and to learn it from a pro like Matt. And let’s face it, I was running out of runway in terms of how much longer I could use Aperture - and how much longer I wanted to use it. So I bought the course, downloaded the videos, and started learning. If you are on the fence about Lightroom yourself, the video series from On1 with Matt teaching is well worth it, even at the normal price (which I believe is around $80). I learned a ton from it.

And while the videos were all about v6/CC, I watched and “played along” with the v5 that I already had. By the time I had watched all the videos (and re-watched some), I knew it was time to make the switch. I was determined to dump Aperture, move to Lightroom, and basically catch up with the times. And I wanted to do it right away. There’s no time like the present, is there?
So I did it - and I’m so glad that I did. It’s a huge relief to be using Lightroom.
The first thing I did was go ahead and sign up for the Adobe Creative Cloud Photography Plan, which is super affordable at $10 per month, and gives me the latest version of both Lightroom and Photoshop. While I am not a Photoshop guy and have never really used it, you can’t argue with the price. Heck, Lightroom alone is worth the $10 a month. It’s like you are getting Photoshop for free.
The next thing I did took a bit longer - quite a bit longer in fact. I started figuring out how to get all of my photos out of Aperture and into Lightroom. I have seen and read SO many things online about how best to move an Aperture library over to Lightroom, and every single one of them indicates that there are some “gotchas” in the process. Those risks range from losing keywords, to missing files, to even losing edits you have made on the photos in Aperture. So I read a TON, and basically got more scared. :-)
Plus, I found lots of different ways to do it - from buying some software I found somewhere online (that actually sounded pretty good), to importing it directly from the Lightroom menu, to manually doing it yourself - plus a few more. I was nearly overwhelmed, and came close to stepping back and waiting.
But I was determined, and figured it was better to try than to wonder about it, right?
So then I started actually moving them. And to clarify, I ran my Aperture library as a fully managed library, meaning the photos were sucked into Aperture’s database and the underlying file structure was invisible to me. It was just one big gooey Aperture database file, full of my photos. This was much more complicated than just importing a series of already existing folders into Lightroom. That would have been easy.
I was scared shitless, to be brutally honest.
This is years of my creative work all wrapped up in Aperture (with all the individual files obscured from my view, basically), and I was terrified that it was going to be a huge mess trying to extricate everything. What if I lost some things? What if it didn’t work?
So what did I do?

I started small, that’s what. I had tons of Aperture projects, all organized neatly and orderly. So I just picked one of the projects, and in Aperture I highlighted all the files in a project, selected Export -> Originals, and ticked the box that said “include IPTC metadata”. I then exported them to a folder on my external drive that I created using the same name as the Aperture project. Then I looked at all the exported files, and looked again.

It's always good to double-check, and in this case, triple-check. Or quadruple.
Although I will say I got this error message a LOT (the one to the left). Aperture doesn't seem to want you to attach metadata to a PSD file when you are exporting. Not sure why, but it happened to me all the time.
I read that when you export Originals, you lose all your edits, but I wanted to make sure I exported all the RAW files, even if I missed the edits. I have previously exported all of my processed photos and uploaded them to my portfolio site at SmugMug, so I figured that worst case I could always retrieve them from there. Or rebuild them, which I guess is actually the worst case.
So how did it go?
Pretty well, actually - thanks for asking. I spent over a week doing this (obviously I didn’t spend all day on it any day - for various reasons, I had to break it up into manageable bites), but eventually got all ~140,000 photos out of Aperture and into a brand new folder structure that I set up on a new external drive to use for Lightroom.
And while in the “old days” I looked favorably upon the Aperture database file and how it obscured things from me (hey, it’s one big file, that’s cool and easy to keep track of and easy to backup!), now that I am using Lightroom I love the fact that Lightroom is the EXACT OPPOSITE of the Aperture method. Lightroom isn’t a file manager, but rather an editing and processing tool. You set up folders with your files in them, store it wherever you want (in my case, on an external hard drive with multiple copies of it on other drives), and just use them in Lightroom. You always see the underlying files, know where they are, and it’s easy to get to any single file if needed. It’s simple and brilliant. I’m a fan, and I never even knew that about Lightroom until I started watching the videos.
So Jim, did you lose anything in the process?
Yes, I probably did, but when you have 140,000 photos it’s pretty hard to tell...so I am not entirely sure just yet (and I still have my Aperture library just in case). After all the exporting, I went through each folder to look at the shots (both RAW and previously edited ones in Aperture) and it looks like they are all there. But I am way too busy to go through it all file by file. I just can’t handle that level of detail over and over - it would take months to check it all, and I would go postal in the process. So I looked in certain folders for particular images that are my favorites, or popular with customers, or whatever - and they were all there...with the edits even, surprisingly.
And since I don’t work full-time as a photographer, I figured I could live with it if something went missing. My best photos were already on SmugMug, so I felt a little smug myself. That’s the beauty of cloud storage - someone’s got your back. Three cheers for SmugMug!

Oh really???

I saw this error message way more than I should have!
I did have some challenges though. Aperture crashed on me dozens of times - like an old girlfriend throwing a tantrum to keep me from leaving. But I stayed Zen-calm the whole time and kept saying “this is better for both of us”. I would relaunch Aperture, start that export job over again, and work my way through it.
I could pinpoint which specific image was causing it to crash, and I would export up to the image before the culprit, then export the one causing the crash as a version instead of as an original, then go back and export the rest of the project as originals. It worked every time. Weird but true.
It looks like all my keywords came through as well - surprisingly - but I will say that all the filenames I had given to my finished photos did not come through. They all reverted to some variant of the original RAW file name, instead of “Sunset over Lake Austin” or whatever incredibly original name I had assigned it. :-) But that is ok with me, as it doesn’t really affect me in any way.
So that’s really it, folks. I’m done! I'm using Lightroom!
It was a little nerve-wracking for me, as you can probably imagine, but it all worked out in the end and now I have all my files (at least, I think I have them all LOL) in a file folder structure on an external drive, and I use them in Lightroom - and it’s freakin’ awesome!
I still have a lot to learn about Lightroom, but having spent so much time in it lately (and watching so much online training), I feel like I have a new lease on my photographic processing and am having a hell of a good time with it!
Thanks for listening! Let me know if you have any questions.
And here is my layout now in Lightroom, with all my well-organized files in a simple structure there on the left. And I love that a quick glance tells me how many photos are in each folder. Simple, easy, straight-forward, and awesome!
Ok, time to go process some photos, folks - thanks for the visit!

Revealing the artist within
I love the Impressionists, and enjoy their work immensely. When Topaz Labs created Impression - a software product that helps you convert your photos to digital paintings in a very realistic way - I was very intrigued. Well I have used it for months now, and have found that it is having a profound impact on my photography. Today's post is all about that, and of course there are a BUNCH of my digital paintings included for your viewing pleasure. Hop on in!
Topaz Impression is changing my photography
sunrise in Austin, TX
golden hour along a canal in copenhagen, denmark
I’ve been a fan of Impressionist paintings for a long time. I have no idea when I first came across them and decided that I liked them, but it’s been a while. There’s just something about them that really speaks to the artist in me.
I love the play of light, the bold use of color, and their use of simple compositions to draw the viewer in. I have no formal education in their works (and therefore don’t pretend to know much, honestly) but I do find them beautiful and interesting, and I am always drawn to them at museums. They seem to be full of feeling.
“If you hear a voice within you say, ‘You cannot paint,’ then by all means paint, and that voice will be silenced.” — Vincent van Gogh
But I can't paint worth a damn, so I take photos instead. I'm ok at that stuff. :-)
Les deux magots, a famous cafe in paris
leadenhall market in london - and yes, this place was used for parts of diagon alley in the harry potter movies
an interesting shop along the royal mile in edinburgh, scotland
Even though I am a fan (and frequent practitioner) of HDR photography - which is typically known for showing a lot of detail in a photo - I love the way that Impressionism actually obscures the details and makes you appreciate the larger scene itself.
It’s brilliant, really. That’s the purpose of art anyways, right? It honestly makes me want to continue to evolve my style of photography. It makes me want to be a better photographer. Studying these masterpieces just really gets me motivated.
“Every artist dips his brush in his own soul, and paints his own nature into his pictures.” — Henry Ward Beecher
a street just off grand place in brussels, belgium
blue hour at notre dame in paris
an alley along a back street in bratislava, slovakia - just loved that red door!
I’ve done the “heavy-handed HDR” thing before (and now and then I still do, because I feel like some scenes just beg for it), and I still like it at times, but more and more I am moving in the other direction. Where am I headed? I haven’t fully figured that out just yet.
I assume everyone that is involved in some artistic pursuit continually goes through the same cycle of creating, continuing to learn, and applying those learnings in new ways. It’s something I have been doing for some time now, and frankly - I love it. I love experimenting with new styles and new processing options, and seeing where it takes me. I love experimenting with new ways of shooting too – trying new composition ideas, new lenses, and generally just mixing things up and keeping it fluid.
shakespeare & co bookstore in paris
sunrise in the temple bar district in dublin, ireland
I guess I feel like I rode a particular horse about as far as it wanted to go (or at least as far as we wanted to go together), and now I am trying out lots of other horses to see which one is most compatible with me. (Yes, I am from Texas. No I do not own a horse - it just seemed to be a fitting description.) I seem to be writing a lot about creativity, change and experimentation over the last 6 months or so. I’m obviously thinking about it a lot, and going through a bit as well.
Am I turning my back on HDR photography? No, I don’t think so. I still love it, and still do HDR a fair amount. It’s just that I am a bit more diversified now. I guess I want to do more than one thing with my art.
blue hour at the bay bridge in san francisco
a boulangerie in montpellier, france
It’s very much like the blog itself. I’ve changed a lot here over the last year or so. The first few years I posted a single photo each day, about 5-6 times per week. Now I do more long-form posts like this one, plus I include a LOT more images, and write about more than just the image at hand. And, I now post about 2 times per week, and sometimes 3 times. So fewer posts, but longer posts, and more images. It’s been great to change things up - I think I needed it.
It certainly keeps it more interesting for me - and hopefully for you.
sunset in portland, or along the willamette river
shopping in galleries vivienne - paris
the natural history museum in london - such a heaven for photography!
But anyways, like the Impressionists (ok, I’m not actually trying to compare myself to them, to be clear), I am finding that it’s better at times to obscure instead of reveal, and that it makes for a more interesting image. If you can’t see EVERY SINGLE THING in an image, it makes you look at it a little deeper, and a little longer, and I think you then start to fill in the blanks in your head a little bit. It’s more interesting. More engaging.
So in an effort to get in touch with the elusive artist inside of me (and I believe we all have that little spark in there somewhere), I have been converting some of my photos to digital paintings, using Topaz Impression. If you follow me on Flickr, you have probably seen me post quite a few of these in recent weeks. I love just sitting around with an old photo, and jacking around with it to see what new thing I can create from it. It’s a good exercise for the creative right side of my brain. Way better than surfing Facebook. :-)
And that brings me to today’s post. These are just some of my recent faves that have gone through Topaz Impression and come out on the other side looking all artsy. It’s quite fun, and I highly recommend it. It’s a great creative exercise, even if all it really is is just moving some sliders around. It’s not really the physical act for me as much as it is the mental one. It makes you think differently, that’s for sure.
st. pancras international station in london - where you can catch the train to paris!
a store in brussels, belgium - i could not resist taking this shot!
before sunrise in grand place, the beautiful town square in brussels, belgium
Admittedly, it’s not for everyone (and I’ve had people tell me that) but it is for me, part of the time and at this stage of my journey, and I love using it as a creative outlet. It forces me to look at things differently than I normally do, and that’s a way to grow and change. That’s a way to improve. And really, that’s what I am trying to do - improve.
“Creativity is allowing yourself to make mistakes. Art is knowing which ones to keep.” - Scott Adams
And just to clarify - because the name Impression puts a certain idea in your head - you can create ALL SORTS of art using Topaz Impression. I tend to stick with the Impressionists most of the time because that is my artistic leaning, but you can do Modern Art, Pencil Sketches, Charcoal and more. It’s incredibly versatile. You can read about it on the Topaz Labs website, or read my review here on the site.
So if you are looking for a way to change things up and explore your creativity, then Topaz Impression might just be what you need. It’s certainly made a difference for me!
sunrise in las vegas
a cafe along rue du bouchers in brussels, belgium
sunset under the millennium bridge in london - what a great sunset that was!
********************************************************************************************************
Note: I am an Affiliate with Topaz Labs, the makers of Topaz Impression and many other great software titles (such as the well-known Topaz Adjust). You can use the discount code NOMADICPURSUITS and get 15% off ANYTHING you order on their site. If you use that code, I get a small commission which I reinvest in the ongoing maintenance of this site. If interested you can follow this link.
But please note that this is NOT a sponsored post. Topaz Labs did not ask me to write this, and did not compensate me for doing so. I wrote and shared this simply because I love the product, and it's making me a better photographer, and I thought some of you would be interested in my thoughts on it. Thank you for stopping by!

Old photos, new results
Do you ever go back and re-process photos that you have previously shared? I do that sometimes, and find that it's a great creative exercise. But recently, I HAD to go back and re-create an old photo for a client, and it took me forever to make it look like how it looked when I first processed it, about 5 years ago. And so I learned a lot in the process - and I am sharing those learnings and my observations in today's post. Have a look!
Some thoughts on going back to the well
(alternate title: There's gold in them there archives!)
I love to take new photos of new places - that’s part of what drives me as a photographer. I long for the new, I guess. And over the last few years, I have built up a decent-sized library of images through all my travels (about 130,000 pics now, and counting), most of which are still in need of post-processing and publishing. I’m getting to it, albeit more slowly than I would like.
But hey, this isn’t a full-time job for me, so I make time when I can. I will say that I am cranking them out pretty quickly this year, which was one of my goals in 2015 - so I have that going for me. :-) In fact, so far in 2015 I have published well over 200 photos (including iPhone shots), which you can find in my Flickr photostream - that’s where I keep everything. I like how Flickr let’s you organize things. (You can read some of my musings on Flickr here.)
With a large backlog of things I want to share (not just photos, but a couple of product reviews, and a laundry list of other topics to write about), you may find it odd that there are times when I dip back into my previously published photos, and do some re-editing.
I don’t really have time to do this, but sometimes I do it anyways. It's a great exercise.
But sometimes, it's a necessity. This recently came about because a customer contacted me about an image I shared several years ago. It was an HDR of a sunset in La Jolla, CA and - according to my current thinking - it was more of an over-the-top HDR. Ok, it was a very over-the-top HDR. It’s not even remotely close to what I would do with the photo today. But they liked it, and they wanted it, and I was happy to oblige.
You see, my style has changed quite a bit since the “early days” of 4-5 years ago, and (in my opinion at least) my application of HDR is much more subtle - most of the time. Now and then I hammer those pixels, but mostly not so much.
But here’s the thing - the photo was done in such a way that I HAD to re-process it in order to make it larger for them to print (I made a LOT of mistakes early on in this creative pursuit of mine). But the problem was this: I had no idea what I had done to get the photo looking the way it did. I knew generally what software I used, mostly because it was all I had at the time, but as far as the steps I used to create it, specifically? No idea. No. Idea. Whatsoever.
So what did I do?
I did the only thing I possibly could do - I started to re-process the photo that I first created about 5 years ago. It was a lot of trial and error, though mostly error. And guess what? It took me forever to get it looking even remotely close to what the client was expecting. (No surprise.) I finally got it there, but the whole exercise was a great learning process. A bit painful I might add, but still a great learning process.
Here are some things that I encountered, observed, and learned by going back to the well, and why I recommend it as a fabulous creative exercise:
Your stylizing choices really do change over time - and perhaps drastically.
Assuming your processing is somewhat consistent from image to image (I am often a creature of habit), don’t hesitate to chronicle this somewhere, as a point of reference at least, should you ever need it. I can hardly remember what I had for breakfast, so a journal of this stuff could come in really handy someday - like last week! :-o
Your workflow has probably changed quite a bit too, and likely for the better.
But just like the last point, if you chronicle this somewhere you can refer back to it. Can you remember which filters you applied, and in what order, when processing your pics in years past? Can you remember which software products you used? I know what I do today, but that’s different from last year, much less several years ago. You could even keyword this stuff into the image in the library, I guess. And I am not suggesting you do this for every image - because that’s a little too OCD - but maybe some just general notes about your “style”.
Use this exercise as a yardstick to measure your development.
Your skills have likely matured - a LOT. Most of the images in today’s post were processed years back, but just sat there on my hard drive because I didn’t like the results at the time. They were flat, boring - even ugly in some cases. Perhaps I just didn't have the right skills in post-processing to bring the image to life, and I certainly lacked the confidence to "put them out there".
Now that I have come back to look at them with fresh eyes - and better skills in post-processing - I have been able to create photos that I deem worthy of sharing. These are also all single exposures. Part of the reason I never did anything with them in the past was that I was just TOO addicted to HDR and these, being single frames, just got passed over in favor of “better” shots to share.
Software gets better over time...
That’s another thing about today’s photos. I don’t think I could have gotten the results you see here 5 years ago. Maybe I could have with a lot of work, but with all the advances in software, it sure makes things quicker and easier on us...and at least in this case, it saves these from being banished to obscurity forever. And I rather like these photos I am sharing today. I’m glad that I dug them out.
...but it also gets different.
I used Topaz Adjust on the original image 5 years ago, and thus used it on the re-edit, in an attempt to "get it right". That product has gone through a LOT of changes in the last 5 years (and I’ve used it all this time, though not on every image), so even remembering the way you did things back then might not lead you to the same end result these days.
This is an endless source of entertainment...
I realize some photographers consider what they published in the past “off limits” because it’s a snapshot (no pun intended) of where they were at the time - artistically speaking - but I am not that way at all. I have occasionally gone back to previously published photos and done a re-edit, just for the hell of it. It’s damn fun, especially going into it with the mindset that it’s damn fun! You can easily pass a few hours doing this.
...so know where to draw the line.
When you have a large library of photos, you have to decide what’s worth a re-edit, and what’s better left alone - otherwise, you could spend all your time just messing around with the old stuff and never get the newer work published. Nothing wrong with it of course, but I suspect a lot of photographers are like me, and want to create new work from recently captured images. There’s an addiction to the new, so to speak.
You may create some amazing work - and you didn't even know it was there.
Although I would do this whole photography thing for free (and in some ways, you could argue that I do!), I do want to earn some money from my efforts if possible, in order to fund new purchases and travel. So why not dip back into some old favorites and give them a new look? Or like I did with these photos - dig out ones that you never did fully process, and never shared, because you thought they weren’t “good enough”. You may find some real keepers buried deep in the archives.
It’s your art, and it’s your right to do so. Why not then share those pics wherever you host your shots for viewing? I add mine to my Flickr photostream as well as put them into my portfolio site on SmugMug. No one will ever discover them if they just sit in my library, collecting virtual dust. What good is that? You’re not doing anyone a favor, least of all yourself. So share that stuff!
********************************************************************************************************
And now thanks to this little accident of mine, I have this whole post worth of images to share, because once I fixed that one old photo for my client, I started looking at all the others I took of that sunset...and it was a beautiful sunset. Real beautiful, in fact. So then I got busy processing, and processing and processing...and all of these photos above are the results.
And guess what? I added all these to my portfolio site, and they are going on Flickr too...because that’s where they may get discovered by people that might just be looking for a California sunset picture. So don't hesitate to dive back in to some old files - you really may find a diamond or two in the rough!
And if you read this far, then you may be asking "where is that HDR you are referring to, Jim?". Well, here it is - this is my re-creation which mimics the stylizing I did on it 5 years ago...not at all what I would do today, but 5 years ago, well...things were a little different for Jim here. :-) I was VERY in to pushing those pixels around.
And yes, curiosity killed the cat, so you can bet that after finishing this for my client, I went back to it and decided to reprocess as an HDR in the style that I prefer today...so below is that version of the pic. It's still a somewhat aggressive use of HDR - depending on your definition of aggressive, of course - but it's way closer to what I would do with the photo today, and more closely resembles my current tastes.
And lastly - yes, in case you are curious, that first photo at the top of today's post is a single exposure from the bracket set used to create this HDR. That's another reason I am doing less and less HDR - I find I often get a result I am pleased with when using just a single exposure. Not always, but often.