
Luminar AI Update 4 - now with Portrait Bokeh AI!
Luminar AI just got a free update to include Portrait Bokeh AI. It automatically creates a mask for any human in the photo and then allows you to control how much blur the background gets. It’s amazing! Check out my summary here and my First Look video on YouTube.
Well friends, we finally get the long-awaited bokeh AI tool in Luminar AI, which was first promised when the product was originally launched, late last year. Was it worth the wait? See sample screenshots below, and check out my full demo video as well!
My opinion? It’s quite good, and it will be really useful too!
Now, when it was first announced last year, it was just called Bokeh AI. But now it is Portrait Bokeh AI. So keep that in mind. In other words, it is designed for portraits, and not just any photo. It uses AI to recognize humans in an image - even groups of them - and automatically creates a mask over them. Then you can adjust the bokeh for the background, as well as quite a few other things: brightness, temperature and more!
I love when new products or new features come out, and even though this isn’t exactly something I need all the time (if you follow my work, you know that taking portraits is not my thing). But I do feel that with this update, they have done the impossible - they’ve made me interested in portraits! LOL
Honestly though, I am having a lot of fun with it and think you will too.
Check out my full First Look video here:
Here are some sample screenshots, showing how the mask looks over this photo. Keep in mind, this mask was AUTOMATIC and was done in a couple of seconds. It’s amazingly fast and accurate too. Of course, if you need to adjust the mask, you can do so with the brush in the Portrait Bokeh AI tool. You can paint over parts of the photo to either add focus to them, or blur them. It’s quite ingenious and of course all you portrait photographers out there are going to love it.
Unedited photo on the left. Photo showing mask in the middle. Final edit (with new sky, too!) on the right.
Click any image to enlarge.
Now here is the other thing I want to point out about this tool. This is the FIRST TIME that Skylum has actually shown us the mask with their AI tools. Take Sky AI (automatic sky replacement) for example. Sure, the sky goes in automatically and looks great, but you never actually see the mask. It’s not hard to figure out, of course, but I think this is a big deal because in the past these things have been obscured. So I think this is a positive development.
And as I said, it will also handle group portraits with ease. Here is a sample group shot. You can see the mask, which is 95%+ accurate. I think that is pretty amazing all around.
If you want to see more of this tool in action, I recommend watching my YouTube video about it. I will also be back soon with even more videos about this tool.
And just to make sure that Portrait Bokeh AI doesn’t overshadow the other big updates, I wanted to share them here. The Sky AI tool has been improved and simplified. A new on-screen tool makes it even easier to get a new sky in the right position. They replace 3 separate sliders with a new Horizon Position tool, which operates a little like an adjustable gradient. It’s quick and easy, and I cover that in the video too.
And lastly, the Texture tool was updated to include visual previews of textures. This is great because many times the name of the texture might not be very clear, so this visual preview helps a lot! There are two new sets of textures included, and you can even load your own folders of textures and get a visual preview of them, too. It’s awesome!
There are also a lot of bug fixes and performance updates to round out Luminar AI Update 4. Keep in mind this is a FREE UPDATE for current customers, so it’s no cost to you my friends. Get it and have fun editing!

Exploring New Features in Aurora HDR 2018
Here's another video demonstrating some of the new stuff in Aurora HDR 2018 - it's coming soon!
Yep, another video on Aurora HDR 2018 - I couldn't help myself! ;-)
I've been having a LOT of fun with Aurora HDR 2018. I have spent countless hours messing around with photos in it - both HDR and single exposure - and am really enjoying this release. It's going to be available on September 28, but of course you can pre-order now right here.
If you missed the big announcement you can find all the details right here on my blog. You can get a special pre-order price, too, which is awesome. Anyway, see the video below and let me know if you have any questions! Thanks!

Creating a Cinematic Orange and Teal Look in Luminar
Have you noticed the popularity of the orange and teal look? It seems to be everywhere. So, here's a new video showing you how you can recreate that look in Luminar. Enjoy!
Have you noticed the popularity of the "orange and teal" look?
I never paid attention to this "look" until someone sent me an email and asked how he could create this look. Once I started experimenting with it, I started noticing it EVERYWHERE. It's in movies, all over Instagram and more. And now that I have spent a lot of time recreating the look, I like it quite a bit and better understand the attraction of using it.
Orange and teal sit on opposite ends of the color spectrum, and thus they are very complementary. And yes, the first photo I edit is the same image as I shared in yesterday's blog post. No, I'm not double-posting the same shot, it's just that I finally have the video ready and the timing is what it is. But check out the video because I edit 4 pics in it. Enjoy!

Creative Color Shifts in Luminar
Here are tips and filter suggestions for creatively shifting the colors in your images using Luminar. Enjoy!
Here's another Luminar tutorial - showing how to creatively shift colors in your images.
I love to experiment with Luminar and see what sort of nonsense I can come up with. A lot of it goes into the trash bin but some of it survives and becomes a video. This one survived. I have been experimenting with a lot of color shifts in my images - just for artistic effect - and came up with 7 different filters you can use (individually) to do this. It's fun, interesting, and gives you some new creative ideas to apply to your own images. Enjoy!

Crafting Epic Landscapes with Aurora HDR and Luminar
I you love landscape photos as much as I do, this video might help give you some ideas for editing them successfully in Macphun products. Enjoy!
Here's my latest video - and it's all about editing epic landscapes!
I love to shoot landscapes as much as everyone else does, but sadly I don't get to them very often. However on this epic family roadtrip we are doing, we stopped for a week in Banff, Canada and I was able to capture a LOT of landscape photos.
My favorite destination there was Moraine Lake. It's a glacially-fed alpine lake surrounded by amazing mountain peaks. the water is an incredible blue color and you just can't argue with the scenery. It's pretty amazing.
So I take a 3 exposure bracket set shot at sunset, and merge them to HDR in Aurora HDR before taking that blended image over to Luminar for some stylizing. It's about 10 minutes of video, but I cover a lot of ground and offer up a bunch of tips, too. Enjoy!

Deconstructing Luminar's New Accent AI Filter
Here's a new video showing how I try to use multiple filters to recreate what I could more quickly do with just the Accent AI filter in Luminar. It was an interesting exercise for sure!
This is a seriously powerful filter, and it's just a single slider!
I am all about ease of use and saving time when editing. I take a lot of photos, and I always do some sort of editing to them, so I want to move through them without spending too much time on any single photo. That is one of the reasons why I have created so many presets. They are time-savers (plus, it's fun to experiment with different looks).
So when I first got to experiment with the new Accent AI filter, I was pretty excited, and then after experimenting with it I was BLOWN AWAY. It's pretty incredible.
It does what it would normally take several other filters to accomplish, all in a single slider. But I got curious about which filters it could theoretically replace, so I took a photo and did a comparison. I edited it with just the Accent AI filter, and then I did it again with other filters except for Accent AI. It was a fun exercise, and proved just how powerful Accent AI really is.
Here's the video. Take a look and let me know if you have any questions!

Macphun releases Luminar Neptune!
Macphun sneaks in another amazing - and free! - update to Luminar, called Neptune. Check it out! There are new features in this release, and they are offering a great bundle deal, too! I also have a video showing you the new features. Dive in friends!


More awesomeness from Macphun - they just keep on giving!
I assume by now you know that I absolutely LOVE Luminar by Macphun. It’s my go-to editor for every photo, and it works wonders. It’s incredibly powerful and continues to innovate. That’s why I recommend that you drop the Nik Collection and adopt Macphun right away (I wrote that a couple of weeks ago, and now this new Luminar update is out - great timing to prove my point!).
Today Macphun is announcing another update to Luminar, adding in several new features, performance improvements, and more. It's a free update to current users!
Check it out and let me know if you have any questions!
If you don't have Luminar yet, be sure to read the special offer below!! It’s a great deal my friends!
New Feature Highlights in Luminar Neptune:
- Accent - AI-filter – Uses artificial intelligence to create stunning images with a single slider movement, tapping into the power of dozens of filters.
- Quick & Awesome workspace – A workspace consisting of the Accent AI, Saturation & Vibrance and Clarity filters. Great for achieving fast results in a fun and easy way.
- Plug-in integration with Creative Kit and Aurora HDR 2017 – Seamlessly access Macphun’s other photo editing tools you own with Luminar as the host application
- Brush, Gradient and Radial Gradient tools – Dramatically faster performance yields smoother selective editing.
- Vignette filter – Addition of Vignette Styles, Place Center and Pre- and Post-Crop modes deliver even more flexibility to this popular photo finishing tool.
- Memory management – Increased overall performance for large files and 5+ simultaneous open images.
- User Interface changes – Extensive improvements to in-app animation and mode transitions make for a more pleasing editing experience.
- Crop tool update – Added the ability to specify custom crop ratios.
- Local history – Provision for reviewing separate history while in Transform, Denoise, Clone & Stamp modes helps optimize editing.
Some quick personal experience insights into these new features:
I have been using Neptune for about a week now, and absolutely love it. I think you will too. The new Accent AI filter is AWESOME and I have been using it on a bunch of photos. So cool, quick and easy! The new workspace, Quick and Awesome, is very helpful too. It's a combo of the Accent AI, Saturation/Vibrance, and Clarity filters. Works every time! I will often start with that workspace and then add another few filters to the image, depending on what I am trying to accomplish.
The plug-in integration with other Creative Kit apps is really helpful, though of course this is only when using Luminar in standalone mode, when it can function as the host app. Nonetheless, I do that a lot and so now I can quickly pop over to Aurora, Focus, etc if I want to. That's great to have at your fingertips!
The update to the Vignette filter is super handy and I love the "place center" option which I have wanted for quite a while. All the other stuff is great too, but these are the highlights from my experience over the last week. I also took a few minutes and recorded a video showing Neptune in action. In this video, I edit 4 different photos, rather quickly, and of course I use the Accent AI filter every time. I know you will enjoy it!
Here's a video wherein I edit 4 photos using the new filters, workspace and more:
Bottom line is that this amazing app just keeps getting better! Thank you Macphun for continuing to innovate!
Go get your free update if you are a current user!
Are you Luminar curious now? Interested in getting this amazing app for yourself?
Well then, here's a great new special offer on Luminar Neptune + bonuses such as training, presets and more!
LUMINAR NEPTUNE OFFER INFORMATION:

Luminar + Video Training, eBooks, Presets and Overlays for $69. Total value of $309.
Pricing as low as $49 for Macphun users when you use coupon code JIMNIX or $59 for non Macphun users that use coupon code JIMNIX.
OFFER AVAILABILITY: Thursday June 15th - Sunday June 25th
You Get:
- Luminar, The Supercharged photo editor for Mac that adapts to your skill level. ($69 Value)
- Photography Fundamentals Video Training - In this series, you'll learn all about the essential concepts of photography from professional photographer and educator Richard Harrington. ($99 Value)
- The Grand Landscape eBook by Ian Plant - In this eBook, Ian Plant shows you how to make great landscape photos in no time, helping your work to stand out from the rest. ($19 Value)
- 2 Luminar Preset packs - ($49 Value)
- Over 500 Overlays - ($45 Value)
- The Black and White Landscape & Candid Portrait eBooks from Andrew Gibson ($28 Value)

Check out my Luminar presets, too!
And once you get Luminar (spoiler alert - shameless plug coming next), feel free to take a look at my preset packs here. There are quite a few for Luminar and all the feedback has been great. They are packed with one-click looks you can easily adjust, and they are very reasonably priced. Enjoy and let me know if there are any questions!
Not convinced yet? Take a free test drive!
At the very least, go download a free trial of Luminar and give it a test drive. It's an amazing product and one that I use literally every single day. I love it and I feel like it is the most powerful and flexible photo editor out there today! I think after you use it a little and get familiar with it, you will agree.
- Need help understanding how to use it? Here's a bunch of stuff that will help.
- Interested in getting one-click awesome looks in Luminar? Check out my presets!
- Want to watch some videos? Check out my YouTube!
Let me know if you have any questions! Thanks for stopping by!

Blue hour in Prague: Aurora HDR + Luminar workflow
Here's my latest video, showing how I build the base HDR photo in Aurora and then take it into Luminar for some additional editing and customization. Enjoy!
Here's my latest video, showing how I start with Aurora HDR to build my base HDR image, and then take it into Luminar for some stylizing work. This was shot on my recent trip to Prague. I was up super early to get out on the Charles Bridge, specifically so I could avoid all the tourists. Worked out perfectly! I had the bridge nearly to myself for a couple of hours!

Why now is the right time to adopt Macphun
The Nik Collection is dead. What are you going to do about it?
It's official - the Nik Collection is dead. What are you going to do about it?
This image is from the PetaPixel article about this topic, referenced below.
Over a year ago - right after Google announced that the Nik Collection would be given away for free - I wrote an article here on the blog (go on, give it a read first, then come back here) about why I wouldn’t get too dependent on it. Having been down the primrose path with other companies in the past, I felt strongly that this would not end well. Now it’s official - the Nik Collection will no longer get any updates. In other words, it’s dead.
This hit the photography news sites the other day and made it into my social media streams countless times. I’m not exactly sure that it is “new” news, but at least now we know for sure - the product is dead. If you have depended on it for editing your photos, it’s time to face the truth and move on. This product is headed for the trash can.
You can read about it here: https://petapixel.com/2017/05/30/google-abandons-nik-collection-popular-photo-editing-software/
Google announced this via the banner on the top of the Nik Collection page.
Yep, that sucks. I have barely used their products for the last 2 years - having made the move to Macphun a while back - but prior to that I used them for 4+ years nearly exclusively and I loved them, especially Color Efex Pro and Analog Efex Pro. I have fond memories of Color Efex Pro and using Control Points to apply selective adjustments to my shots. It was cool, innovative and effective. But no business can sustain a product for free forever, even Google. Why would they want to? It's a waste of their time.
So before your OS or host application gets updated and your Nik Collection becomes incompatible, start doing your homework. Figure out what you need to do next. Download some trials (you can get Macphun trials here), and get busy experimenting. This might sound like a huge pain in the ass - and frankly, it may be - but you will come out on the other side of this thankful. You will learn a new product suite that you can count on being around for years to come, you will gain new capability and you will learn new skills. You might actually reinvigorate your photography. That's exactly what happened to me.
I made the switch to Macphun and it’s awesome
When I wrote that article last year, I was just getting into Macphun. I had been using the Nik Collection for ages and frankly felt a bit stale in my processing. It was the same thing on each photo, day in and day out. I wasn't challenging myself to experiment and grow my skills. I was on autopilot. I felt like I needed some "new stuff" but I didn't know what it was. I tried several product suites in hopes of finding some inspiration.
That's when Macphun entered the picture. At the time Aurora HDR was pretty new, and their other excellent products were useful too. It was a whole bunch of stuff to learn and experiment with, and I loved it. Since that time, Macphun has unleashed Luminar on the world and it is simply the best product I have ever used. I know my decision to go in this direction was the right one. I'm reminded of that each time I open a photo and begin editing it.
These days, I edit nearly every photo in Luminar (and sometimes Aurora HDR) and I am very confident that this product will be around for a very long time. It’s new, it’s fresh, it’s innovative, and their user base is growing. The only knock I ever heard from people is that it is Mac-only.
Well now Macphun is adopting both Luminar and Aurora HDR for Windows. So think about that. Not just innovating and adding new features and capabilities, but expanding their products to another platform and growing their user base. This is good news for photographers. This is a company that is growing, investing and planning for the future. More good things are ahead.
If you are interested in learning more about Luminar, take a look at my Luminar Tips page, where I share tips, tricks and videos showing how to use the product. If you have questions, feel free to use my contact form. I’ll do my best to help.
If you want to download a free trial of Luminar, you can do that here.
Note that I’m not saying that adopting Macphun is the right move for everyone. I'm just sharing my experiences and recommending that you add it to your list of things to try. It was the best move for me, so I am just speaking from experience. There are other very solid product suites out there - maybe test those out too and see for yourself. Give each of them a test drive. But do something, because being stuck sucks, and you need to figure this out sooner rather than later. You’ll be glad that you did.
So, what are you going to do?
Disclosure: I am an affiliate of Macphun, so if you click on my links and purchase something I receive a small commission which I reinvest in this site. If you are interested in purchasing, use the coupon code JIMNIX to save a few more $.
However, this is not why I recommend Macphun. I recommend their products because I use them every day and feel that they are the best out there, and I tried everything when I realized I had to move to another product suite. My experience with them has been excellent.

Mastering Layers in Luminar
Confused about how to get the most out of the layers function in Luminar? This guide gives you tips, tricks and ideas about how to maximize your use of layers in Luminar by Macphun. It's the ultimate guide to mastering layers in Luminar.
A Guide to Help You Better Understand How to Use Layers in Luminar by Macphun
Need a better understanding of Layers in Luminar? Looking to master layers for better image control? Looking for some tips and tricks? Confused about Merge Visible Layers, Merge All Layers and Rasterize Layer? This guide is designed to help you get the most out of using layers in Luminar so you can master this powerful feature.
One of the most powerful features of Luminar is Layers. Using layers allows you a lot of creative freedom and versatility that you just can’t get in Lightroom. Using Luminar as a plug-in to Lightroom (or as a standalone app) gives you this extra boost of flexibility, thus allowing you to do much more than you could do in Lightroom alone.
Aren’t familiar with layers? It’s a simple idea, but once you understand it you gain a lot of power and control over what you can do with an image.
A layer in Luminar is basically a virtual transparent sheet of paper that goes on top of your photo. Just as you can stack one transparent sheet of paper on top of another, you can stack one layer in Luminar on top of another. And just as you can write on each transparent sheet of paper with a pen and your view from the top is a combination of all the writing on each sheet in the stack, your photo is the combination of all changes you make on each layer.
Each layer is given a default name/number. Your base photo is Layer 0, then Layer 1, Layer 2, etc - although you can also name them yourself which allows you to remember which edits are on which layers. Naming your layers is quite handy once you start to get several layers in place.

There are basically two types of layers you can add to a photo: an adjustment layer and a new image layer. An adjustment layer is a layer on which you would apply individual filters or a preset. A new image layer is for adding a texture or something else such as a new sky (more on both of these types later).
When you first add an adjustment layer (which will be displayed as Layer 1), you can “see” completely through it to the photo underneath (which is your original photo, Layer 0). This is because when it is first added, there are no adjustments yet made to the image. So you are basically just placing a transparent sheet of paper over your existing image. It’s a blank canvas, and you can do whatever you want to do with it. Once you begin making adjustments on Layer 1, these will impact how the photo will look. Your photo becomes a combination of adjustments made on this new layer, as well as any adjustments you have previously made on the base/starting layer, Layer 0.
Each new layer essentially “starts” from the previous layer and they build upon each other. Hence, you can stack layers to continue to add new and different edits each time. This gives you unbridled flexibility to customize an image, and incredible control over how you do it. This also allows you to easily reverse an edit by removing the layer or just zeroing out the edits there and starting over.
When you first add a New Image Layer (as opposed to an Adjustment Layer as described above), the image chosen for that layer will show at 100% opacity, and thus you will not see the underlying layer in these cases (but we’ll discuss that down below). Basically, in adding a New Image Layer you are placing a photo on top of your base photo, so you will see this new photo on your screen, because it is on top, and it is not transparent. Make sense?
Here’s an example of how layers work:
- Layer 0 - let’s say I increase saturation and vibrance here, and then add a new adjustment layer on top of it, which is by default named Layer 1
- Layer 1 - my starting point here is the base photo with the increased saturation and vibrance (Layer 0), and then any adjustments I make on this layer add to that
- Layer 2 - my new starting point is Layer 0 + Layer 1 and their related adjustments
- So on and so on…
A layer can contain any adjustments you make, a preset, or it can even contain a new photo or a texture. This allows you to get REALLY creative. This will not harm your base photo. You are working “above” your original so it is non-destructive. You can always remove a layer should you not like the result. But note that the photo as you see it will be a combination of all the edits across all the layers.
As you can see, you also have the option on each layer of adjusting the opacity as well as changing the blend mode. While this article does not cover blend modes, I recommend trying some experiments with them. A blend mode basically changes how your current layer will blend with the one below it. You may get some crazy awesome colors, a really dark and moody blend, or a washed-out looking, faded blend. It's very difficult to predict, but that does make it fun.
Adjustments on a layer are not permanent
You also have the flexibility to click on any of the underlying layers to further edit them, even when you have new layers on top of it. Perhaps you added a texture on Layer 1 and reduced the opacity to 50%. Let’s say you are now on Layer 3, but have decided that the texture layer needs a further reduction in opacity because it's too prominent. Just click on that layer in the Layers Panel and make any adjustment necessary. You can do this with filters, presets, etc on any layer at any time. Once you are done, click back on your “top” layer and make sure you have reactivated all the layers underneath it, so you can see how these most recent adjustments to an underlying layer have impacted the final product.
Note that in order to see how your image looks, you always have to be on the top layer, with all underlying layers active (the eyeball icon next to the layer in the Layers Panel must be checked). This is also helpful when you are not sure about the impact a particular layer has made to the final product. You can click each layer on or off with the eyeball icon to see what impact that has. If you turn it off and like the photo better without it, just delete the layer by making sure that layer is highlighted in the Layers Panel, and then hitting the big minus sign.
Adding Layers and Understanding Your Options
To add a layer in Luminar, just click the + sign in the layers panel. You have three choices from the Layers Panel:
- Add a New Adjustment Layer
- Add a New Image Layer
- Create New Stamped Layer
Let’s dive into those next.
1.) Add a New Adjustment Layer
This is a new, blank layer that is wide open for you to add filters to, make minor or major adjustments, or even apply presets. Grab some filters and move the sliders around. Experiment. Try different looks. Try out some presets to see how they look. It doesn’t even matter if you like what you end up with. Just add some layers, stack some edits, and get familiar with using Layers.
Hint: I generally start with one of my own presets on each base layer (although of course I am biased towards them; this is just a personal preference). These serve as inspiration for me and set me off in a particular creative direction. If I decide I want to add several additional filter adjustments to the photo, I will normally add a new adjustment layer and apply those there. While I could just add those filters to the layer which includes the preset, I like to add them on a new layer so that the layer with the preset remains “pure”, containing just the preset. That way should I decide I don't like the incremental edits, I can delete that layer and my preset is still on the base layer, untouched. This is simply how I like to do it, as I like to keep things separate in my head. You can do it however it feels comfortable to you.
When you add an adjustment layer, you will be given the option to add filters immediately. You can also close that and instead choose to add a preset.
2.) Add a New Image Layer
You would choose this if you wanted to apply a texture or replace a sky, for example. Either of those is a “new image”, and using this will apply that “new image” on top of your current base photo. You can then use various methods to blend them into the base photo to achieve your desired outcome: gradient mask, brush, opacity slider, blend modes, etc.
A couple of hints about how I use the "Add New Image" command:
- When replacing a sky, I generally use the gradient mask to blend the new sky into the base photo, although you can also use the brush and just paint it into the shot. However I prefer the gradient mask because the very nature of the gradient mask means that the opacity of the new layer (the sky image) is reduced as you approach the horizon line, and that seems to work better for blending it into the shot (at least most of the time).
- When adding a texture, I just reduce the opacity until it looks good. Sometimes I will reduce the opacity AND use the brush to apply the texture selectively to certain parts of the shot. It really just depends on the image.
Here are a couple of videos in which I replace a sky via the Add New Image Layer command:
Note that the “new image” will lay on top of your existing photo at 100% opacity, which means you will not be able to see anything underneath it. When I am blending layers, it often helps to just drag the opacity slider down from 100% to something considerably less, such as 30% or even less, so you can see the base layer underneath it. This is not required, but sometimes it helps just so you can see the base photo, especially in cases where you want to brush in just a portion of the new layer. You can always increase the opacity later.
Also note that this “new image” has to come from your own files - these are not built into or stored in Luminar. So any new sky or texture that you want to apply to your photo must be stored somewhere that you have access to. When you choose this option, it will open up a dialog box which allows you to choose a file. I keep textures and new sky images in folders on my desktop, just to make it easier to access. Also note that this new layer, with your new image on it, will be named based on the name of the file you choose.
Idea: Did you know you can apply presets and filter adjustments to your New Image Layer? Of course you can! It’s just another layer, after all, and it’s a photo. So if you replace a sky, you can apply adjustments to it to bump up the colors, for example, or add a preset to it. If it’s a texture, you can apply adjustments or a preset to it in order to change the colors, details, tones, etc. This is a great way to further customize and personalize your final image, and it also allows you to get more mileage out of a texture by changing the look of it each time.
In this example, I have chosen a texture called "burlgrunge" and as you can see below, it is applied on top of my base photo at 100% opacity, which means I cannot see through it to the base photo underneath.
Whenever I apply a texture, I immediately reduce the opacity so I can see the underlying photo. This helps me better understand what I want to do next in terms of blending the photos together.
3.) Create New Stamped Layer
This allows you to create a merged copy of all of your layers. All of your current layers combine into a new layer at the top of your layers panel. The benefit of using Stamped Layers is that you can combine everything into a new single layer, however you keep the original layers intact/visible, just below your new Stamped Layer and in the same order. This allows you some additional flexibility if you decide to do some masking, for example.
Here is a screenshot showing the above photo with the texture after adding a Stamped Layer. You can still see the underlying texture layer as well as the base layer (Layer 0).
Additionally, you have a couple of choices in the top toolbar menu under Layers:
1.) Merge Visible Layers
This merges all layers together into a new layer, much like Stamped Layers, however it does away with the base layers underneath and all you have left is the new merged layer. However, if prior to merging you have “unselected/turned off” any layers by clicking on the little eyeball icon next to it in the Layers panel, that layer will not be included in the new merged layer (and thus, neither will the edits on that layer), and that “unselected” layer will show in the layers panel below the new merged layer. This “unselected” layer is not “visible” to Luminar because it is turned off, hence it is not included in the new merged layer, and is thusly displayed on its own below the new merged layer.
Here is a demo of Merge Visible Layers. I have taken a photo and added several layers to it, including two different texture layers for this example. As described above, I have unselected the texture layer named "burlgrunge". Thus, that texture is not applied to the photo - it's an inactive layer, so basically Luminar does not see it.
Now, here is the photo after choosing Merge Visible Layers. See how the merged layer just includes those layers that were selected above (that is, the layers that are "visible"), and the unselected "burlgrunge" layer is shown separately below the new merged layer?
2.) Merge All Layers
This just merges all the layers into a new, single layer. Your result is a new, single layer and that is all that is visible in the layers panel. However note here that if you have “turned off” one of the layers, the edits on that layer are NOT included in the final merged layer. So you can get the same final image as with Merge Visible Layers, except that the layers panel WILL NOT RETAIN the “unselected” layer such as it will with the Merge Visible Layers command described above.
Here's an example (and disregard the look of the photo, as I just grabbed a shot and stuck two different texture layers on it for demonstration purposes). There are 4 layers here, a base layer plus two texture layers with an adjustment layer between them.
Now, here is the same photo after performing a Merge All Layers command. Note that all you see is the final, merged layer. All the other underlying layers are gone.
Using the Gear Icon

By the way, you can also get to all of the Layers options and controls via the little gear icon that is in the upper right corner of the Layers Panel. In fact, there are also some additional options available to you there. Just click on it once and that will open up a little menu, offering you all the above choices. It will also give you quick access to Masking options and Blend Modes, although we are not detailing those subjects in this article.
Note that when you choose one of the actions in that drop-down menu, it will apply to the highlighted layer. So be sure that you have clicked on the layer to which you want to make a change before you make the change.
I believe that most of these options are easy to understand, except for possibly Rasterize Layer. Let's cover that next.
Rasterize Layer
I will admit that at first, I was not clear on what Rasterize Layer did to my image. But after some experimentation, I sort of figured it out - and then I asked the technical folks at Macphun to explain it. I was somewhat right, but not completely. Thankfully the good folks at Macphun offered up some insight into what it does and when you should use it.
Here is what Rasterize Layer does for you:
Rasterize Layer was made to decrease the number of filters needed to be recalculated when something in the existing layer stack is changed. If you convert a layer to a Rasterize Layer then Luminar won't have to calculate the filters on that layer again (except upon Export). This is used when you have a lot of filters on a layer and you want to try some finishing touches with it, but without having to wait for Luminar to recalculate the entire image. It takes less time to process when a layer is rasterized, and the application uses significantly less memory after this action.
Another benefit of Rasterize Layer is that you clean up your workspace. When you use a lot of filters on a layer, it can get congested in the workspace, so using Rasterize Layer will clean that up for you right away. All the filters "disappear" and you are left with the image on that layer based on your previous edits, but your Workspace is empty. Now you can add more filters onto this Rasterized Layer and continue editing if you want to. Of course, you can also just add a new layer for additional edits if you would rather.
So what this means is that all of the filters applied on a layer, if Rasterized, get "collapsed" and essentially disappear from view. The edits from all of those combined filters on the layer stay, but everything is basically "hard-coded" into that layer and your ability to go back and make edits on that layer are gone. This command sort of flattens the layer. So only use Rasterize Layer on an image if you know for sure that your edits on that layer are finished and you plan to keep them.
Example...
Let's say you have several layers on a photo and each layer has multiple filters applied to it. Perhaps you have stacked presets on 2 layers (something I do a lot) to get to your current result. What if you are looking for some final touches to really get the shot over the finish line? Well if you want to add a new layer and then make adjustments to it, Luminar has to calculate your edits on this new layer as well as incorporate all the edits that are contained in the previous 2 layers with the different presets. So that can slow it down a little. By Rasterizing each of the 2 layers with the presets, you can then apply this new layer with your finishing touches and it will calculate more quickly.
Perhaps some screenshots will help illustrate this feature.
In the first photo below, I have taken a photo that was done in color (which was previously edited in Luminar, and thus Layer 0 is the full color, finished photo that I start with in this example) and I converted it to monochrome using one of my presets from my Cityscapes Preset Collection. This preset was added on Layer 1, above the original color photo, and since the preset is a monochrome the photo is converted to monochrome. As you can see, this preset contains quite a few filters and they run off the page (I believe 5 filters are in this preset). This is where Rasterize Layer comes in handy.
Let's assume that I am happy with the look of the photo at this point, and I want to Rasterize this layer so that I collapse all of those filters and reduce processing time for future edits on new layers (and clear up the Workspace).
So, I just click on the gear icon and choose Rasterize Layer. It takes a moment and then all the filters are "gone" and the layer has been renamed to Rasterize Layer 1. Notice in the filter section that all of the filters are gone, although the edits that the filters applied to the photo have been applied and my workspace is clear. That's what Rasterize will do for you!
Now that I better understand this feature, I can totally see the advantages of it. I have tried it a few times and I can see that it is a time-saver. Just keep in mind that you lose the ability to go back into that layer and change things, so be wise in your use of it.
And yes, you can still turn on/off a rasterized layer, and you can even delete it. So if for some reason you rasterize a layer and then decide you don't like it, you can always delete it. Obviously all the edits it contains are gone, but you are not "stuck" with a rasterized layer if you later decide to remove it. Just another great feature in Luminar!
Using Luminar Is Better Than Using Lightroom or Photoshop
Layers is an incredibly powerful tool to have at your fingertips and having a deeper understanding of it can give you incredible control over the final look of your photos, as well as opening up many creative avenues for you. The key thing is that none of this is available in Lightroom. These features just do not exist there. Lightroom users generally have to go to Photoshop for these features, or some other 3rd party plug-in. Either way you are talking about either a significant expense or a significant learning curve, and in some cases it's both.

But it’s all in Luminar, and frankly it’s quite easy to use - it just takes a little practice and experimentation. Besides, Photoshop isn’t exactly something you just open up and start using - especially the layers feature. It’s (in my opinion) a bit of a complicated beast with a steep learning curve.
You don't need Lightroom or Photoshop to craft amazing images - you can more easily do so in Luminar. Despite all the features and power in the product, Luminar is quite easy to master and you can quickly be up and running with it. You'll be creating your own masterpieces in no time.
Luminar is very reasonably priced at $69, plus you can get a $10 discount using coupon code JIMNIX at checkout!
The Benefits of Using Layers in Luminar
So, why would you use layers? What do you get out of it? Here are just a few ideas:
- Stack edits of different types on different layers (Tone and Contrast on Layer 0, Color Adjustments on Layer 1, etc). This allows you to better visualize how each type of edit will impact your final result. You can even create “mini Workspaces” in Luminar for each type of edit, and thus easily have access to the appropriate filters each time.
- Stack presets on different layers. Use different presets on different layers, and blend in the best parts to achieve your final look (using the brush), or just vary the opacity on each layer to get some of the benefit of the preset without the full effect.
- Add a texture - create a vintage look or something else creative. You can even use multiple textures on multiple layers to really get creative.
- Replace a sky. Perhaps a beautiful sunset eluded you, so you can just add a new sky to replace the boring one you saw. This is quick and easy using a New Image Layer and the Gradient Mask.
- Do some composite work. Just brush in one element from the top layer, so that it is added to the final photo. Example: add a new image layer that has a bird in flight, and then brush in that bird so it appears to be flying across the sky in your final photo. Note that this type of work requires some really fine and detailed brush work, but it can be done.
- Create a double exposure. Add a new image layer and blend it into your base photo using the masking and brush tools, to create a unique double exposure look.
- Blend the best parts of different exposures for a better, more evenly lit final photo.
- More control over your photo - make different edits on each layer so you have finely-tuned control over the final result.
The bottom line is that having this feature in Luminar is a HUGE benefit, especially if you are interested in ultimate control over your image or you want to try and experiment with creative outputs such as textures or a sky replacement.
Thanks for stopping by and I hope that this helps!
Download a free trial, or buy it and save $10 now!
Luminar is a lot of fun and the only limits are our own imaginations. Let me know how it goes and have fun out there creating! If you don't have Luminar yet and decide you want to try it, click on the banner below to download a free trial. If you decide to purchase, use the coupon code JIMNIX to save $10 on your order!


Luminar Workflow: Drygate Brewery
In this new video I edit an evening shot in Luminar, employing various tools and tricks to get to my final result. Check it out!
In this video, I take a fairly flat and somewhat lifeless evening photo from Glasgow, and convert it to a much more dynamic and interesting-looking shot. I use a variety of tools to accomplish this. I employ one of my presets, and then add in additional filters with masking and slider adjustments. It's just a few minutes of work but the end result is much better and certainly more interesting, in my opinion. It's easy with Luminar!

5 Amazing Filters in Luminar (that don’t exist in Lightroom)
Have you heard about Luminar, but haven't jumped in yet? Are you Luminar-curious? What are you waiting for?! Luminar offers SO much, including these 5 amazing filters that you cannot get in Lightroom. Check it out!
I spend WAY more time in Luminar than I do in Lightroom, and it's partly due to the collection of built-in filters. They are just fabulous and quite capable. If you are using Lightroom but are Luminar-curious, this is for you!
When I first got my hands on Luminar, I liked it. I found it to be intuitive and easy to use, while also being powerful - and that my friends is an incredible combination. However, it wasn’t until I really started spending a lot of time in Luminar that I realized that it is actually way more powerful, flexible and adaptable than Lightroom.
Luminar blows Lightroom away in terms of the breadth of filters that are built into it and in terms of ease of use - it’s not even close. Luminar is just much easier to get started with. I spent years using Aperture, and when I moved over to Lightroom a few years back I had to buy an online course to learn how to use it. Moving into Lightroom is like learning to speak another language. I had very little idea what to do with it or how to get started. It’s just not very intuitive.
But you simply don’t have that with Luminar. The tools and filters are easy to understand and they simply work (and if you need help, check out my YouTube channel). Now that I have been deep into Luminar for several months, I don’t even use Lightroom other than to manage my library/catalog (and that feature is rumored to be coming to Luminar at some point).
I’m not saying that Lightroom is a bad product - in fact, I have grown to like it over the last few years of using it - but Adobe does not seem to innovate at the same pace as Macphun, and that is a little concerning to me. I rode the Aperture ship nearly to the point of drowning, so when I see a product that doesn't appear to be getting a lot of incremental new stuff, I get a little worried. Now I don't think that Adobe is ignoring LR in any way - and they certainly aren't abandoning it - but it's definitely not advancing at the same pace. And personally, I want my software to continue to push forward.
In other words, I am very glad that I am using Luminar, and despite all the amazing features that are packed into Luminar, we are technically still only on version 1! Can you imagine how much more awesome it will be in 1 year or 2 years? Literally, the sky is the limit. (And in case you were curious, Macphun has already released two updates with new features added each time, and Luminar only launched back near the end of last year, a few months ago. It's been great.)
Now that I use Luminar exclusively for my editing instead of Lightroom (except for HDR, for which I still use Aurora HDR, though sometimes I bring the base HDR into Luminar to edit), I was examining my workflow and the filters that I like to use, and realized why I love Luminar so much - there are simply some amazing filters in it that don’t exist in Lightroom. This gives me the ability to create custom looks and grow my vision for my shots. It's incredible.
So for any of you out there that are on the fence about Luminar, this is for you. If you are serious about editing your photos, Luminar is way more capable than Lightroom - period.
While there are plenty of filters in Luminar that don’t exist in Lightroom (at least a dozen or so), below is a selection of them that I find myself using a lot, with before and after examples (or videos) to help illustrate their capability.
Now to be fair, some of these things can be accomplished in Lightroom in other ways, but not nearly as easily. That’s part of the beauty of Luminar - you don’t have to learn complicated ways to do things. Just use a slider and get it done. Easy.
Before any Lightroom-lovers take offense, I am not trying to bash the product. I have Lightroom and I generally like it. It's a good product. And yes, it has some features that are not in Luminar yet, such as a catalog/library. That's a fair point. My point here is that Luminar is rapidly encroaching on it and exceeding it in several areas. You don't have to abandon LR anyway - just test out using Luminar as a plug-in for editing some of your images. I trust you will be impressed with it!
By the way, there is a HOT DEAL on Luminar going on right now, up until Feb 19th. Click here for details. Get Luminar plus some great bonuses, and save money in the process. It's a win!
Ok, are you curious yet? Great. Let's get started!
1) Color Balance
I use Color Balance a LOT. I put it into some of my presets, and when I don’t use a preset on a photo, I will bring Color Balance into the mix in some way or another. It’s an incredible tool that can significantly change the look of your photos. The best part is that it is very simple to use. You select Shadows, Midtones or Highlights and then move sliders to get the colors aligned to your liking.
I use this filter on a lot of sunset and blue hour photos, because it helps me accentuate the color tones that are already present in the scene without over-saturating the photo. However I also use it on a lot of cityscape photos, which allows me to better control the color in the final look of the photo, or to significantly change the color tones if I am so inclined. It's very flexible. You never know what you will get, so I invite you to experiment with this filter and see what results from it.
Here’s a video about the Color Balance Filter if you would like to see it in action:
2) Cross Processing

10 different options for cross-processing
Cross processing is a digital representation of an old film trick where people would deliberately develop film in chemicals intended for a different type of film. Basically, they would use the wrong chemicals and come up with some very different looks. It's interesting stuff.
In Luminar, this is just a fun filter for experimenting with different looks. You have 10 different options at your fingertips, all named after a city somewhere. Each has a particular color look to it, and then you move the slider to increase the intensity of the effect. You may use one to pump up a sunset shot, and you might use another to get sort of a vintage look. It’s quite fun and worth experimenting with. It's another one of those "you never know until you try it" scenarios.
Technically, there are 3 “cross process” presets built into Lightroom, although they are buried in the left-hand menu under Presets and then Lightroom Color Presets. Not only are they hard to find, but they are fairly useless to me (and there are only 3 of them), plus there is not a way to easily adjust the intensity of each effect. Luminar makes it much easier by making this a filter with a slider. Choose one of 10 effects, and drag the slider to increase or decrease the amount. Easy.
As you can see in the below example screenshot, I have used “Seattle" which gives it a nice twilight sort of feel. I like to use this setting on a lot of my sunset and blue hour photos as it seems to complement them quite well. (And note that this is the ONLY filter used on the photo below, since it is just for example purposes. In reality I would use more filters on this photo.)
In this example, I took a lovely sunset photo (previously edited) and applied the "London" Cross Processing option to give it a golden hour sort of treatment. Just experiment with this filter and have fun - there are a lot of things you can do with it!
3) Orton Effect
Oh, the Orion Effect - you either love it or you hate it. Personally, I love it and find that sometimes it is the perfect complement to a photo. It adds a bit of contrast and some soft focus, all wrapped up in a dreamy overlay sort of thing. I don’t know how to describe it, really. Just try it for yourself. I think it looks great on landscape photos when you are looking for that little something extra, or to add a little interest to a gritty cityscape. So fun.
The below screenshot is a good example of what the Orton Effect will do to a photo. The base photo is a 3 exposure HDR that was merged in Aurora HDR 2017 but no further edits were made to it. It is highly detailed and “crisp” in the Before photo, but as you can plainly see the addition of the Orton Effect gives it a little more interest and moodiness, while softening it up a bit.
Additionally, there are two options for this effect: Type 1 and Type 2. I generally use Type 1 as I just prefer that look. You can also see other sliders below it that give you more flexibility to customize the impact of the filter on your photo. You can further adjust Softness, Brightness, Contrast and Saturation. Lots of power to customize your look.
4) Top and Bottom Lighting
Top and Bottom Lighting, which I like to just call TBL, is so handy. It’s perfect for all sorts of photos, though I generally use it on landscapes and cityscapes because a single exposure rarely has the perfect light distribution. It seems there is always a section of my shot that needs to be brightened a little, and that’s where TBL comes in. With the ability to shift and rotate you can use this tool for all sorts of lighting adjustments in your shots. It works well as a polarizing filter for a sky, to brighten a foreground and more (conversely, you could darken with it).
Using it in the example below basically saves the shot. With that dark of a foreground, you lose basically half the photo so being able to bring it back is a huge win. Again, this is the only filter in the example below, which is not how I would actually edit the photo for display (see example video below for more on how I handled this photo).
In Lightroom, this would need to be done with a combination of gradient masks and exposure settings, but in Luminar it’s a standard filter with simple sliders (though you can also use the gradient mask and exposure filter if you want to). I believe that Luminar’s approach is much easier to understand as well as to implement for most users.
Here's a video showing how I edited this photo in real life, and it illustrates the use of Top & Bottom Lighting, along with a bunch of other filters in Luminar:
5) Golden Hour
This filter is perfect for golden hour or any sunrise/sunset sort of photo when you want to accentuate the golden tones in the scene. It can also be used to change the mood in a photo by giving it a golden tint (see screenshot below as an example of this idea). It really amps up those lovely warmer tones and gives your photo a nice pop of color too. I love to use it on photos taken on the edges of the day in beautiful light. It’s quite easy to use too, since it’s just two sliders: one for amount and the other for saturation. Simple and effective!
In the example below, I took a previously edited photo which was darker and moodier, and applied the filter to give it a completely different look, more of a colorful sunrise version.
This video shows it in action along with some of the other filters that were recently added to Luminar.
So that's it - any questions?
I hope this has been helpful and possibly eye-opening for you. Luminar is a full-featured photo editor and in my opinion it is the best there is - and believe me, I have tried just about everything. Despite all the power under the hood in Luminar, it is still quite intuitive, easy to use and the interface is a dream to work with (and thanks to their innovative Workspaces in Luminar - which I haven't even talked about here - you can customize the appearance and use of Luminar to fit your workflow). Tools are placed in logical spots and you won’t spend a long time trying to figure things out. You will be up and running with it as your primary photo editor in no time at all.
Powerful + intuitive + easy to use: what's not to like about that?
Interested in reading more about Luminar? Click here to see my full review and tutorial. It covers a LOT of ground!
Follow me on YouTube for Luminar tips and tricks!
Should you need to see more examples of Luminar in action, I recommend taking a look at my YouTube channel, where I have over 50 videos now, primarily focused on Luminar and Aurora HDR, both from Macphun. I keep adding new tips & tricks videos, as well as workflow examples, every week. I love doing this stuff, and it's free for you. Win. The below screenshot gives you an idea about what I cover in my videos. Answer: lots of stuff!
Follow me here: https://www.youtube.com/user/jimnix17

Three more things before you go!
- If you are interested in trying Luminar for free, you can download a trial copy on their website. It’s a great way to test things out before you commit to buying it.
- If you decide to buy it, use the coupon code JIMNIX at checkout to save $10 on the purchase.
- I briefly mentioned my preset packs above. Thus far I have released a pair of awesome preset packs for Luminar, which you can find on my Presets Page right here. Both are very reasonably priced and are packed with a lot of options. They are an easy add to Luminar if you like to experiment with a lot of different looks. I also have a free pack available there, and I am close to releasing a NEW PRESET PACK which I will share soon-ish. Thanks!
Thanks for stopping by and let me know if you have any questions!
Full Disclosure: I am an affiliate of Macphun, and if you buy through my links I receive a small commission which I reinvest in the growth of this site. However your price is the same whether you buy through my links or not. You are doing me a small favor - which I greatly appreciate! - and that allows me to continue bringing you great content week after week. Note that Macphun did not ask me to write this, and did not compensate me for writing this, either. In other words, this is not a sponsored post. This is my blog and I wrote it because I believe it to be true, and I use Luminar for 99% of my photo editing because I absolutely love the product. Please let me know if you have any questions about this.
Thanks very much for your support!
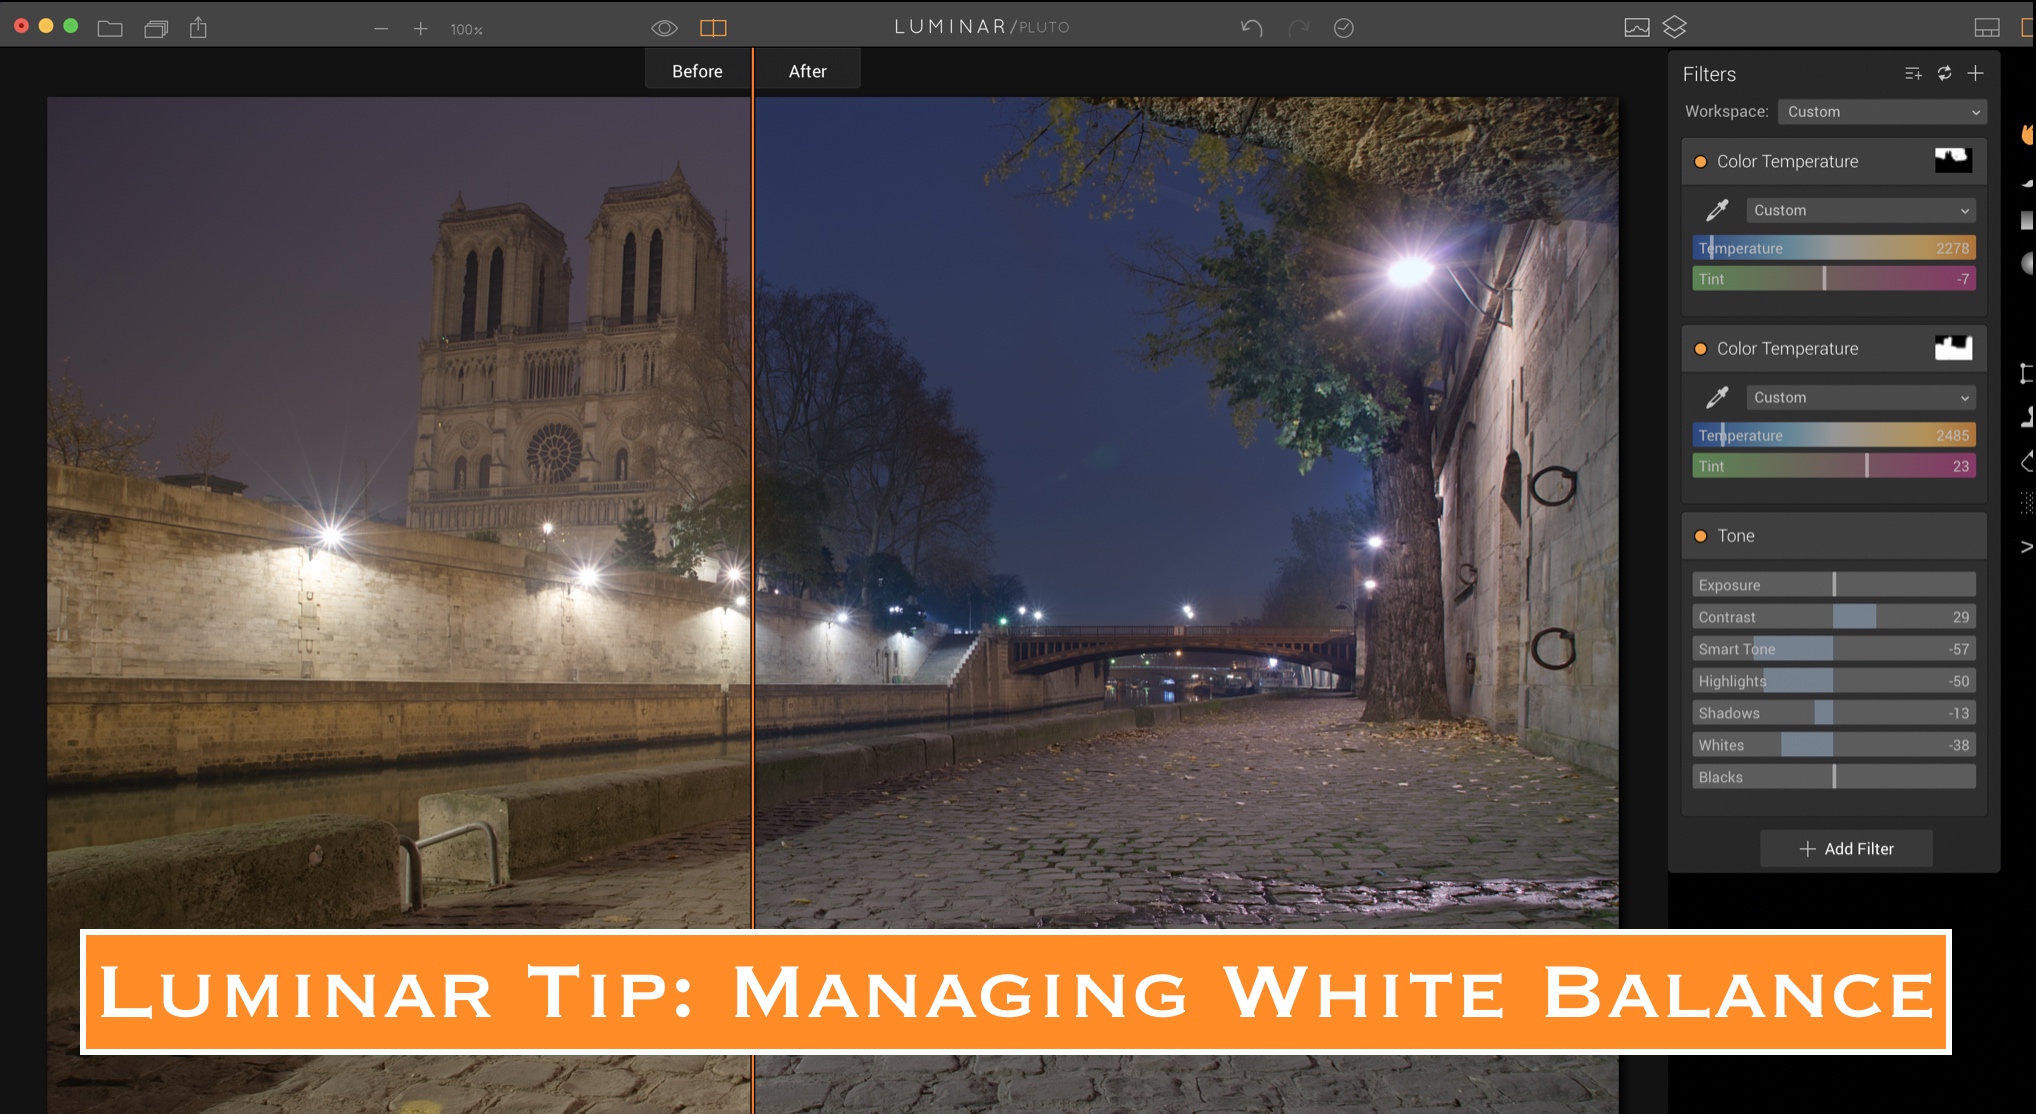
Luminar Tip: Managing White Balance
In this video, I share 3 methods for managing white balance in Luminar as well as share some tips to really customize it in a photo with the use of filter masking.
In this video, I share 3 tips for managing white balance in Luminar with the color temperature filter. All three work well and with the latest update to Luminar, you have a more advanced tool at your fingertips. I also share how I customize white balance by masking in different settings to different parts of the photo. Enjoy and let me know if you have any questions!

Luminar Workflow: Stars over Nashville
Here's a new video showing how I quickly transform a flat, lifeless photo into a work of art, all in Luminar!
In this video, I share how I transform a relatively flat and boring photo of Nashville into a beautiful and starry night over Nashville. I employ a few of my favorite tricks: using some presets, adding a new sky and more. It's a fun bunch of techniques that are easy yet effective, and the end result is a considerably different photo. Enjoy!
3 Tricks You Must Try in Luminar
Are you using Luminar, or thinking about getting it? Then this is for you. Here are 3 tricks you can do in Luminar that are advanced yet easy to perform. Take a look and let me know what you think!
As you can tell from all my blog posts and videos about Luminar, I am totally in love with the product. Click right here to read my review of Luminar. It literally changed my photography, my processing and my workflow all in one fell swoop. It’s a total game-changer, and I personally believe you are missing out if you haven’t yet given it a try.
In fact, Macphun allows you a free trial download so there’s absolutely no risk on your part. Just click the banner below to check it out. You can't argue with a free trial, can you? ;-)
Now, back to the 3 things you need to try in Luminar. While there are literally thousands of things you can do with the product, I think these three are really good ways to stretch yourself and your skills with post-processing. They are not really difficult to perform (that’s part of the beauty of Luminar - it makes complicated tasks much easier) but they do require some vision, forethought and patience to get them right. Practice makes perfect as they say, although I will admit that perfect is not the goal. I think the goal is to learn something new, get creative, and experiment.
So grab a cup of coffee and let’s get started, shall we?
Here are the three tricks you need to try in Luminar:
Replace a sky
Add a texture
Change day to night
By the way, all of these tips have companion videos that are on my YouTube channel (click here to subscribe), so you can read about the tips here, then watch the videos to follow along with me as I perform the exact steps needed to craft the images. Sounds like fun? Great!
Ok, let's get going!
1. Replace a sky
We have all taken shots in less than ideal conditions. It happens. However, thanks to the power and ease of Luminar, you can quickly replace a boring sky with a much more beautiful one if you are interested in doing so. All you do is add a new image layer and then use the gradient mask to blend it into the base photo. (Note: You can also use the brush to paint in the new sky, but I prefer to use the gradient mask because it uses a varying opacity, which I feel works well with sky replacements.) From there you will likely need to do a little brush work to make it look as natural as possible, but that’s just part of the learning process.
To make this easy, I have a video I previously shared showing how I do this. In fact, there is a second video below that wherein replacing the sky is one part of the process for that photo. Take a look at both and see how easy it is to do this. Seriously, it's not hard at all. In fact, I believe you will now start taking photos of just the sky when it's gorgeous outside, in hopes of using those skies as replacements for boring ones. That's what I have been doing for a while now.
2. Add a texture
I will admit that I have only been interested in using textures for the last year or so. Prior to that I avoided them. I am not entirely sure why, but my opinion about textures changed and I am really glad that it did. I love how you can completely change the feel of a photo by adding a texture. It really is a wonderful and expressive creative outlet for those photos that you may otherwise pass by. And yes, that is generally when I use a texture. I would never want to cover up some amazing sunset or great colors, but a flat, boring lifeless shot that has a decent composition and could become something better…then yes!
This is an easy thing to do, too. Just add a new image layer, choose the texture as the image layer you are adding, and once it is applied note that it will appear at 100% opacity, which means you cannot see the photo underneath it. Just move the opacity slider down to the left and you will start to see the underlying photo. I generally apply a texture at somewhere around 30% or so, although it does vary per photo. After you add it, you can also use the brush/eraser to remove it from parts of the image if you want to, or if it is distracting, etc.
After adding the texture, I often go and drop a preset on top of it as a new layer (adjustment layer), just because I like how presets can quickly and easily change the look of an image. And...that's exactly what this video is all about. Follow along!
3. Change day to night
Now this is a fun trick to try on your photos, but I will admit that it doesn’t work perfectly on every photo. If you have a super bright sky that was shot in midday with direct light beaming down into the shot, that just won’t look very good. This works best when you have a gray, overcast sky that is somewhat evenly lit, colorless and gray, or if there is little to no sky visible in the photo.
Once again, this is just a generous use of gradient masks and the Color Temperature and Exposure filters. You use the mask to select the area, then use the filters to adjust accordingly (darker the area with the Exposure filter, and change the temperature of it with the Color Temperature filter). I usually do this in sections around the photo, instead of trying to apply one mask across the whole thing. That works better and gives a cleaner result, in my experience.
Here are two videos showing me using that trick. The first one is dedicated specifically to changing day to night where the sky covers a large part of the photo, whereas the second one is using that trick as part of the process of just darkening the shot. You should get a good handle on it after seeing these two videos.
That was fun, right? Now get out there and try this stuff yourself. You'll be glad you did!
I hope that these three tips are something you find useful. Once you start to experiment with Luminar, I truly believe you will find a LOT of creative and useful ways to express your own vision with your photos. Take some time to learn all the tools and you will soon be crafting your own masterpieces. It’s easy with Luminar!