
Renewing my interest in mobile photography!
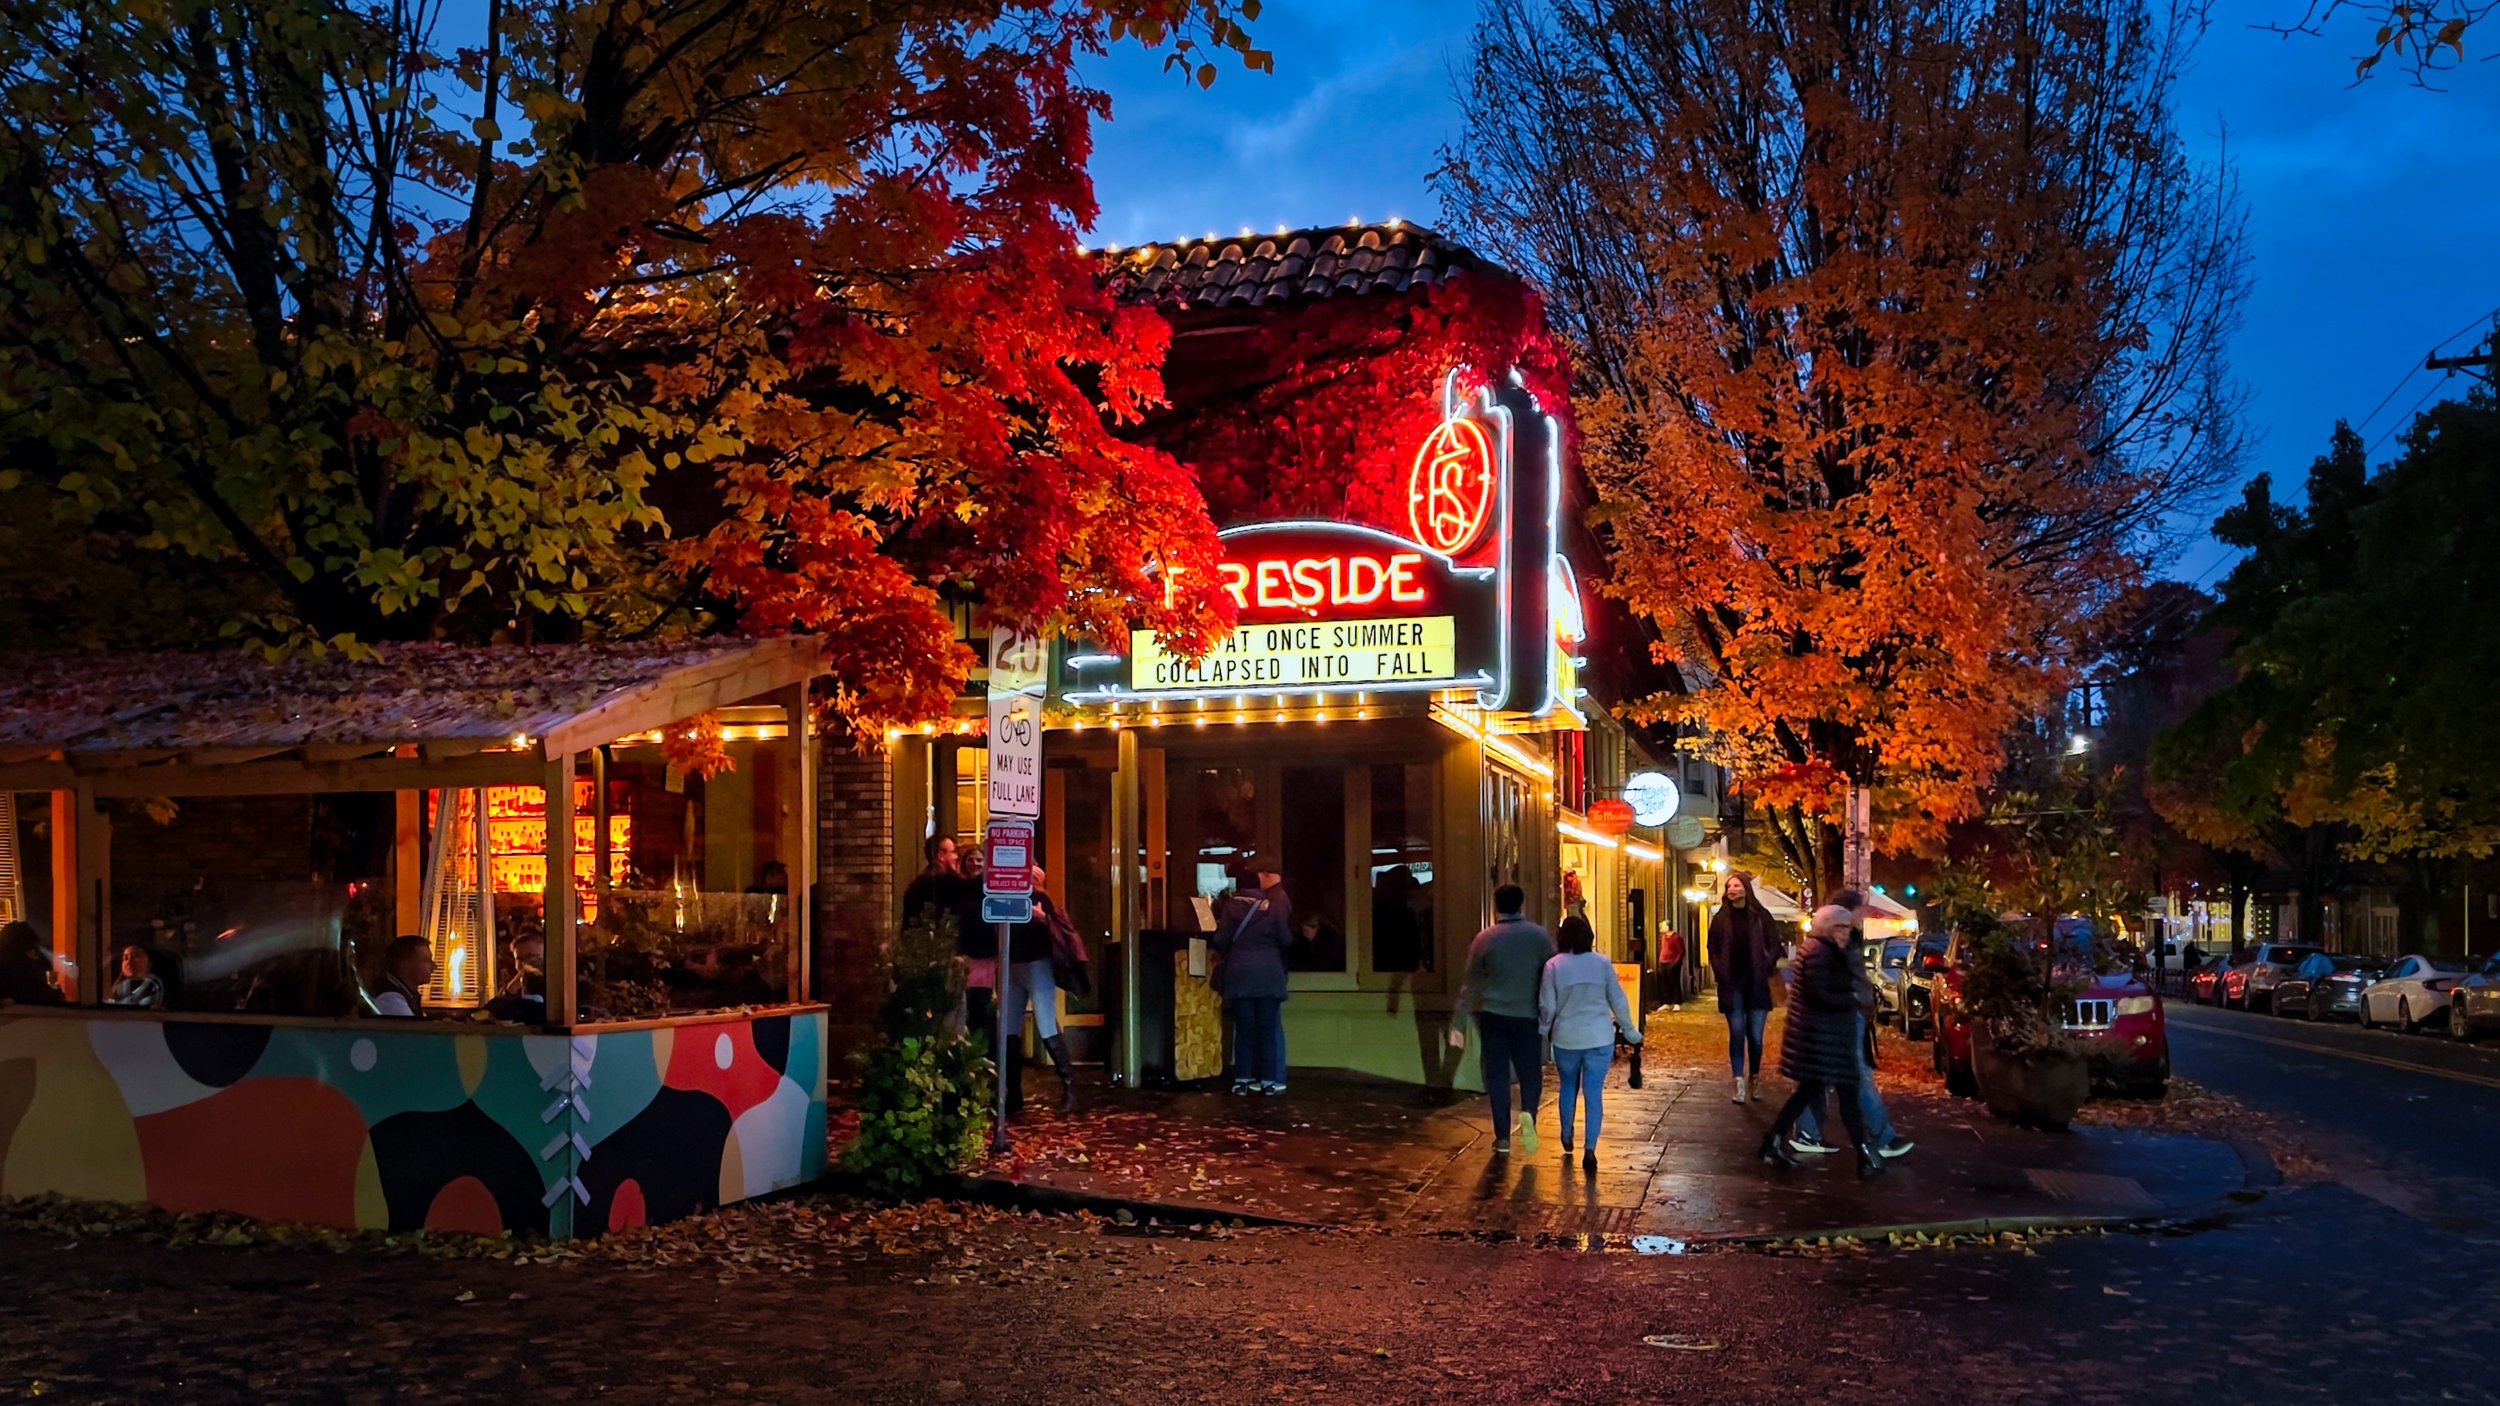
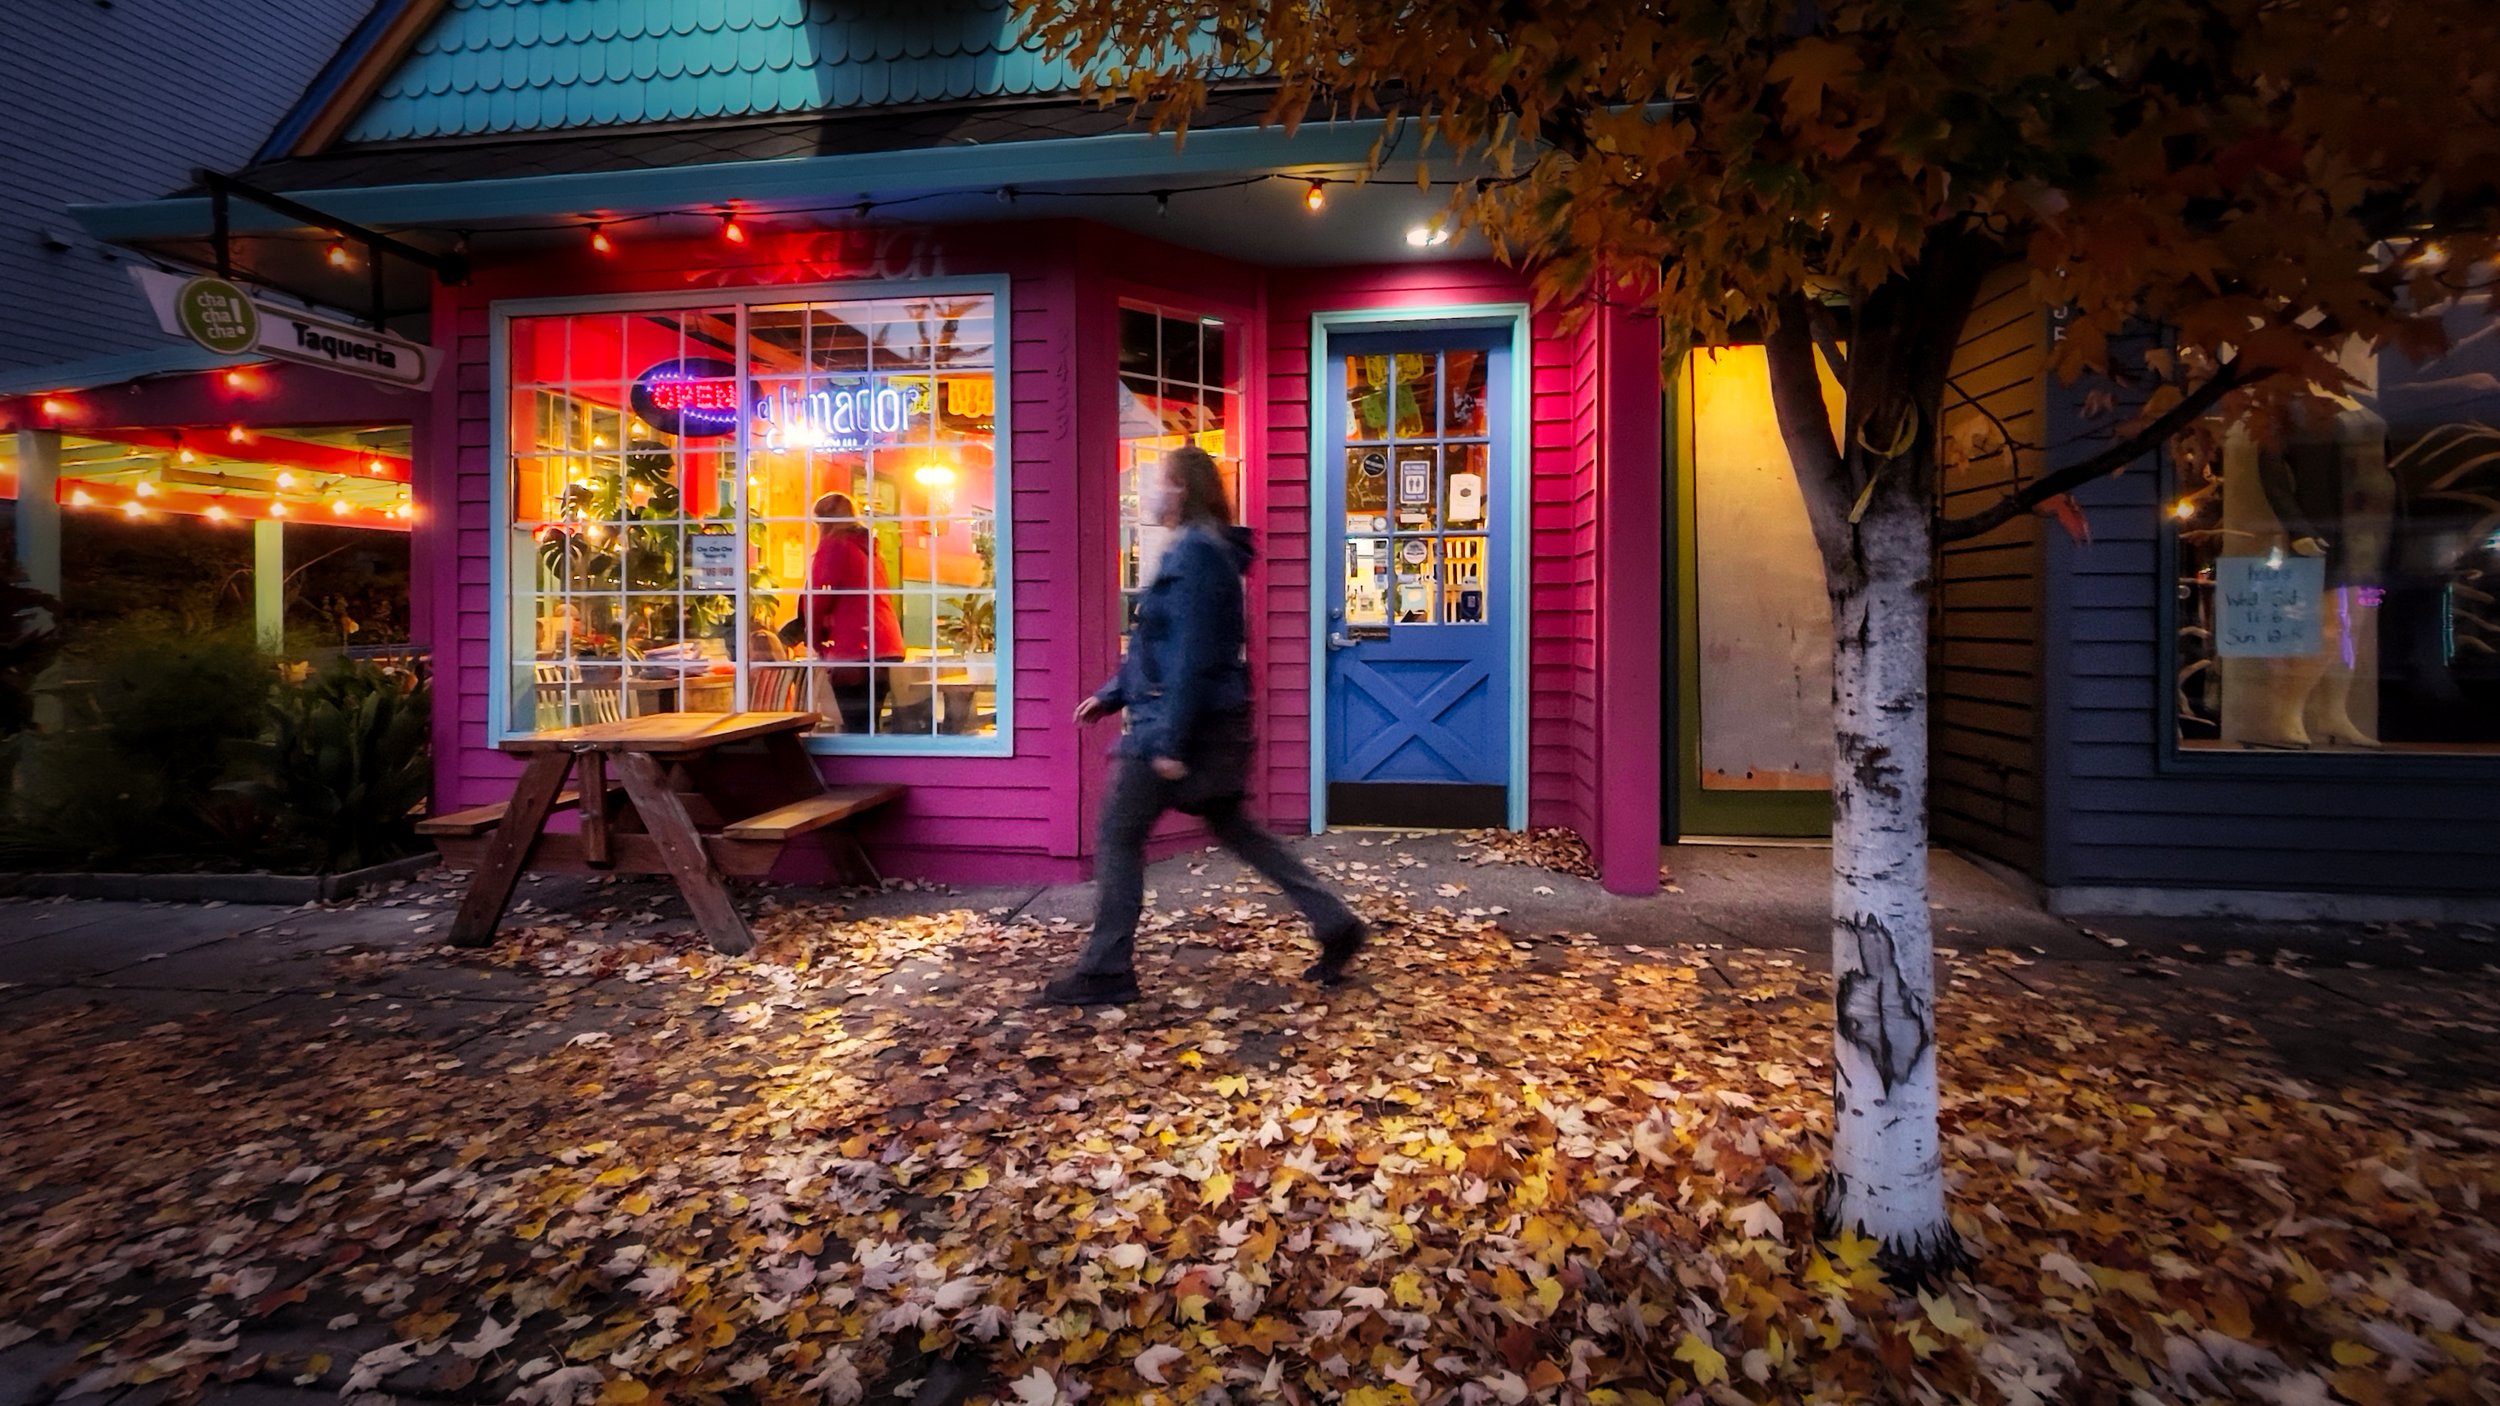
I’m just back from Portland, OR where I shot only with my iPhone 12 Pro. Even in lower light, this camera is delivering some stellar images. Check them out!
I’m just back from a quick trip up to Portland, OR - and all I had was my iPhone!
Years ago, I shot with my iPhone all the time. I mean ALL THE TIME. I loved it. I always had it with me, of course, so I shot away with it. Eventually I ended up with an iPhone 7, which at the time I thought was great (this was 4+ years ago when I got the iPhone 7). After a while though, I just felt like the image quality was not up to par for me, unless it was in pretty great lighting. Time after time, I would look at the images, zoom in, and be disappointed. Eventually I just quit shooting with it altogether.
A few months ago, I upgraded to the iPhone 12 Pro (yes, I know the 13 just came out, but I had to get a new phone at the time, and couldn’t wait). I had read so much about the advancements in the camera, and I couldn’t wait to try it out. It’s just so much better than what I had (granted, it’s several years worth of advancements, but still). I have been pretty much blown away with how good the camera is.


So when this trip to Portland came up - and knowing I had limited free time to go shoot - I decided to forego my usual Sony stuff and just shoot on the go with my iPhone. It also happened to be peak Fall season, so there were lots of amazing colors in the trees, and additionally we were able to visit several different parts of town, so I ended up shooting quite a bit!
The thing that impressed me the most is how well it performs in low light. Now to be clear, it doesn’t compare to my full frame Sony in that regard, but still it does a pretty darn good job. The images look amazingly crisp to my eyes, and I am quite happy about that! And of course, this has renewed my interest in mobile photography, which is great fun! I’ve missed it. It’s good to be back at it! And now I will be using my iPhone much more often when I am out shooting!
And as far as editing goes, I edited all of these photos in Luminar AI. Just a few quick adjustments is all it takes!


Oregon - Still my Favorite State
I’m just back from a trip to Oregon, and I captured some beautiful shots while I was there. This is a little teaser of coming attractions - all shot with my new iPhone 12 Pro!
I just love Oregon, and can’t seem to get enough of it.
Arriving into PDX during a stunning sunset
We just returned from a trip to Oregon. It was part business and part fun, so it wasn’t entirely a photo trip, but of course I was able to squeeze in a little camera time here and there. Although we spent a fair amount of time in Portland, I didn’t really shoot there. I enjoy that city, but for me the main draw to Oregon, photographically speaking, is the coastline and the waterfalls. Basically, nature itself. I am often in cities, and I love to shoot them, but when I get a chance to spend time in nature and photograph it, I’m in.
We spent a few days down in Cannon Beach in the early part of the trip, along the northern coastline. This is my favorite spot in the entire United States. I find the rocky coastline and tide pools essentially irresistible. Every time I visit, regardless of the weather, I come home with some beautiful photographs. Add in the sense of serenity and calm from wandering along the coast, and it just can’t be beat. That was on the front end of the trip.
Sunrise in Arch Cape, just south of Cannon Beach
Sunrise on Cannon Beach
Tidepools are just awesome!!
Then, we were in Portland the rest of the time, but did spend one long afternoon/early evening hiking and shooting along the Columbia River Gorge, east of Portland. This is home to a long list of beautiful waterfalls - something I love to shoot - and is well worth a visit if you have the time (it’s about 45 minutes from downtown Portland).
A view over the Columbia River Gorge
I haven’t had time to really dig into my photos yet, so all of these were taken with my newest camera - the iPhone 12 Pro. My old iPhone 7 was really falling apart (I had it for over 4 years), so right before this trip I upgraded to the 12 Pro and WOW what a difference in that camera. I can’t believe I waited this long to upgrade, but I am glad that I finally did. I will be sorting through my “real” photos (taken with my Sony gear) here soon, and those will start appearing on my Flickr page and likely in some YouTube videos, but for now I leave you with a few iPhone shots.
Thanks for stopping by and see you again soon!
Create Stunning Mobile Phone Photos in Luminar!
Have you used Luminar yet for editing your mobile phone photos? Maybe you should! It can help overcome some issues these little cameras face. Here are my thoughts on just that.
Here's a recent video I did, showcasing how I edit a recent iPhone shot from my trip over to London and other parts of England. Though I love shooting with my iPhone when I travel, the small sensor does cause a few issues, which I can use Luminar to overcome. Check it out!

A morning in downtown Austin
Here's something new - a drone and iPhone video montage from a morning in downtown Austin. Check it out and let me know your thoughts!
Here's something different - a drone and iPhone video montage!
I have been experimenting a lot with video capture, both with my drone and my iPhone 7+ (which takes 4k video). It's been a lot of fun to capture scenes I would otherwise just observe. So one recent morning I went downtown and filmed with both devices. I then compiled it into the below montage video. It's something different for me, but a lot of fun to capture and share. Enjoy!
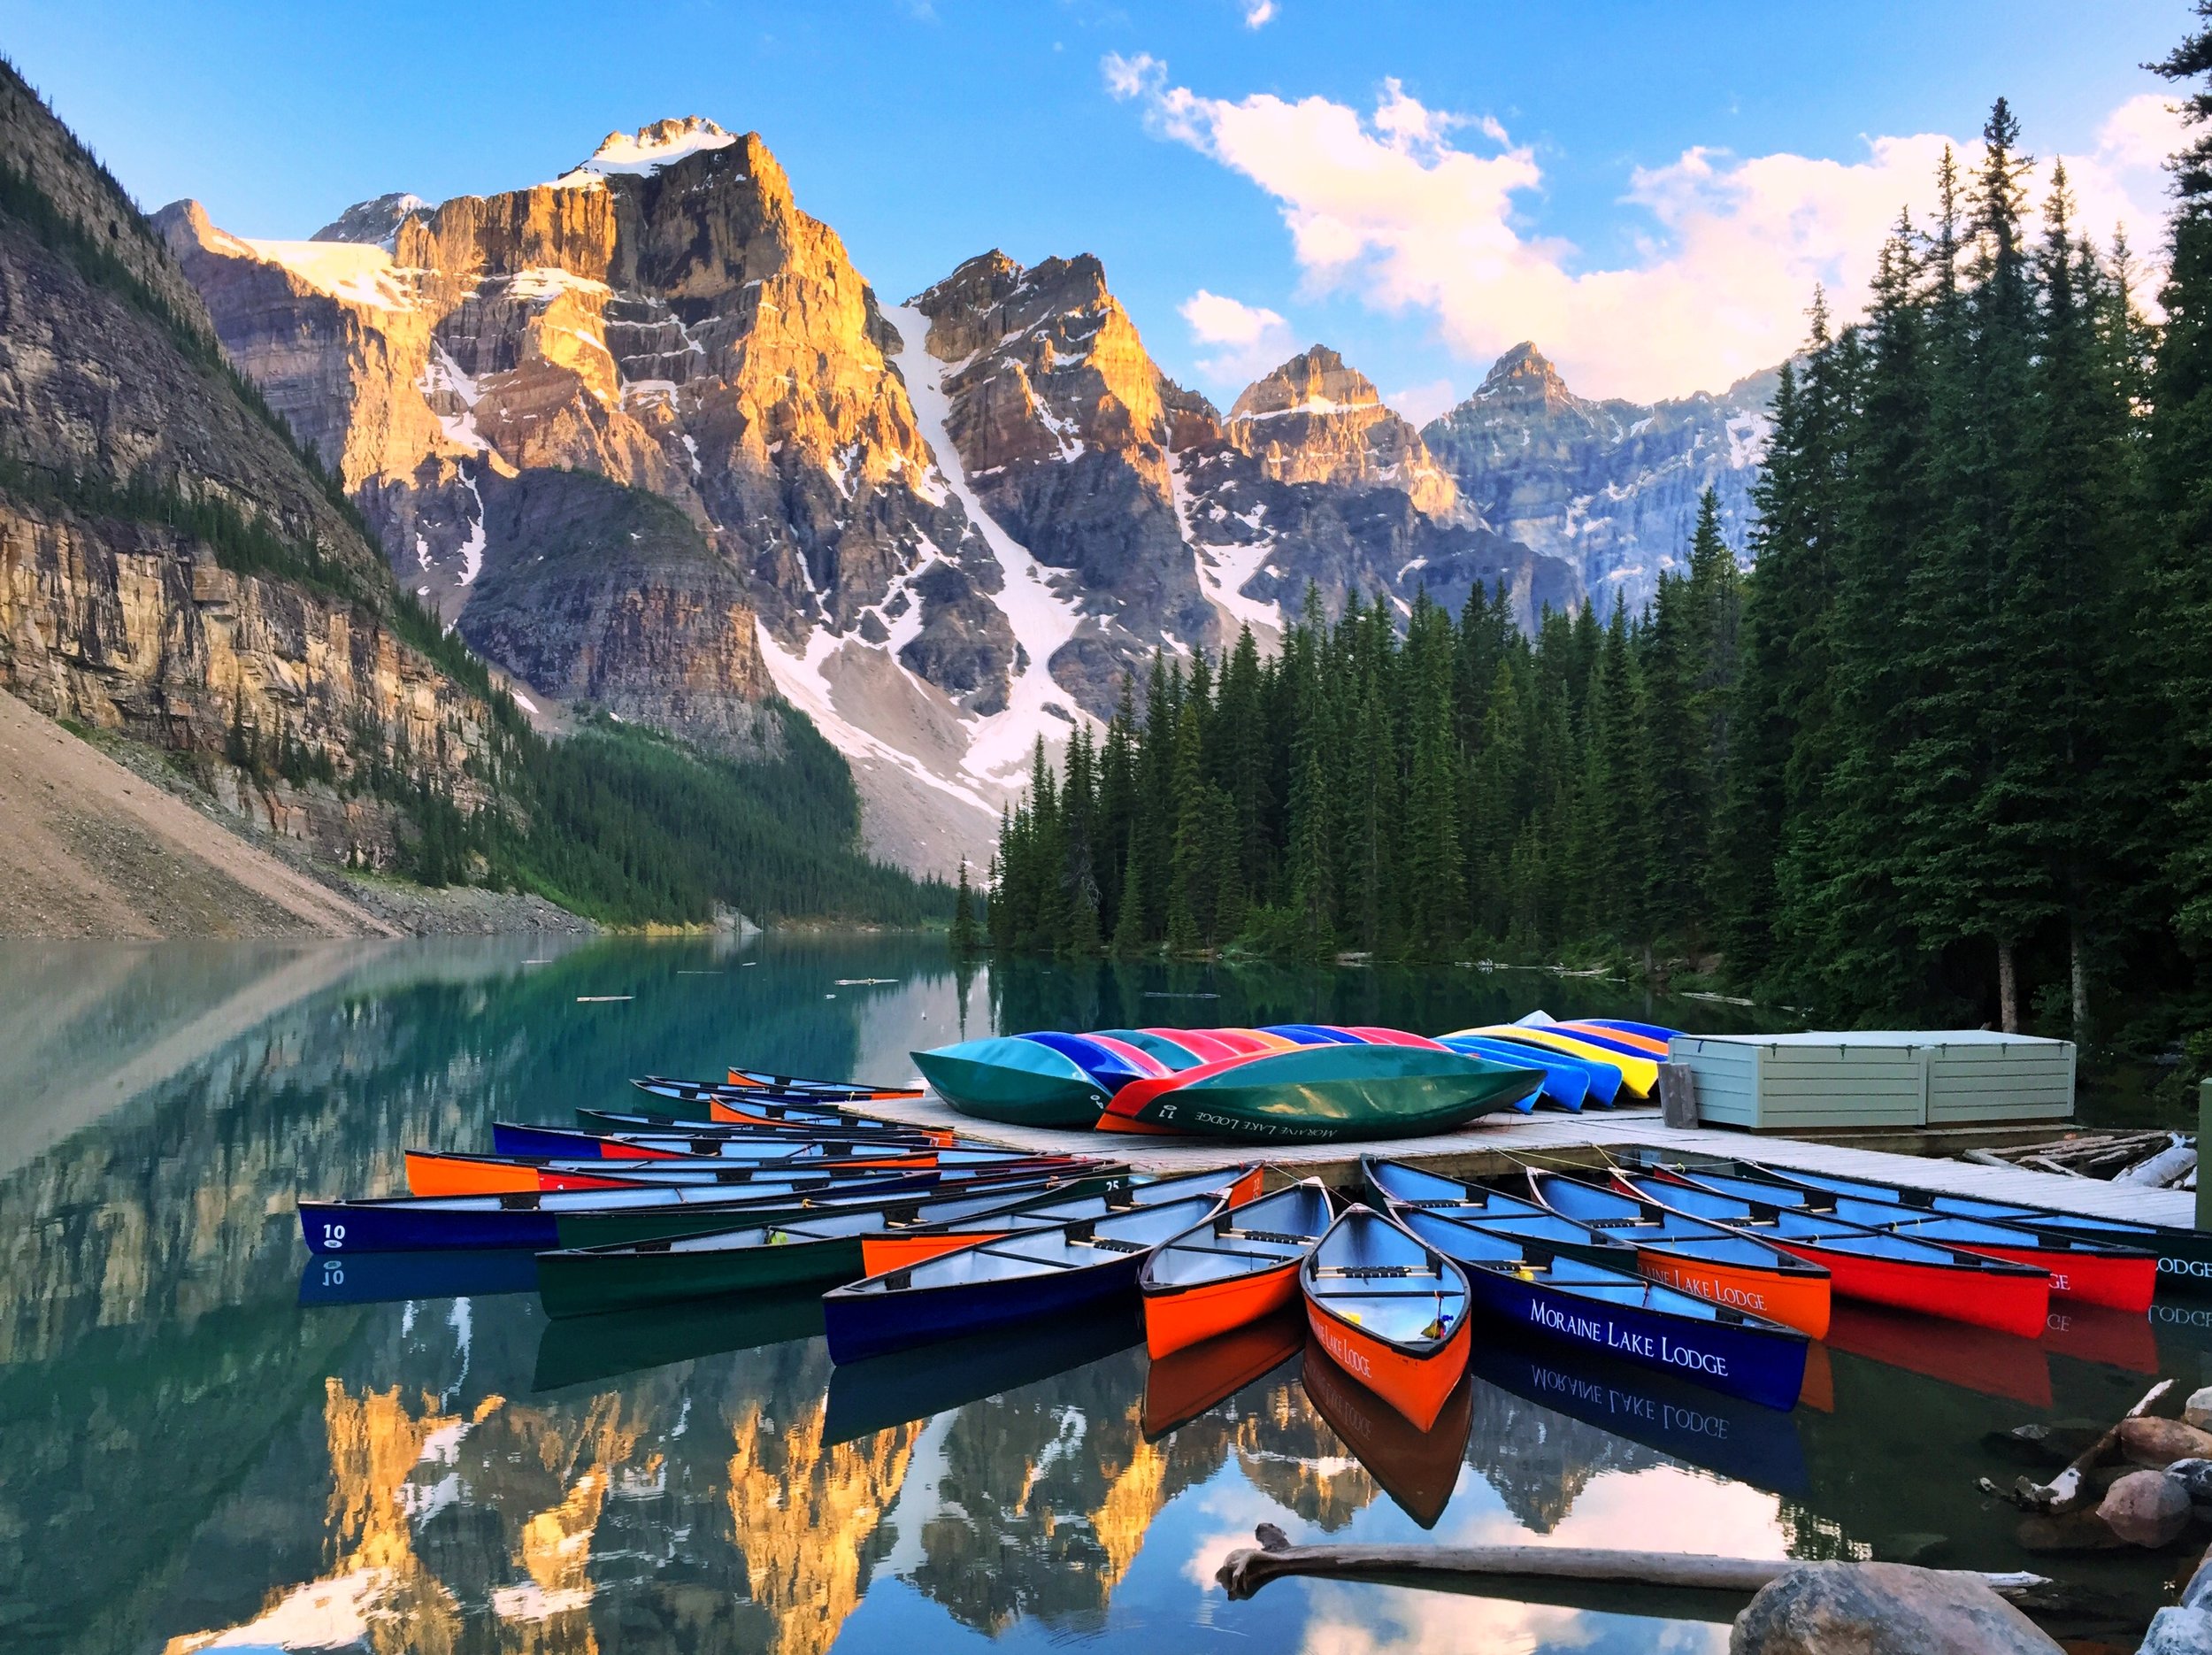
iPhone fun at Moraine Lake
How about a group of iPhone shots from Canada? I was here at Moraine Lake last Friday night, and the sunset was INCREDIBLE!
A stunning sunset at an incredible location!
We are in the midst of a lengthy family roadtrip, and spent last week in Banff, Canada. It's a beautiful little mountain town with an incredible amount of beautiful scenery to photograph nearby. One of the best spots is Moraine Lake, which is less than an hour away by car.
We spent last Friday night there, with me standing on a large pile of rocks firing brackets into the sunset. It was pretty awesome, I will admit it. Most of the visit to Banff was under clear, blue skies and somewhat colorless sunsets, but this one lit up nicely and I was a very happy guy!
These are just a few of the iPhone shots I took, while also firing like crazy with my Sony camera. I haven't had any time to slow down and process my Sony shots, so I thought I would share a few iPhone shots for a change. These were all taken in the ProHDR app (it blends two exposures to make the HDR) and then some minor adjustments were made in Snapseed. Enjoy!

iPhone fun in LA with my daughter
I spent most of the last week in LA on a fun trip with my daughter. We laughed, toured, ate and photographed quite a bit of the City of Angels. It was fabulous. Here are some iPhone shots to prove it. ;-)
I'm just back from a fun week in LA with my daughter.
My 14 year old daughter and I just spent the last week in Los Angeles, CA and had a blast. We walked a TON, shot a bunch, and just enjoyed the city. It was great.
We have been talking about doing a Dad-Daughter trip for a long time, but for various reasons we just now got it done. It was awesome. We walked and Uber-ed all over LA and had a great time. We went to museums, shot graffiti, went up to the Griffith Observatory and over to Malibu and the Santa Monica Pier.
Since this was a trip for my daughter (and thus, not for me to shoot a lot), I opted to just bring a single prime lens and no tripod. I wanted to be able to travel light and shoot fast, even at night. So everything was quick handheld shots with the lovely combo of my Sony A7ii and my new lens, the Voigtlander 40mm f/1.4 prime lens. It worked great. As soon as I have more time with this lens, I will likely write up a review of my experience with it.
I certainly feel like I took some great shots, but readily admit that I haven't even looked at them yet (other than chimping after a shot), since I am writing this from the airport prior to departing LA and heading home. So today's post is all iPhone images, edited in Luminar by Macphun. It's a killer combo. Now that I use Luminar on everything, I have also started editing my iPhone shots in it, too. It works so well.
So this is a quick tour of some of the fun we had and these are in no particular order whatsoever. We got rained on a bit the first day, but otherwise the weather was just cool enough (high 60's) and I had some nice clouds, too. As soon as I am able, I will get some LA shots up here from my Sony camera, too. Enjoy!

Street art in Florence
I found myself on a quest while in Florence, Italy - a quest to capture as much of the work by street artist "Blub" as I could find. I discovered 16 works by the artist, so here they are. They all feature either a famous work of art or a famous person (real or imagined), each fitted with a swimming mask. It's a fun diversion from all that other art in the city!
I found myself on a quest while in Florence - looking for street art by someone named "Blub". This is WAY better than Pokemon Go.
I'm a fan of street art (some call it graffiti, or urban art, or a million other things) and find myself photographing it just about everywhere I go. It's always interesting and beautiful. When I was in Florence, I found myself on a bit of a quest, chasing works by the artist known as "Blub".
You see, we spent over a week there, and while the town is amazingly beautiful and full of possibly the best art in the world, you can get "art fatigue" as they call it. You see so many historic and famous works that after a while your brain just wants to melt. Or you need a beer. Or gelato. Yeah, gelato. Florence has the best gelato.
Anyhoo, as I walked around the town I started spotting these works in all sorts of places. Generally they were pictures drawn of a famous person (William Shakespeare, or Santa Claus), or a famous work of art (Mona Lisa), all with a swimming mask on their face. Something about it just got me interested, so I took a photo the first time I saw one.
Then, I saw another one, and another one, and so on. The quest had begun. I ended up capturing the 16 photos you will find here today. And FYI these were all shot with my iPhone. It's always with me, and especially for a quick snap it's hard to beat. And these aren't great shots, just quick snaps of something interesting. I wasn't trying to create art here - it's already art, anyway - but rather just a quick capture of cool street art.
Sadly, in some cases someone had marked on these, or torn them, or otherwise defaced them. I hate when people do that. This is still art and should be treated that way in my opinion. Enjoy it with your eyes, take a photo, and leave it alone people!
So if you find yourself taking a trip to Florence, take a break from the famous art and go on a hunt of a different sort, chasing these also beautiful and interesting works of art, scattered on street corners and tucked away little spots all over the city. It's quite fun and a great diversion from the art browsing you will do in places like The Uffizi.
I sent one of these pics to some friends and told them I was chasing these all over the city, and they said it was like some "high brow" version of Pokemon Go. I don't play that game, but I get the reference and definitely got addicted to this quickly! And it was way more interesting to me.
By the way, I found this artist's Instagram page if you want to follow their work. You can find that right here: https://www.instagram.com/lartesanuotare/
Click any image to embiggen...
iPhone highlights from Florence
There's something special about Florence, Italy. We recently spent over a week there, and I loved it. Here's an iPhone photo summary of some of the great things we witnessed!
Thought I might do this again, sort of a teaser of coming attractions!
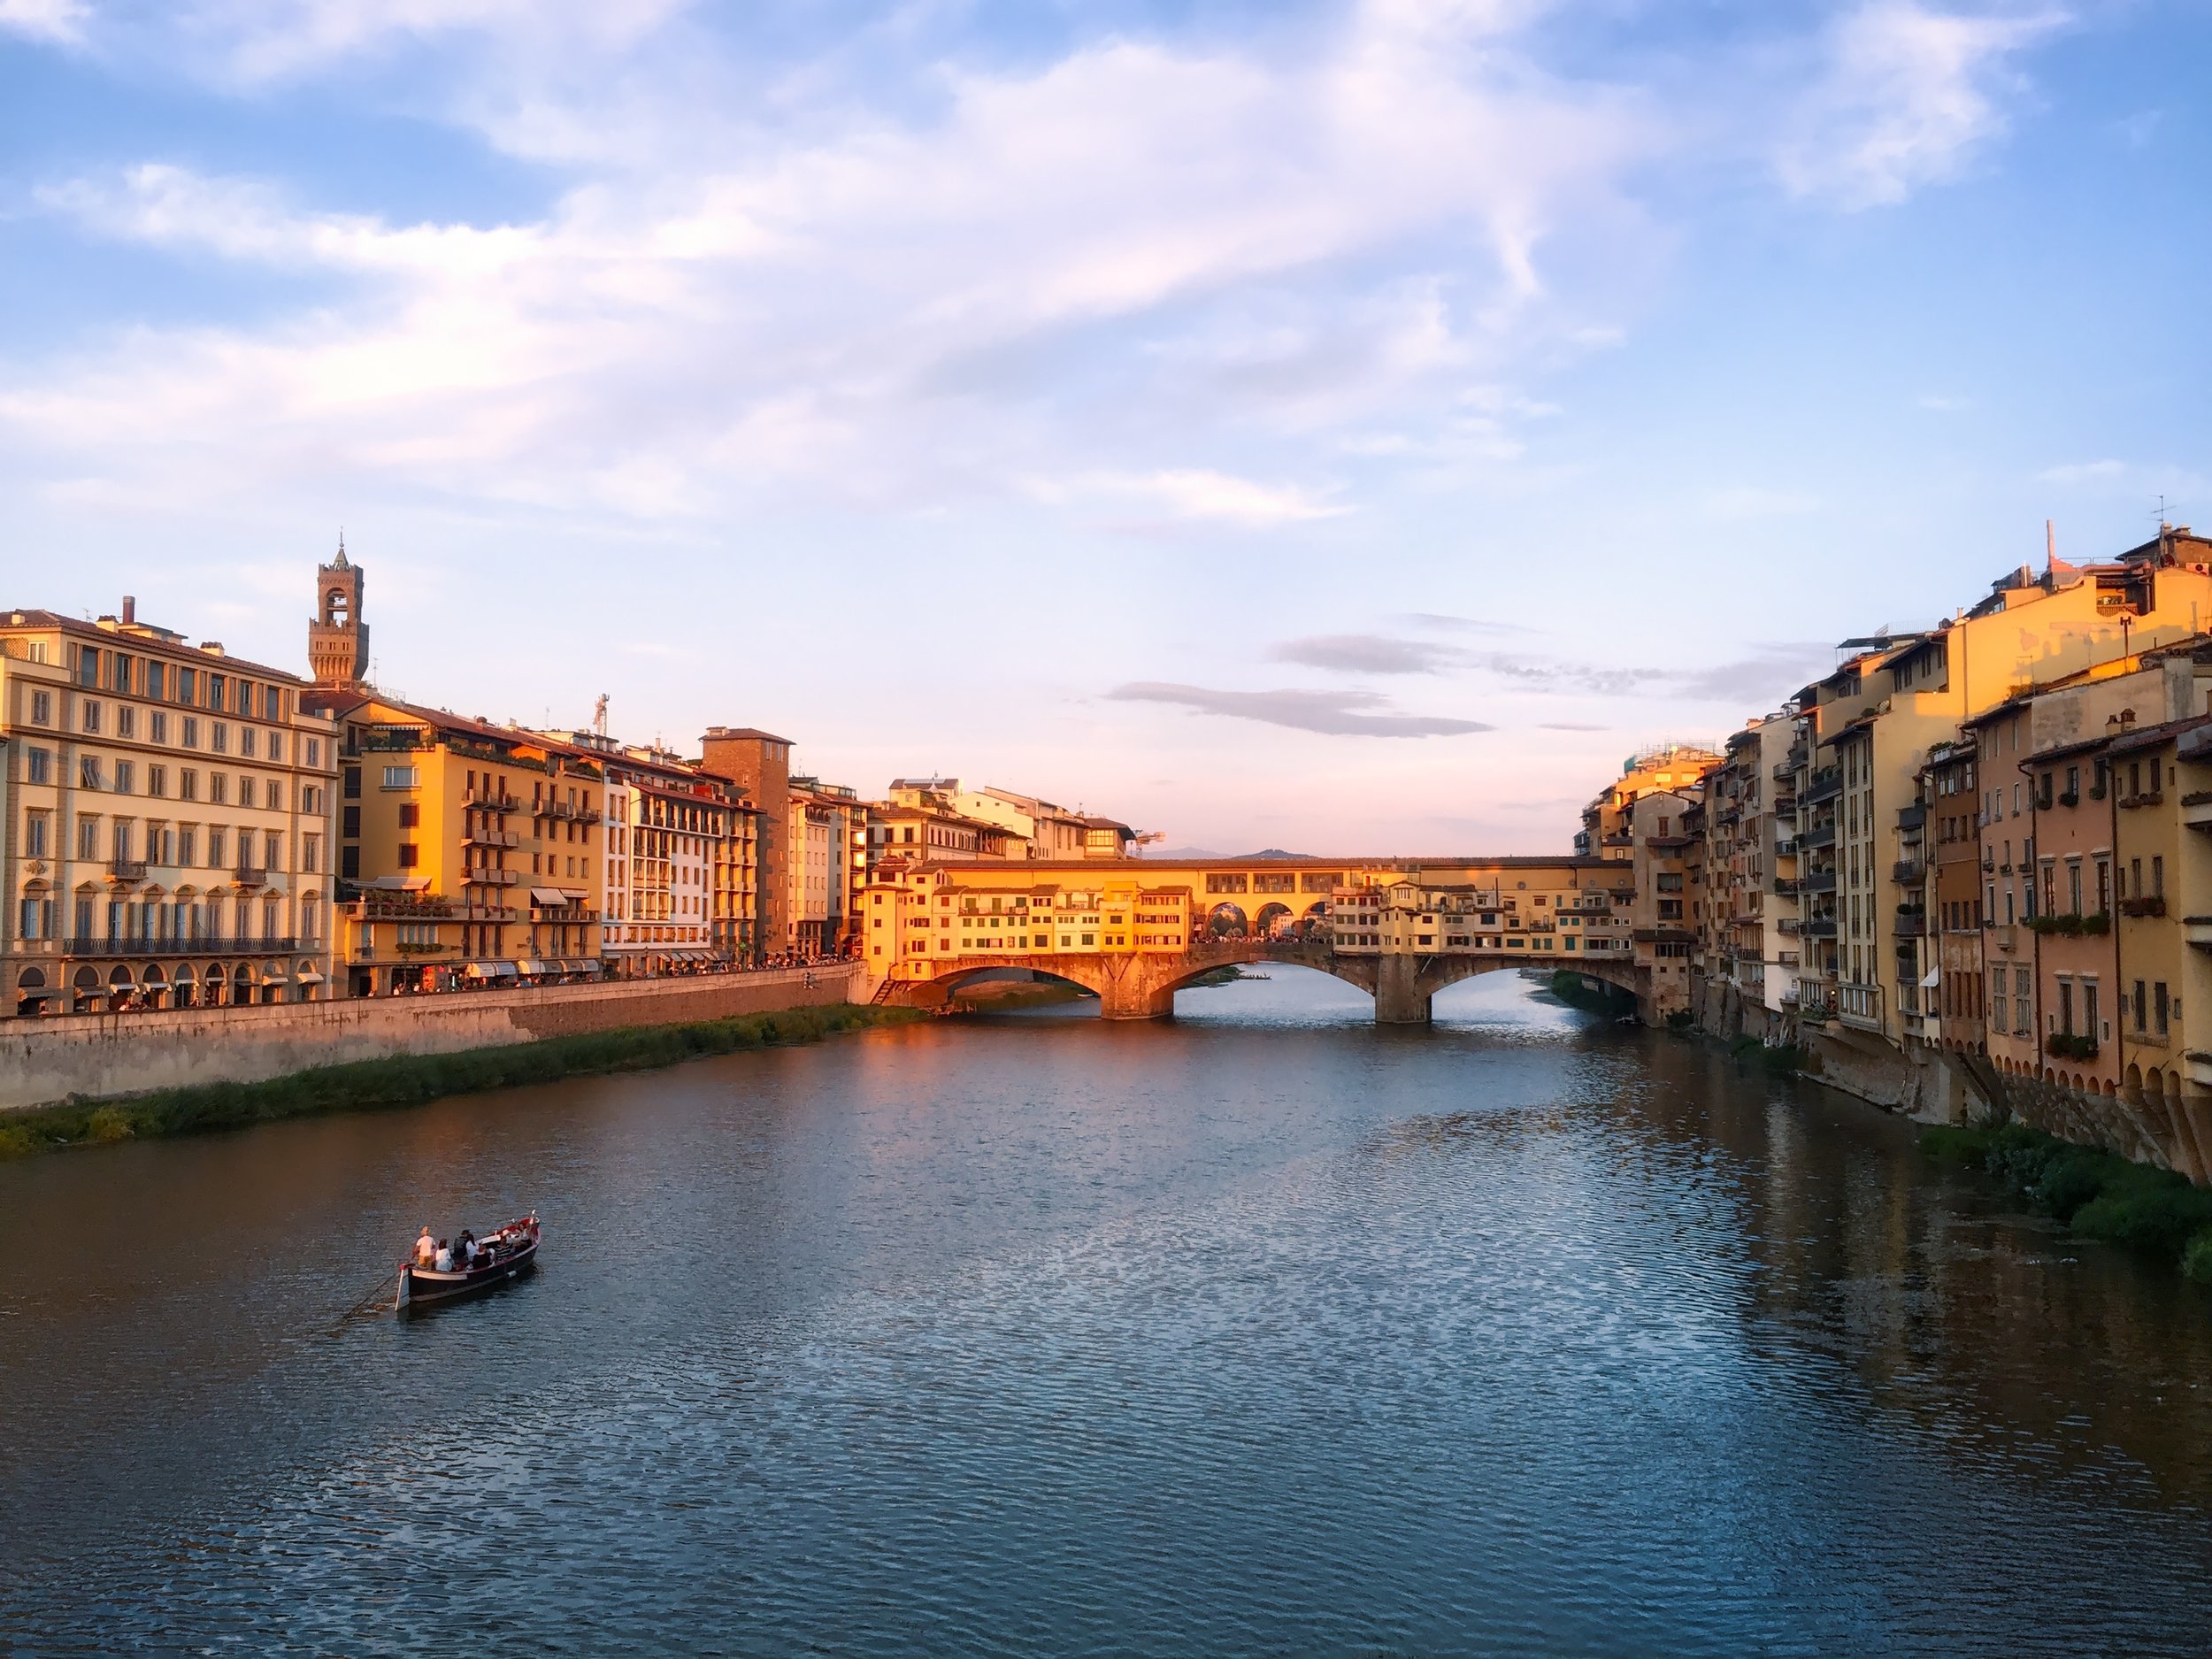
After our time in Venice - which I shared here - we headed down to the lovely town of Florence (or Firenze to the Italians) for 9 wonderful evenings. We camped out in an apartment just a short walk to the Ponte Vecchio (that is the famous and often-photographed bridge), which is very central and made it super easy for me to get EVERYWHERE.
Literally, I went just about everywhere in town and photographed it top to bottom. I love it there, and I find the city very photogenic. I had a list prior to getting there of all the spots I wanted to shoot, and I made it to every one of them.
So this post is just a sampler platter, or a teaser of coming attractions, or whatever you want to call it. But basically here's a preview of what I shot there, except that these pics were all taken with my iPhone 6. I still shoot with my iPhone A LOT when I travel, and usually my faves end up in this set on Flickr. So if you go check out that set you will see a lot more from all of Italy (and elsewhere, of course - going back a few years actually!).
Sunset over Florence
Just a typical street scene, though this happens to be where our apartment was
The view from atop The Duomo
The ceiling inside the Baptistry, next to The Duomo
Sunset with Florence in the distance, as seen from the little hilltop village of Fiesole
Inside The Uffizi, which is a great museum and possibly my favorite museum anywhere
The famous sculpture of David at The Accademia
Watching the golden light of sunset hit the Ponte Vecchio
A daytime closeup of the Ponte Vecchio
The Basilica of Santa Croce, which houses many famous tombs, including Michelangelo

iPhone highlights from Venice
We recently spent 5 nights in Venice, Italy and I captured nearly 3,000 photos. Today I share my 5 favorites from my iPhone.
We recently spent 5 nights in Venice, and I left with about 3000 photos. Here are 5 of them, all from my iPhone.
If you follow me on Facebook, you will know that I am traveling around Italy with the family right now. We are on a multi-week trip around the country, exploring a lot of great cities and photographing the heck out of them. Well, I'm photographing the heck out of them. :-)
We arrived in Milan and spent 3 days there, and after that it was off to Venice for 5 nights. If you haven't been, it's beautiful. Let me just say that. Sure, it's a lot of twisting and turning as you try to navigate the streets, but boy is it fun. And if you wear a FitBit, charge that thing because you will be walking a LOT.
Since we are still on the road, I thought I would toss some of my favorite iPhone shots from Venice out there today. I just haven't had time to get to all my "real" photos from my other cameras. Hopefully soon. In the meantime, enjoy these iPhone shots from that gorgeous city in northern Italy. I already want to go back.
And if the photos don't quite show it, I had a couple of amazing sunsets there. And yes, these are all shot on my iPhone. It's all I have found time to edit thus far.
More coming from the rest of Italy as we continue exploring. Right now I am in Florence, and capturing even more Italian goodness here! Come back soon for a taste of it!

MPJ iPhone camera lens kit review
Today I delve into my love of iPhoneography with a review of a new lens kit for the iPhone. It's made by MPJ and includes a zoom lens, a fisheye, a wide angle and a macro - it's a lot of great stuff. Take a look and let me know if you have any questions!
I've been having a lot of fun with my iPhone lately!
I love to shoot with my iPhone. When I travel, I am constantly taking shots of this and that while I roam around, even as I stop and take shots with my “real camera”. There’s just something satisfying about taking a quick snap with the iPhone, making some adjustments in your app of choice, and sharing it with friends and family. So much fun. Plus, I find that I am shooting things a bit differently with the iPhone than I would otherwise. It’s a great creative outlet, and a great way to explore new techniques and compositions.
And since I do this quite a bit, I have accumulated a pretty large collection of iPhone shots on my Flickr page, where I keep them in this set, in case you would like to see them. While that is only a fraction of what I actually have taken, it’s a good example of what I am talking about here. And even though they get a lot of views, I’ve never really given any thought to them being anything other than just a quick mobile upload. It’s usually just something I saw and shared (although I tend to edit them first, normally in Snapseed).
Recently I was contacted by the people at MPJ regarding their camera lens kit for iPhone 6/6S. They found me on Flickr and asked me if I was willing to test out their camera lens kit on my iPhone and share my thoughts about it. I was clear that I would be honest about the product and in my thoughts about it, and they agreed. So, today’s post is a review of that product with a lot of sample images.
TLDR (Too Long, Didn’t Read) version: this is a nice kit, works exactly as advertised, and adds some extra fun elements to the already fun camera that is the iPhone. I’ve really enjoyed experimenting with this kit and I am glad that I now have it to experiment with!
For starters, it comes in a nice box. That might sound like a stupid or useless fact, but I really mean it. It was a nice box, and for a piece of kit that sells for about $40 on Amazon, I didn’t expect that. You know what they say about first impressions. This started off well.
The kit includes a number of lenses and more, so here is a complete list:
- telephoto lens with manual focus
- fish eye lens
- macro lens
- wide angle lens
- universal holder
- hard plastic case for iPhone 6/6S (which is required to use because lenses attach to it)
- mini tripod
- velvet bag
- lens caps
- cleansing cloth
- instruction manual
I find that long of a list to be impressive considering the cost. It’s a great value. And altogether, I suspect this stuff adds up to about 1 pound of weight, roughly. It’s all pretty small and light. You can easily carry it with you in another photo bag, or if you carry a purse or backpack it would take up limited space. I actually stuff it all in a tiny zippered bag that I put in my larger photo backpack. Small and light, so it’s easy to travel with. When I get somewhere and want some iPhone shots, it’s a quick job to attach whichever lens I want and start shooting.
Additionally, everything feels like it is really well made. It’s all very solid and sturdy feeling. I don’t worry at all about the quality here - it is evident immediately.
Of course, my interest lies more in how well it performs in the field. While iPhone images aren’t the backbone of my photography work, they are quite fun and I want to make sure they are something I like and am proud enough to share - and I hope that I continue to use my iPhone for imaging for years to come.
To summarize, these lenses all performed well for me and I enjoyed each of them for different reasons, though I admit I like some better than others. Let’s examine them all individually (and I have included sample images for informational purposes).
The telephoto lens - 12x zoom is farther than you think!
This is by far the largest of the lenses, which makes sense. It gives you some pretty serious reach, photographically speaking, and adds the ability to manually focus (which also makes sense). It provides 12x magnification from the standard iPhone view. I’m not sure if 12x sounds like much, but when you attach it and see how much further you can see through it, it’s pretty amazing.
It’s just over 3 inches long, and you screw it onto the hard plastic iPhone case. The area on the iPhone case where it attaches (right in front of the iPhone camera, of course) is threaded and the lens just screws into it. Easy.
Once you put it on and open up the camera, you will immediately see how much zoom this lens has. To be clear, it is a fixed focal length lens so you cannot zoom in and out with it. But it does cover a great distance, so anytime you want to see something way off in the distance, this is a great option.
This lens is the reason for the mini tripod that is included. While I like the little tripod, it’s just that - little. It’s basically a tabletop tripod with extendible legs - fully extended it is less than a foot tall. It is great if you take product shots at home or something like that, but I tend to take travel images, so this wasn’t super useful to me.
Being out in the field, I rarely have a good place to set this mini tripod, so it ended up on the ground. But down there I find it hard to get in a position where I can clearly make out what the camera is displaying. Thus, I haven’t used it a lot, though I can say that it holds the iPhone steady, which is the point.
The telephoto lens works exactly as you would expect, and with the manual focus it’s easy to focus on whatever subject you have chosen. Personally, this was my least favorite lens of the bunch. To be clear, it works great and the reach is incredible - I just found that I enjoyed the other ones better. That’s likely due to the creativity the others inspired in me and in no way is a reflection on the quality of this lens.
A shot of the Austin skyline, with no lens attached
The skyline again, with no lens attached
A closeup of the Frost Bank Building in downtown Austin, shot from the same spot as the photo on the left
A railroad track crossing the river in Austin, shot from the same spot as the photo on the left
The fisheye lens - talk about a fun lens!
As the name implies (and just like other fisheye lenses), this one gives you a very interesting rounded view of things (a 180 degree view) and is actually my favorite lens of the group (almost rivaled by the macro lens). It’s very experimental and fun to attach the fisheye and just fire away. There is a strong vignette on the image, but it’s fun and that isn’t a bother to me at all. It’s just part of the art of the fisheye effect.
The lens is about the size of a quarter, at least in diameter, and less than 1 inch tall. Small, light, easy to travel with, and fun. You could easily just carry this in your pocket, either attached to the plastic case they provide, or just loose in your pocket. And to be clear, it just screws onto the hard plastic case the same as the zoom lens does.
On a couple of recent outings, I found myself using this lens more than any other. Once I attached it, I found it hard to remove. Not physically - it just unscrews quite easily. I mean that it was just so fun that I didn’t want to remove it!
Perhaps I am in a honeymoon phase or something, but I just really got into the fun of using a fisheye and the creative compositions you can conjure up when using one. I really feel like this is the lens I will use the most, though they all have their merits.
The macro lens - get in real close!
I thought that the macro lens was done in an interesting way. Instead of screwing it onto the case like the zoom and fisheye lenses, it is mounted on a clip bracket that you attach to the case. You just line up the lens with the camera eye, clip it to the plastic iPhone case, and presto! You have a macro lens.
I wasn’t sure how well this was going to work until I tried it, but it does work well. Of course you have to make sure it is lined up properly, but that is simple. FYI that the focusing distance is incredibly close. It took me a bit to figure that out, because everything looked blurry - because I wasn’t close enough.
Once I got in closer it all worked great. This is a pretty fun lens too, because there are a million things you can shoot in macro that you would normally never pay attention to. Again, a nice creative boost to your iPhone photography. It’s quite fun, and also small enough to carry around in your pocket.
I find myself looking much closer at things now and experimenting with this macro lens. I would say this one is my #2 out of the 4 lenses in this kit. Again, it’s very different and allows for interesting views of things, so I think that’s what attracts me to it.
The wide angle lens
This one gave me fits for a while, but not because the lens didn’t work. It works great. My issue was that I kept trying to attach it to the hard iPhone case, just like I did with the zoom lens. It wouldn’t fit, so I assumed I was doing something wrong, though of course I didn’t know what it was.
Finally, I got onto Amazon and read about the product, and found out that the wide angle lens actually screws onto the front of the macro lens, and once screwed on there you just clip it to the hard iPhone case like you did for the macro lens. That’s my one “complaint” (in quotes since it’s not a product issue) - I saw no documentation anywhere that explained how you connect the wide angle. Then again, it wasn’t too hard to figure out after a little online research.
One more thing about attaching the wide angle. When you screw it onto the macro lens clip, note that it screws in counter-clockwise (to the left). Perhaps that is standard in other cultures, but in the US we screw things in clockwise (to the right - hence the expression lefty-loosey, righty-tighty - just a silly American expression). Oddly, the zoom lens screws in clockwise so that was my expectation for this one too, since that is the “normal” way to do it for me. That was another reason why I couldn’t figure out where it attaches, and I did not find anything about this in the documentation. Anyways, it’s all solved now and everything works fine, and I am out shooting and having fun with this kit.
Summary
I have really enjoyed this kit and it has sparked some creative stuff for me with my iPhone photography. I am mostly using the fisheye and the macro, so I find myself leaving home with the hard plastic case on my iPhone and the fisheye, macro and wide angle in my pocket. That way if I see something interesting, I can just grab a lens from my pocket, quickly attach it, and I am off and creating something interesting.
In summary, I find this kit to be made in a high quality manner out of sturdy materials. The lenses perform well, especially considering how small the entire kit is, and they offer up some great creative possibilities that extend the usefulness of your iPhone camera. You can easily take them along when traveling and find new ways to shoot with your iPhone, and capture things you could never capture before. I will continue to use this product and definitely think it is worth the $40 if you want some new options for your iPhoneography!
Full disclosure: I received this kit at no charge, as MPJ asked me to review it and share my thoughts. Apart from the kit, I did not receive any compensation for this review, and this is not a sponsored post (that is, they did not pay me to write this - I am sharing my experiences with it in exchange for the product). All thoughts on the product are my own, based on my experiences with it thus far. I made it clear to MPJ prior to accepting the product that I would be in honest in my review, and they agreed. Please let me know if you have any questions.
If you are interested in this product, you can find it on Amazon here. It sells for about $40.
Have fun out there shooting!

My 2015 summer plans
We are just starting a multi-week family summer vacation and it's awesome already! Read on to see where we've been so far and what we plan to do for the next few weeks (hint: lots of outdoor photography). I also included a few teaser iPhone images taken on the trip and a map of our travels. Fun!
Look out Clark Griswold, here we come! :-)
As I mentioned somewhere here on the blog in a recent post, I am in the midst of a wonderful and awe-inspiring family vacation. It’s a bit like Clark Griswold and his clan doing the whole drive out to Wally World, though I don’t think we will end up with a dead Aunt Edna tied to the roof. At least I hope not. I don't even have an Aunt Edna.
This is something that we have been planning for a long time, and it is finally here (in fact, we are finally here). “Here” in this case is Arch Cape, Oregon and it is an incredible place. It’s a very small town outside of the slightly larger (and better known) town of Cannon Beach, Oregon.
We have been here before (for a week last time) and separately I have been to Cannon Beach on a couple of previous trips (including the first NXNW meetup, which was awesome). In other words, it’s so beautiful here that I always want to come back. I do love it, and for good reason. This is the land of incredible coastlines, sea caves, waterfalls, forests, and those awesome big ‘ol rocks dotting the coast (most famous example: Haystack Rock in Cannon Beach).
Have you ever seen the 80’s movie The Goonies? It was shot in this area. So if you remember that scenery at all, that will give you some idea of what I will be aiming my camera at over the next 5 weeks. (And if you don’t remember it, well come back and you will see a lot of it here!)
And yes, we are here for 5 weeks!
Isn’t that awesome?? We found a beautiful home to rent and it’s a short jaunt from the beach, so we will be spending a lot of time hanging around the edge of the Pacific Ocean and just enjoying the scenery, relaxing, and I will be taking photos. Loads of them!
As I said above, we drove out here, and though you can cover the drive from Austin to the Oregon coast in about 4 days (at least according to Google Maps), we opted for the scenic route and picked a few spots we wanted to see along the way. (We will plot a different route home, just for the sake of seeing different stuff - and thus taking photos of different stuff. Win.)
(I have inserted a few iPhone pics below that I have taken in the last 10 days, just to give you an idea of what's coming, when I find time to process some of this awesomeness I am capturing!)
We stopped first in New Mexico simply because that is a place we could stop after about 10 hours of driving the first day. Texas really is that big. From there it was on to Sedona, and since we arrived a little early we popped over to the Grand Canyon. It was my first time to see it and it was great! After 3 blissful days in Sedona (and about a million pics!) we took off for 1 night in Las Vegas.
a lovely afternoon at the grand canyon
The stop there was really just to allow my daughter to see the Cirque du Soleil show “O” and to show her around a little. She’s twelve and has seen pics of Vegas (and heard of it), and wanted to see it for real. She's a fan. Some of those casinos make quite the impression.
staring at cathedral rock in sedona, az
After that it was a straight shot over to the California coast. We stopped in San Simeon for the night, with a couple of tours of Hearst Castle the next day. It was my 2nd visit there, but first with a camera, and a first for my daughter (she loved it). Then we took a leisurely drive up Highway 1 with a stop in Carmel, ending the day in Santa Cruz.
hearst's office which is on the "upstairs suites" tour - highly recommended and better than the "grand rooms" tour which we also did
The next morning had us on the road again, off to Ft Bragg/Mendocino, California which is a quaint little beach town with some great scenery around it. We spent 2 nights there, then drove on to southern Oregon. Here we opted for a 2 night stay in Bandon, since I was dying to shoot the beaches there (and I got a great sunset both nights!!!), and then drove on from there to our rental in Arch Cape.
All together it was well over 2000 miles of driving over 12 days. Believe it or not, we enjoyed the drive. It helped to have a couple of 2+ night stays thrown in at strategic points to break it up a bit, and of course some of the scenery was literally breath-taking. We already want to return to Sedona. Wow, that place!
along highway 1, somewhere north of ft. bragg, ca
Quite a journey, and it’s just starting. Today is our first full day in Arch Cape (we arrived last night about 6pm). It feels like we have been on vacation forever, and it’s actually just getting started! Plus, I have already taken a couple thousand photos, considering all the Grand Canyon, Sedona, Hearst Castle, Northern California and Bandon Oregon stuff. I totally skipped over shooting in Las Vegas, having done that as recently as this past February (well except for a few iPhone pics).
a wonderful sunset in bandon, or that i shot this past Monday evening
And yes I did promise to share photos from my recent trip to Nashville and Oklahoma City (and I will at some point, because I caught some great stuff in both places!), but I am so excited about all the new stuff I just captured that I may have to come back around to NV and OKC later.
We’ll just have to see - so much to process, and so little time. And so much more to go shoot! (Actually, I have some other pics processed that I will likely share first. And as you can imagine, I could do about 5 different iPhone posts just from the drive up here - not to mention all the posts with images from my Olympus. I guess I better get busy!)
And if you are interested, look at this iPhone gallery on Flickr for all my recent uploads, which includes a BUNCH of stuff from this trip so far (and more coming I am sure!).
Anyways, here’s a map I built that shows our route, at least in general terms. We pretty much took the most direct route each time and stuck to major roads when possible. Plus, we brought our dog (you can’t leave a puppy for that long, it’s like giving up a child) and had to pick pet-friendly spots, which believe me, is somewhat limiting at times. But it’s worth it, because she’s a sweet little thing.
Anyways, we made it work and here we are. And it’s going to be an awesome summer! Time to go shoot some amazing stuff - be back soon! Thanks for stopping by!
iPhone fun in Nashville and OKC
Last week was a busy one for me, traveling to Nashville and OKC and firing quite a few shots along the way. Today's post is a summary of that trip, with all photos taken and processed on my iPhone. I haven't had time to process anything from my real camera yet, because I am on the road again. Pop on in and see what's cooking!
Last week I was in Nashville and then Oklahoma City - 6 flights, 2 hotels, 2 rental cars, and countless photos!
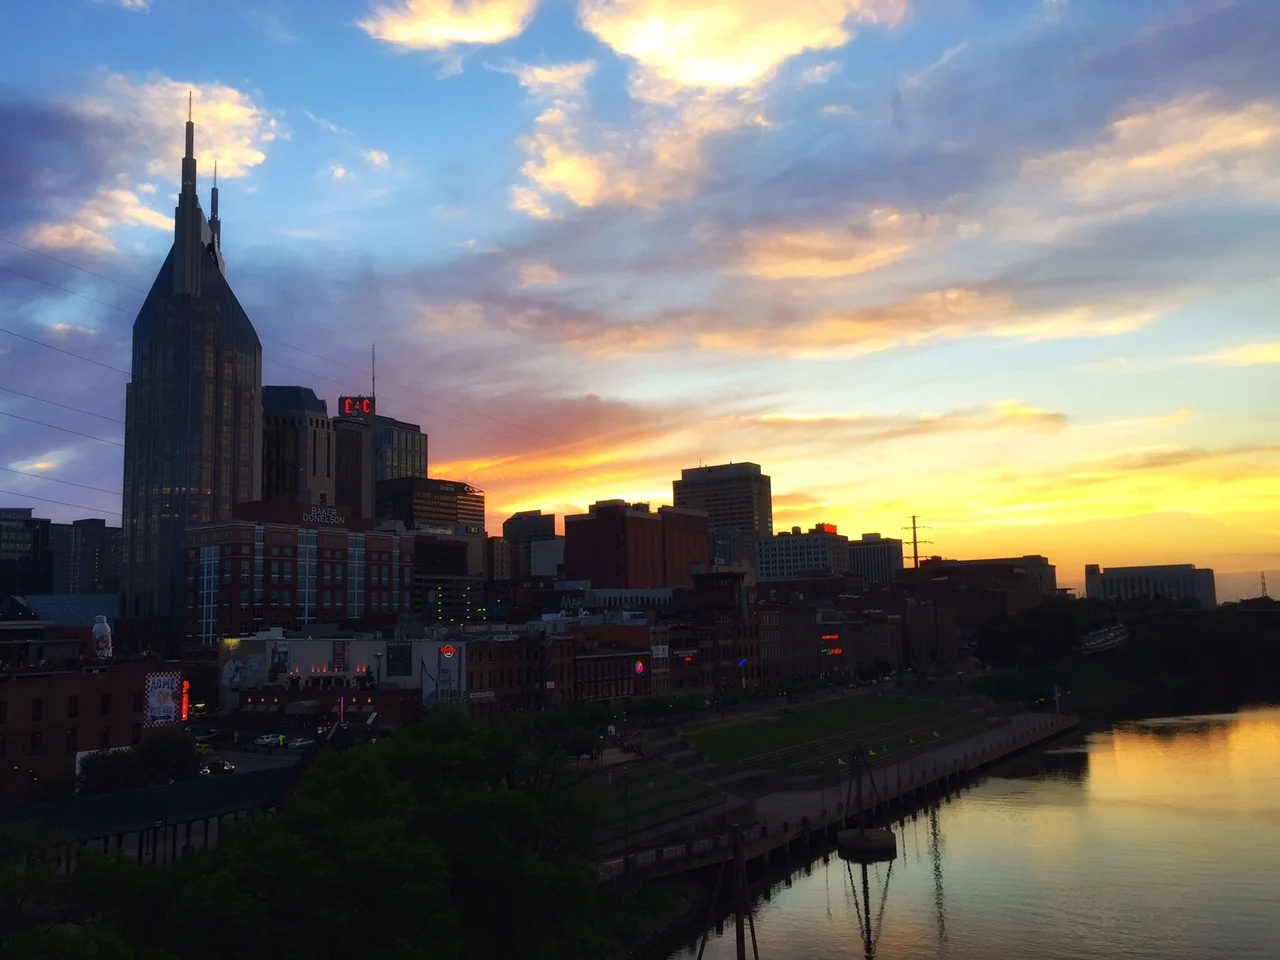
My first night of the trip and I was rewarded with this stunning sunset over Nashville!
I couldn't resist taking out the iPhone when I looked out the plane and saw these clouds.
It was a great week, although I was extremely busy. Luckily I found time each day to get out and shoot (even though I had a conference call one evening during sunset - doh!). I enjoy my visits to both of these cities. I have been to both of them many times, and still find plenty of new stuff to shoot. They are interesting cities, and beautiful in their own ways. These (clearly) aren't the "big name" American cities, but I still find a lot to like about them.
I stumbled across this in an alleyway in Nashville
A different view of that first night's sunset in Nashville
So today's post is a quick iPhone highlight tour of my travels last week. There is no theme, other than they are all iPhone shots processed in Snapseed. I hit my usual haunts in those cities and found some new ones. I shot some cityscapes and skylines. I was (mostly) out at sunset. I stumbled through some alleyways and found some new graffiti. It was a good week, all around.
I am on the road again, but this time with the family, and heading West instead of East. More to come from this current adventure (and I will find some time to process shots from Nashville and OKC that were taken with my lovely Olympus). I have already captured about 1000 photos this week. You can take a look at my current iPhone shots on Flickr. We are currently in Arizona and heading further West. More to come about our grand summer family adventure! (and yes, I will find time to process all the photos I am capturing, and there is a lot more shooting coming my way!).
Also, I am only planning this single post for this week. With it being a short week for those of us in the US, and with me being on the road with sketchy wifi access, I figured it would be easiest to just spend time with the family and my camera and enjoy life a bit. So follow me on Flickr to see current iPhone pics from the road, and come back next week because I have a lot to share!
I hope you enjoy the shots, and thanks for stopping by today!
another alleyway find in Nashville
on Route 66 in OKC
part of a mural in OKC
golden hour over LP Field in Nashville
the OKC Memorial
where the thunder rolls!
cool stuff i found in nashville - of course it is music-related in that city!
i love trains and graffiti - shot this in the gulch in nashville

another view of Lp field in nashville
from okc, another part of an extensive mural downtown
i spent some time driving along route 66 in okc - not a lot of great finds but loved this spot!
another scene from another alley in nashville - i just love grungy scenes like this. and i love peanuts too!
the golden hour over lp field was impossible to pass up!

iPhone fun in San Francisco
I spent last week in San Francisco, and despite being really busy at work, I still got out and fired away quite a bit! I came home with around 1100 photos, which is a pretty good haul when my time is limited. I shot all over town, too, and hit some new spots. It was great. Today's post is a bit of a teaser though, as these are all iPhone pics from the trip, since I haven't had time to process anything yet. More on that later. For now, enjoy the beauty of the City by the Bay!
I spent last week in San Francisco, and it was great!
This is the Bay Bridge, which I love to shoot!
I go to San Francisco several times per year (I work for a company that is based there), and I always enjoy the visit - even if I don't bring the camera. In fact, I have been there many times without the camera, and just shoot with the iPhone, assuming I have time. Even that is fun, although of course I prefer to have my camera with me!
And although last week was very busy with work (and I knew in advance that my shooting time would be very limited), I did find some time to get out and shoot. I brought along my trusty sidekick on this trip, my Olympus OMD EM-1 mirrorless camera, and just because I wanted to travel super light, I only brought one lens: the Panasonic Leica Summilux prime lens.
Some cool graffiti I found while walking along market street
one of my favorite spots in chinatown - i think i have shot here at least 5 times! and I will probably shoot it again some day!
I love the combination of that lens and camera - both are very light and quick, and having the prime lens really makes me think about what I am shooting. Obviously there are some things you just can't get to with a prime (this one is a 15mm, so not-quite-wide but pretty-far-from-zoomed), but I still find it very versatile. It may be my favorite lens. Being able to shoot all the way wide open at f1.7 is one of the many great things about it (and in using it, I don't use a tripod, allowing me to further travel light).
However, I have not had any free time since returning home to process the photos (I took about 1100 with my Olympus), so today's post is a bit of a teaser: these are some of my favorite iPhone shots that I took in San Fran last week. As usual, I took a bunch of iPhone pics, and since I have the ability to process those on the go, I obviously have quite a few to share. These were all taken with my iPhone 6 and processed in Snapseed, which is just about the only app I use for processing iPhone photos these days. It's that great.
a closer look at that graffiti from chinatown
that is the ferry building - just loved the light here!
how cool is this? this was in clarion alley in the mission district.
this is city hall, and it is magnificent!
looking down from the 2nd floor of the ferry building
these stairs were in the embarcadero complex, and i loved them!
In terms of subject matter, I shot a lot around the Ferry Building (my favorite spot in SFO) and along the Embarcadero, including the Bay Bridge. I got a great new vantage point of the Ferry Building from my hotel, too, which was awesome. I wandered one morning over to Chinatown, which is always fun for me. After work one afternoon, I took a taxi over to the Mission District. I have always heard there is some great graffiti there, and there really is (it's in a spot known as Clarion Alley). It was a gold mine. I walked from there over to City Hall, which has an incredible staircase. Lots to come from there. And I ended where I began the week - shooting the Ferry Building, although this time at sunset (and I have a little story to share about how I got a better view there). So I guess I did have a little time to get out and shoot, after all. Yay for me LOL!
You may have seen these on Flickr already, if you happen to follow me there. If not, then these will be all new to ya! Either way, I hope you enjoy this little visual tour of what I encountered while wandering around the City by the Bay last week. As soon as time allows, I will be processing and sharing a bunch of stuff from last week, so stay tuned!
Thanks for clicking by today! Let me know if you have any questions!
a shot of the city hall stairs from down below
this is the second floor of the ferry building, which is fun to wander around, although it's not really a public place.
ah yes, isn't this a great view of the ferry building?!! and isn't that a lovely sunset?!!
here's a pic from the same spot as the last shot, although under lesser conditions - still a beauty of a view, though!
i found a lot of stairs to shoot on this trip! these were in the embarcadero center somewhere. I was just wandering and looked down - click!

4 weeks, 3 trips, 9000 photos
I have spent the last four weeks on the move, and in that time I fired about 9000 photos. It's been productive, amazing, fabulous, and a little tiring. I drove a long way, and flew even further. I have so much to share here that I fear I am already behind! So today's post is an iPhone summary of these 3 trips and all the fun that I had on them. Enjoy!
The last few weeks have been pretty crazy - in a good way!
As the title of this post implies, I have been a little busy over the last month or so. Ok, more than a little busy. I have been extremely busy. I drove about 1500 miles and flew over 20,000. I have hiked, climbed, walked, ridden in planes, trains and taxis, and generally been a whirlwind of activity. I have been to parks, pubs, museums, libraries, train stations, castles, palaces, 3 foreign countries, 1 vacation home, 5 hotels and more airports than I care to think about.
And I have taken photos. Lots of photos. And it has been great.
In this time, I fired almost 9000 photos with my Olympus mirrorless camera, which I am absolutely loving by the way. It's been about a year now that I have had it, and I have really gotten into a groove with it. It's perfect for where I am with my photography right now. It's becoming very well-traveled, which is good for a camera (especially one so small and light!).
But as I have done for years, I have also fired a LOT with my iPhone. I continue to share my iPhone pics in this set on Flickr, but I just don't really do much sharing of the iPhone goodness here on the blog anymore. I have sort of gotten away from doing iPhone posts here.
So I thought that today I would change that.
On these trips (which I will detail below), I also fired hundreds of iPhone shots and put my faves out there on Flickr. But since I have literally 9000 photos to go process - and knowing it will take me forever to get them ready and published here - I thought it would be fun to do a little recap of my recent travels as seen through my iPhone, and thus share some iPhone pics to illustrate everything I have been doing. Which has been a lot.
One thing to note: I just selected a few pics from each location, because honestly, it would take all day to get all the iPhone pics I have from all these spots into this blog post, and I am way too lazy for that! Plus it was kind of fun to pick a few that sort of summarized what each trip was about. But it's always hard to do that; it's sort of like being asked to pick your favorite child.
So here it goes...(and you can click on each pic to view larger in a lightbox)
Week 1: March 13-20, Abiquiu, NM (1800 photos)
It was Spring Break here in Texas, so as a family we decided it would be fun to head over to New Mexico and see some sights (and this was the driving I refer to above - it's a long way from Austin to New Mexico!). We have been there many times, as it's sort of the closest place to go if you want to see mountains and other interesting landscapes. But since most of the past trips have been to Santa Fe (which I do love), instead for this trip we decided to rent a house in the little town of Abiquiu, NM which is about an hour northwest of Santa Fe. It's best known as the former home of the famous American painter Georgia O'Keeffe, and the landscapes there are just incredible. Interesting, strange, beautiful - and incredible. So we hung out and relaxed, and hiked, and explored, and just had a great time. And I took a few pics (ahem). We even saw a few animal carcasses - fun!
Week 2: March 22-29, Copenhagen, Denmark (3200 photos)
Ah yes, lovely Copenhagen! I returned home from New Mexico, spent a day washing clothes and repacking my bags, and then hopped on a plane to lovely Denmark! Copenhagen is a beautiful city, and this was my 3rd visit there. I really do enjoy the place. It's just awesome. This was a business trip, but even so, I was able to squeeze in plenty of photo time in my off hours. I truly saw so much here that it is almost hard to remember. I shot all around Nyhavn, their historic harborfront area, and of course all through the city center too, with lots of architecture and street scenes and churches and palaces (all high on my list of things I love to shoot!). But I also made a visit out to the little town of HIllerod, where I spent the afternoon wandering around and shooting at Fredericksborg Castle, which was awesome. So plenty of great pics coming from this trip.
Week 3: March 30 -April 5 - home for a week of rest and to see the family! Yay! (0 photos)
Sleep. Must get sleep. Oh yeah, and the Easter Bunny came to town too! I devoured some Peeps. Yum.
Week 4: April 6-14 - Dublin, Ireland (1800 photos) and Glasgow, Scotland (2000 photos)
After a week at home (and some much needed rest), I was off again, back to Europe (oh darn). This was another business trip, and it started in Dublin, which is a place that is absolutely near and dear to me. I love that dang town! The Irish people are just wonderful and the Guinness honestly tastes better there. It's true! Ask anyone who's been, and they will tell you the same. So in my off hours in Dublin, I hit all the sights I intended to hit: churches, the University, lots of street scenes, a few pubs (you get thirsty with all that walking!) and even a little trip out to the seaside village of Howth, where I walked on high cliffs next to the Irish sea. Good times!
And so after about 5 nights in lovely Dublin, it was off to Glasgow for the last leg of this business trip (and the end of this crazy 4 week period). I arrived here on the Saturday, which gave me the full weekend to get out and shoot this awesome Scottish city. I also had the good fortune of meeting up with my good friend Mike Murphy, who came up from London for the weekend. We shot like crazy here, and it was excellent. On Saturday we hit a bunch of spots in the city, dodging a little rain here and there. On Sunday we headed out to the nearby town of Falkirk, where Mike's old friend Steve met us, and the 3 of us spent the day firing like crazy at the Falkirk Wheel and The Kelpies. This was a great day, both because of the company and the sights. You just don't get to see stuff this interesting very often. And it'a always nice to wrap up a good day of shooting by stopping in a pub for a couple of pints.
Mike took off back to London on Sunday evening, and I was left to my own devices that evening and Monday evening, and so both nights I hit the streets around dusk and blue hour with my favorite little toy, the Panasonic Leica Summilux 15mm f1.7 prime lens. It's great to walk around and fire that thing in low light - without a tripod, mind you - and get great results. I only wish I had a prime lens years ago! Where was I when that memo went out??
In fact, I went without using a tripod ON ALL 3 TRIPS. I actually brought it with me to New Mexico and Copenhagen, but never even got it out. So when I was packing for Dublin and Glasgow, I decided I may as well leave it at home. And guess what? I never missed it! (Though I will say, I do love my tripod, and have no plans to get rid of it.) Obviously there are some things you prevent yourself from being able to do without a tripod on hand, but I have found that for much of what I do, it isn't necessary. I may write up a future blog post about that, as I continue to evolve my style of shooting. It sure is great to travel light. I actually only had the camera and two lenses the whole time, so that all fit in a small backpack. It felt great!
And speaking of future blog posts, since I now have this collection of 9000 photos to process and share (really, isn't that a few years worth of work??), I also have a huge (or, huger than before) backlog of blog posts to write up. In fact, I was going through my folders for the images from these trips, and have counted - no exaggeration here - about 40 different blog posts that I want to do, covering different sites on these various trips. And yes, each post would contain a good 10-20 photos. So yeah, I have my work cut out for me, don't I?
Well, that's a little summary of the last few weeks of my life. It's been great, and it's been fun, and it's been productive. But it is nice to be back at home with the family, and I hope to find some time to process a lot of these photos, and to share them here. In fact, you'll see the first one in a few days, so please come back!
Thanks for stopping by! Hope you enjoyed this post!

iPhone fun in Paris
How about some iPhone shots from my recent visit to Paris, France? Sound good? Great! Here you go! This is 10 iPhone pics from that beautiful city we all love. Take a look and let me know your thoughts!
Ah Paris, you are so beautiful!
Paris is one heck of a beautiful city! It has quickly become one of my favorite spots. Now I have heard everyone else say that too, and always discounted it a little bit. I mean, everyone knows Paris is beautiful. That's all you ever hear about the place.
And whenever possible, I like to visit new places, because I guess I have a thing about seeing new stuff for the first time. I love that feeling. And I was in Paris about a year and a half ago. While I was looking forward to this return visit, it wasn't like some OMG I'M GOING TO PARIS thing.
It was more like a "nice, this will be enjoyable" kind of thing. But it turned into an OMG thing I guess. I just really, really, really liked it a lot.
It helped that I was able to see and photograph a LOT of new things, which always helps. But there's just something about Paris, and well, I guess it's gotten ahold of me somehow. Oh well, there are worse things, aren't there?
And as I said before I took about 4000 pics in Paris, but I have barely even started on trying to process and share them. I just haven't had time. So today's post is a little iPhone summary of some shots I took at various points over the week or so I spent in Paris.
I hope you enjoy them as much as I enjoyed taking them! You can click on any photo to enlarge it, in case you want to see it a little bigger. And all of these were taken with my iPhone 6 and adjusted in Snapseed (which is the best iPhone editing app in my opinion). Enjoy!
Inside the lovely Notre Dame one evening
the main hallway in the Musee D'Orsay
Sacre Coeur
the entry to Versailles
The chapel inside Versailles
The ceiling of the cafe inside the Musee d'Orsay
Outside the Louvre waiting in line
Inside the Paris Opera Garnier
C'mon you know this spot right?
the dome inside Les Invalides (Napoleon's tomb)